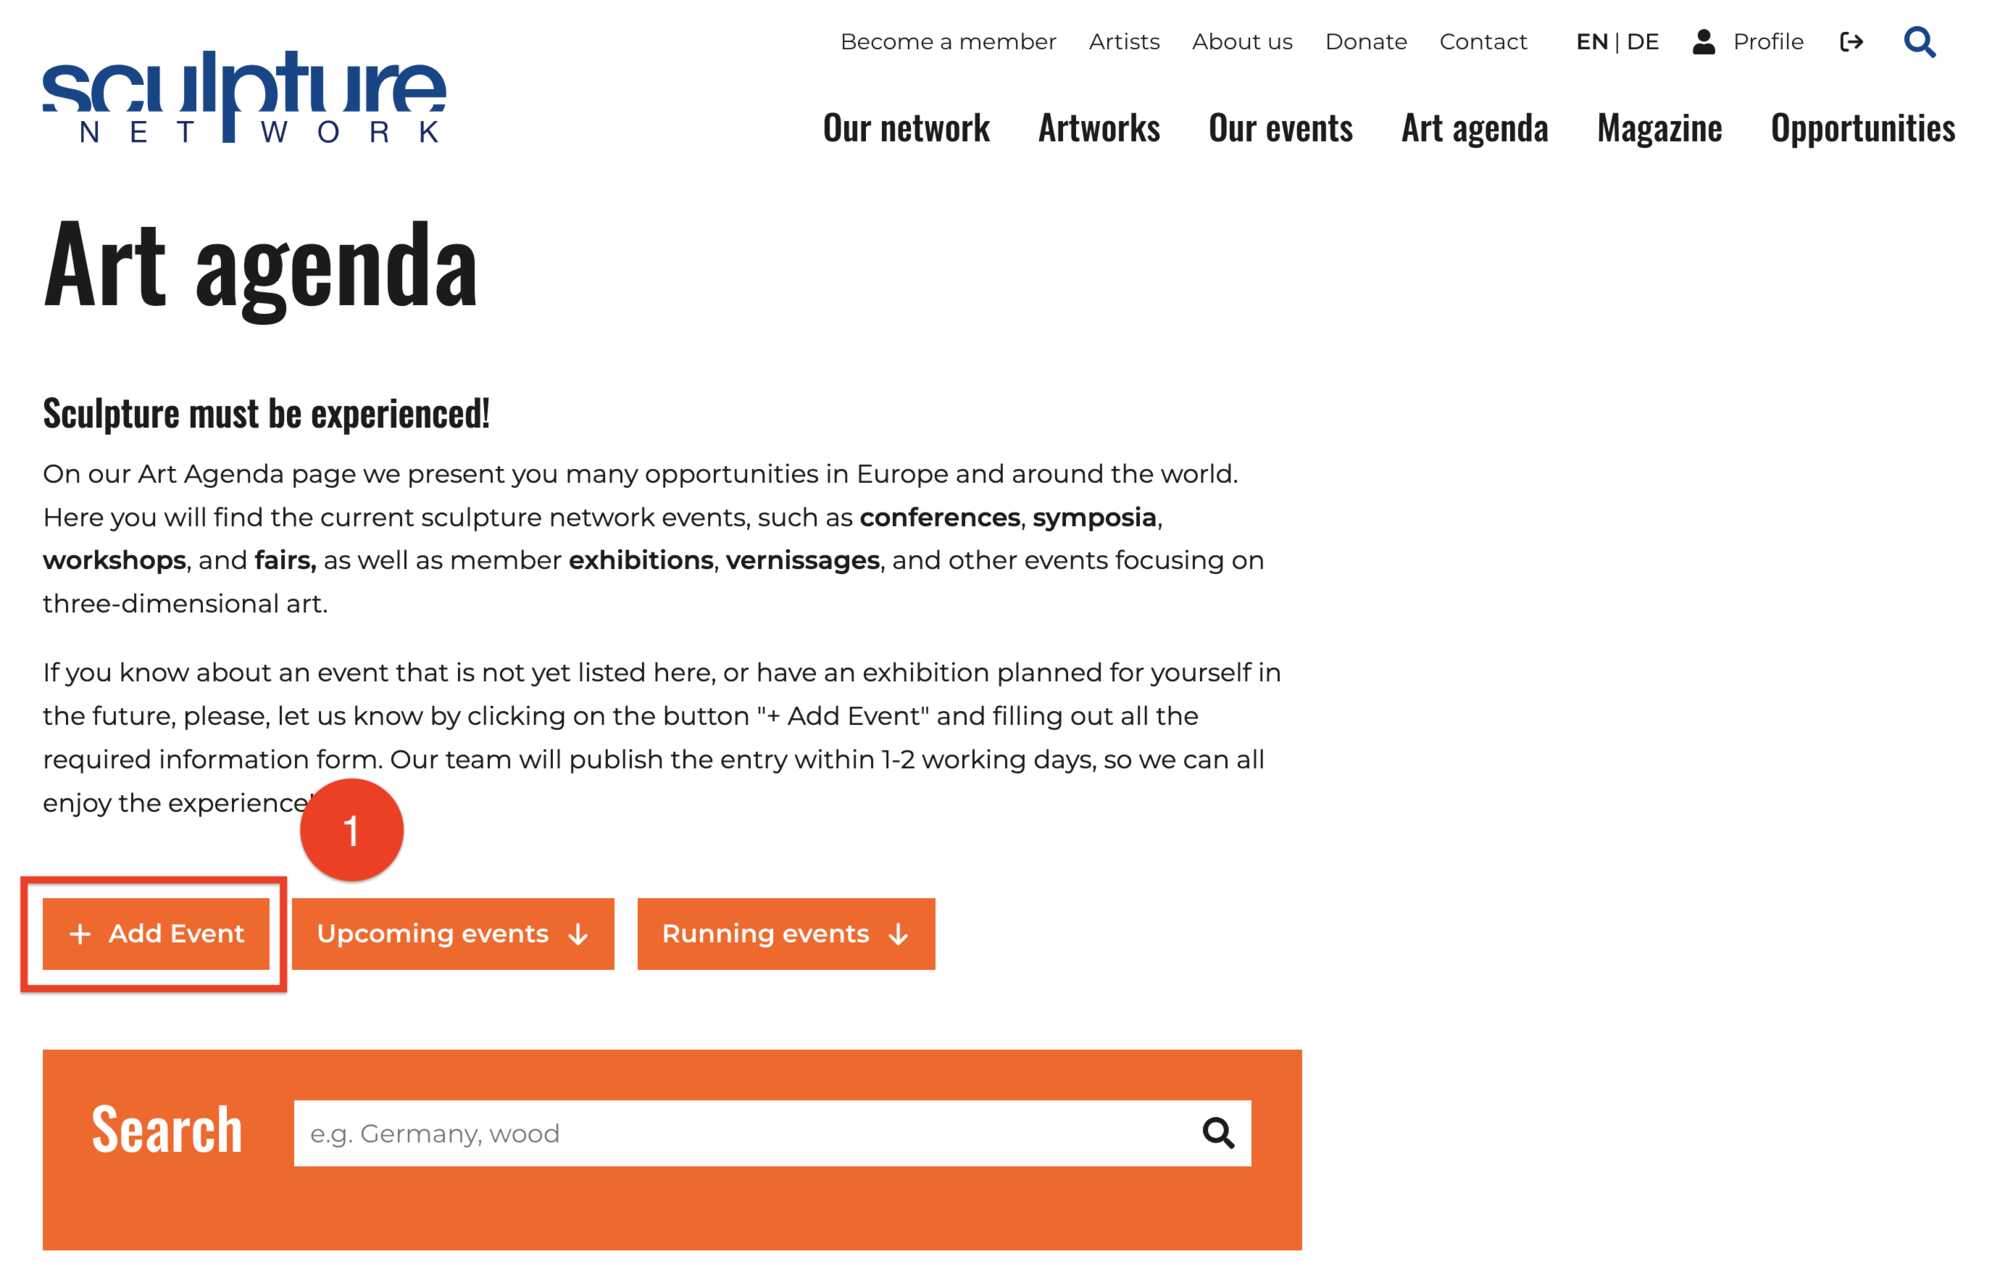
Once you are Logged in, you will notice that the Login button changes to read Profile, next go to the Art Agenda button on the main menu as you can see in the diagrams below and above and click on Art Agendato go to the Art Agenda Page.
Now scroll down until you see the + Add Event button, indicated by the number 1 in the diagram below.
Click on the + Add Event button and you will be taken to the "back end" of the website where a window entitled Add a new event will open, this window is shown in the diagram below.
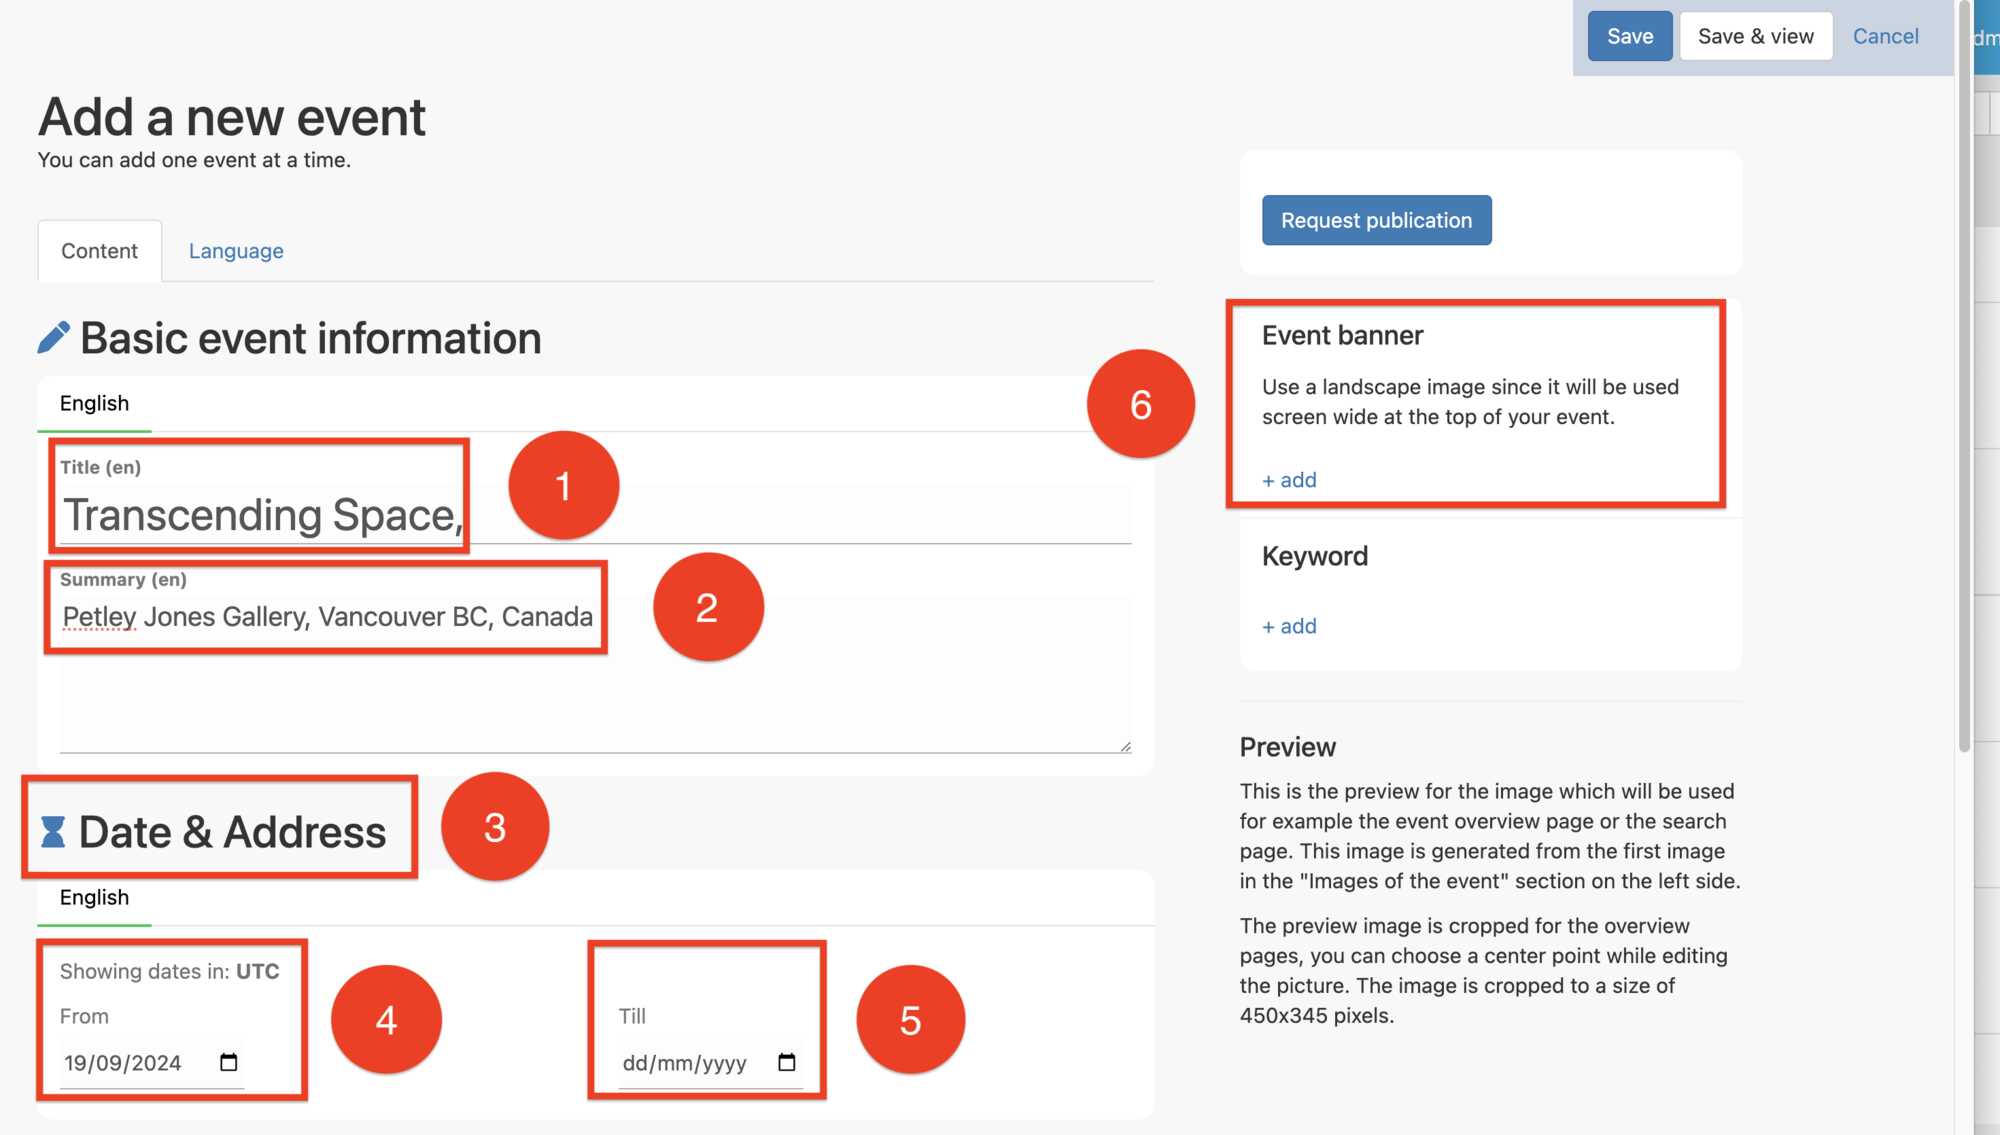
Here you will find all of the areas in which you can enter the information about your event. We will start with the small red box beside the number 1, please choose your Language, either German or English.
In this example I will be entering information about an exhibition at a gallery that represents me in Vancouver so I will use English. Confirmation of this choice is indicated under the Basic event information title, by the green line below the word English.
In the area indicated by the number 2, I will put the Titlle of the Exhibition and below I will add a short summary of the exhibition in the text box indicated by the number 3, shown below.
At any time I can go up to the Save & View button in the upper right hand corner, marked by the number 4, and see how my page will look.
In the diagram below I have filled in the Title of the exhibition in the text box marked by the number 1, as well as included the gallery's address in the Summary text box marked by number 2.
In the Date & Address area indicated by the number 3, we enter the Opening date of the exhibition in the area marked by the number 4, and then the closing date of the exhibition in the date box marked by the number 5.
I have not entered this date so that you can see that there is a date format that has been set out for you as dd/mm/yyyy or day in two digits, starting with 01, month, again in two digits, starting with 01 and then the year in four digits; 2024.
These dates must be entered in this manner as the website will use them to ensure that your event is shown on the Art Agenda page both before your event starts, as well as during your event and then after the closing date, your event announcement will be placed in our archives for future reference.
The next item that we will look at is adding photos for the Preview photo as well as for the Event banner photo, indicated in the diagram above by the number 6.
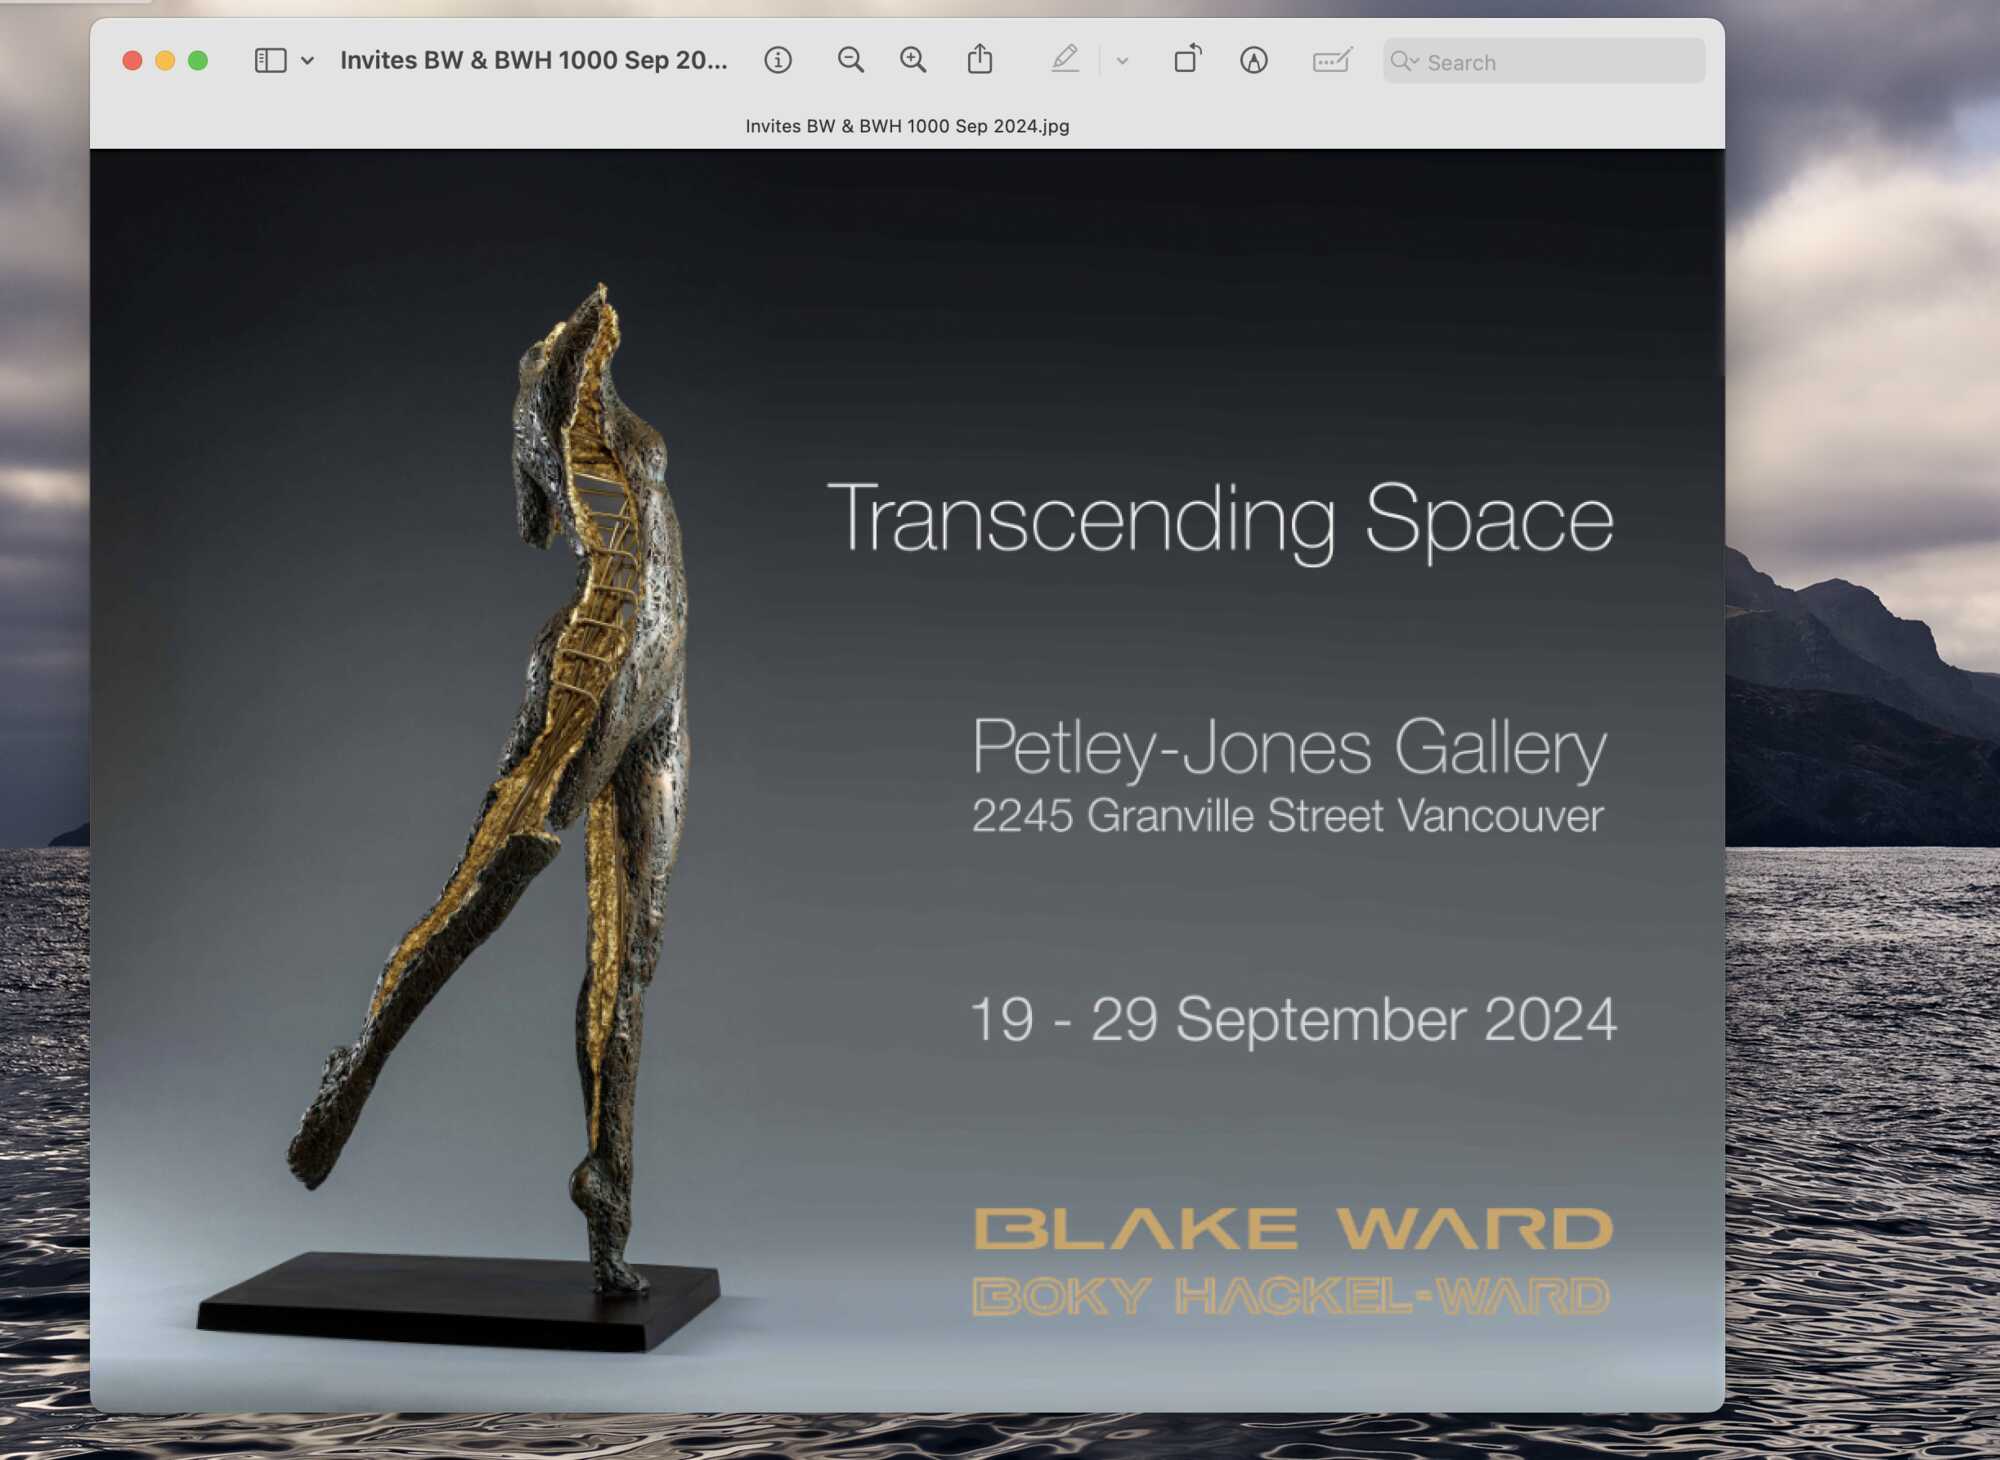
We will need a Portrait photo for the Preview photo and a landscape photo for the Event banner photo, so I will upload to media the invitation for the exhibition that I created and then take a screenshot of a part of that invitation photo, so that I can use the same photo for both the Eventbanner and the Preview image.
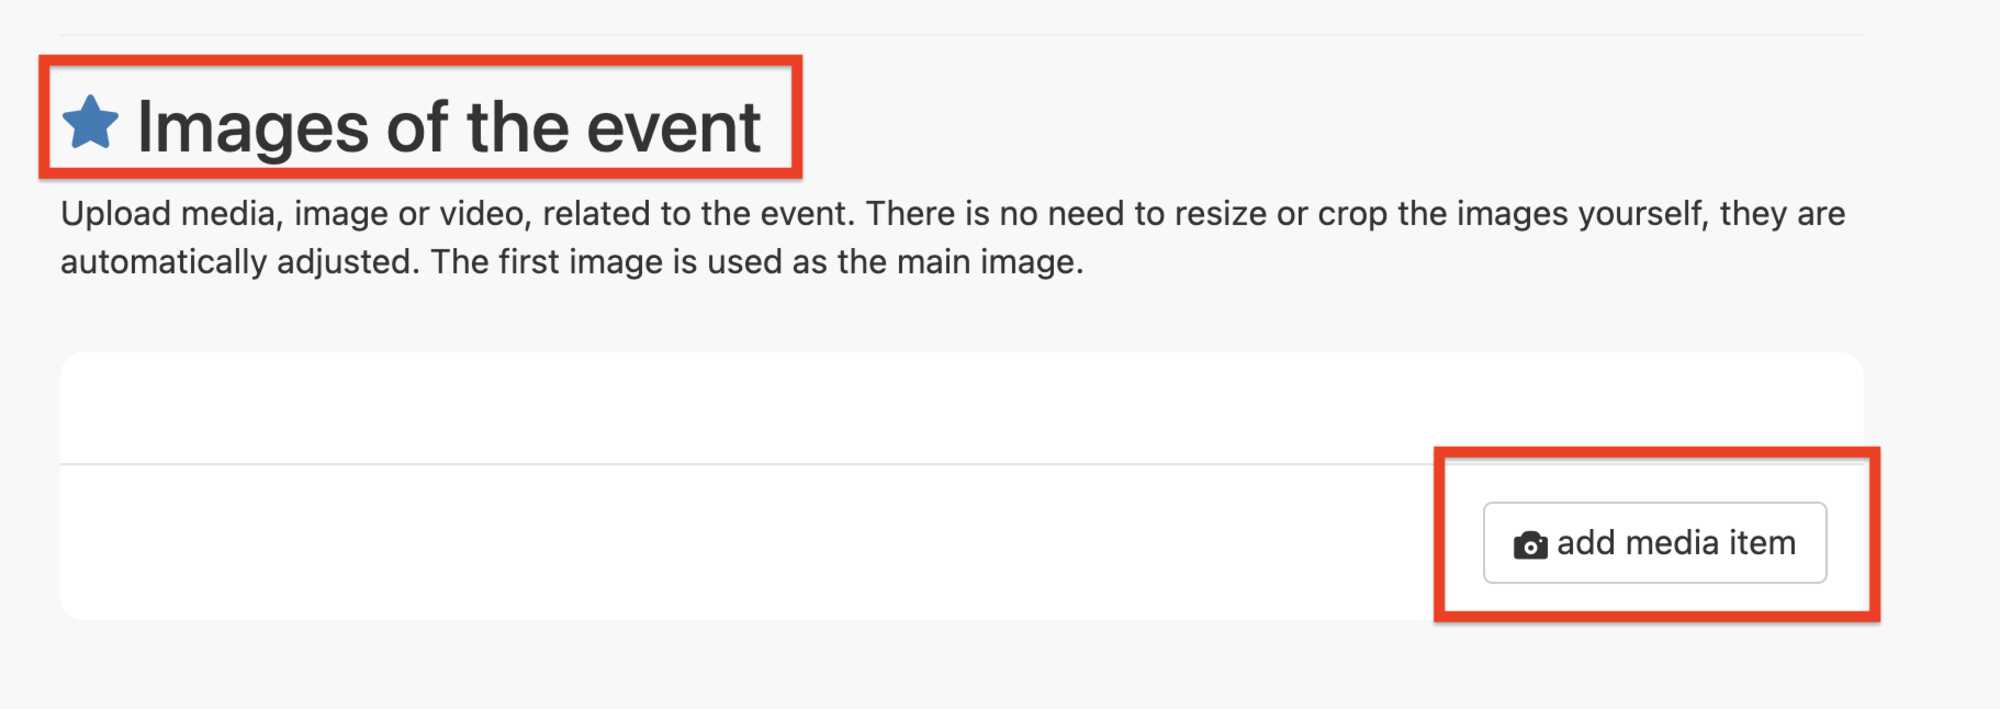
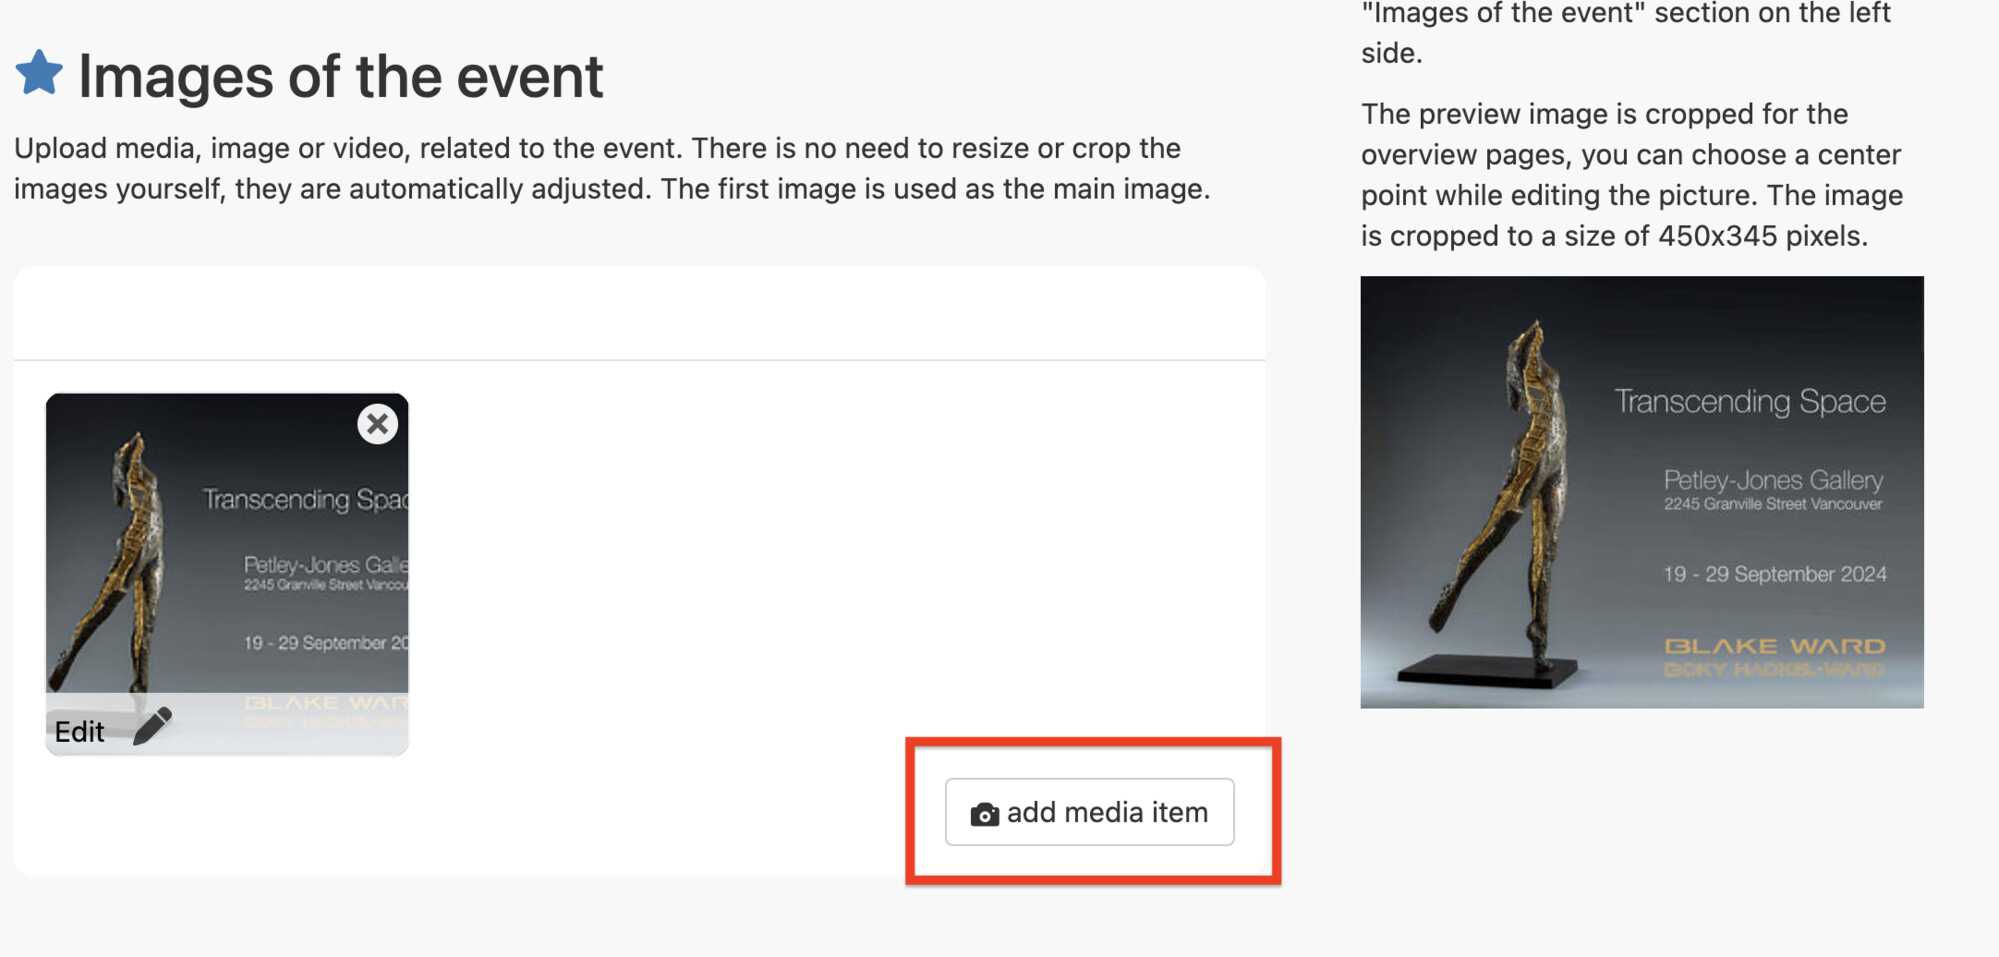
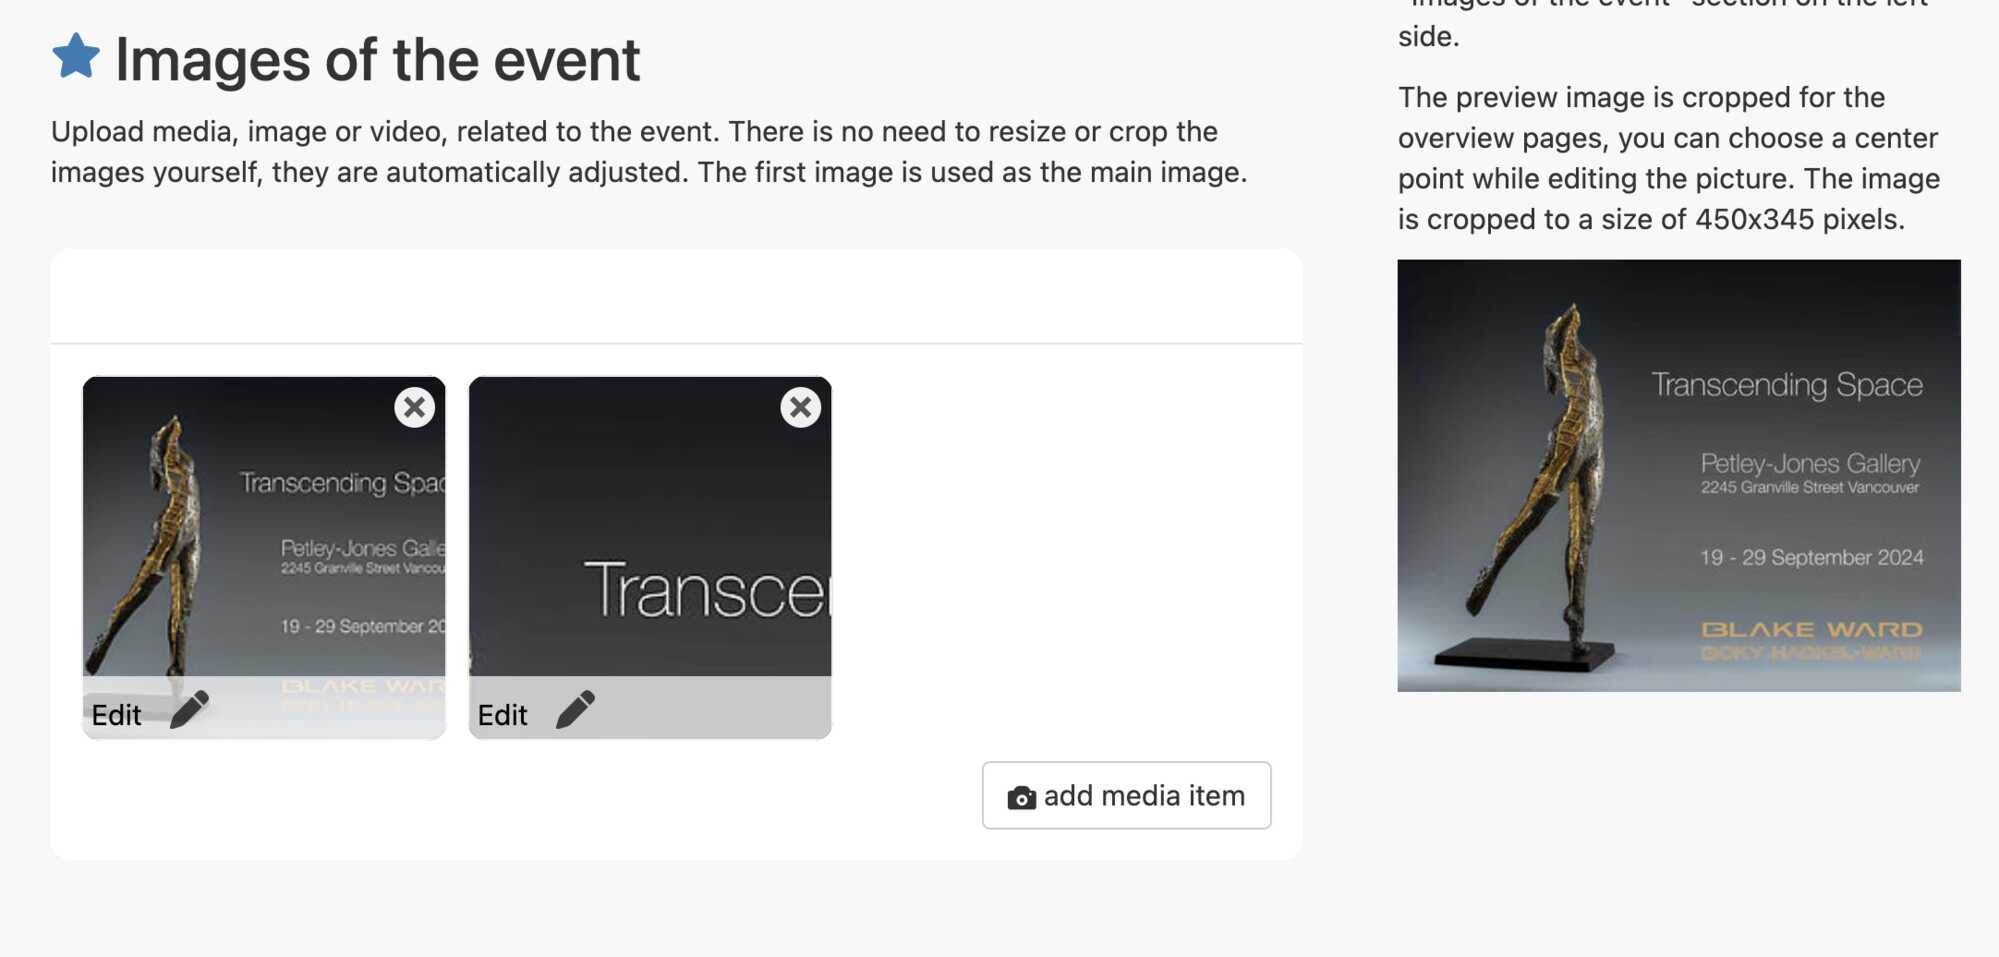
To do this we scroll down until you see the Images of the event window, as shown in the diagram below, where we click on the add media item button in the lower right hand corner of the window, indicated below.
Here we add the principal photo that you wish to use for the event. You can upload the photo into the website in the same manner that we add all photos to the web site.
Click on the add media item button, and the Add a connection window will appear.
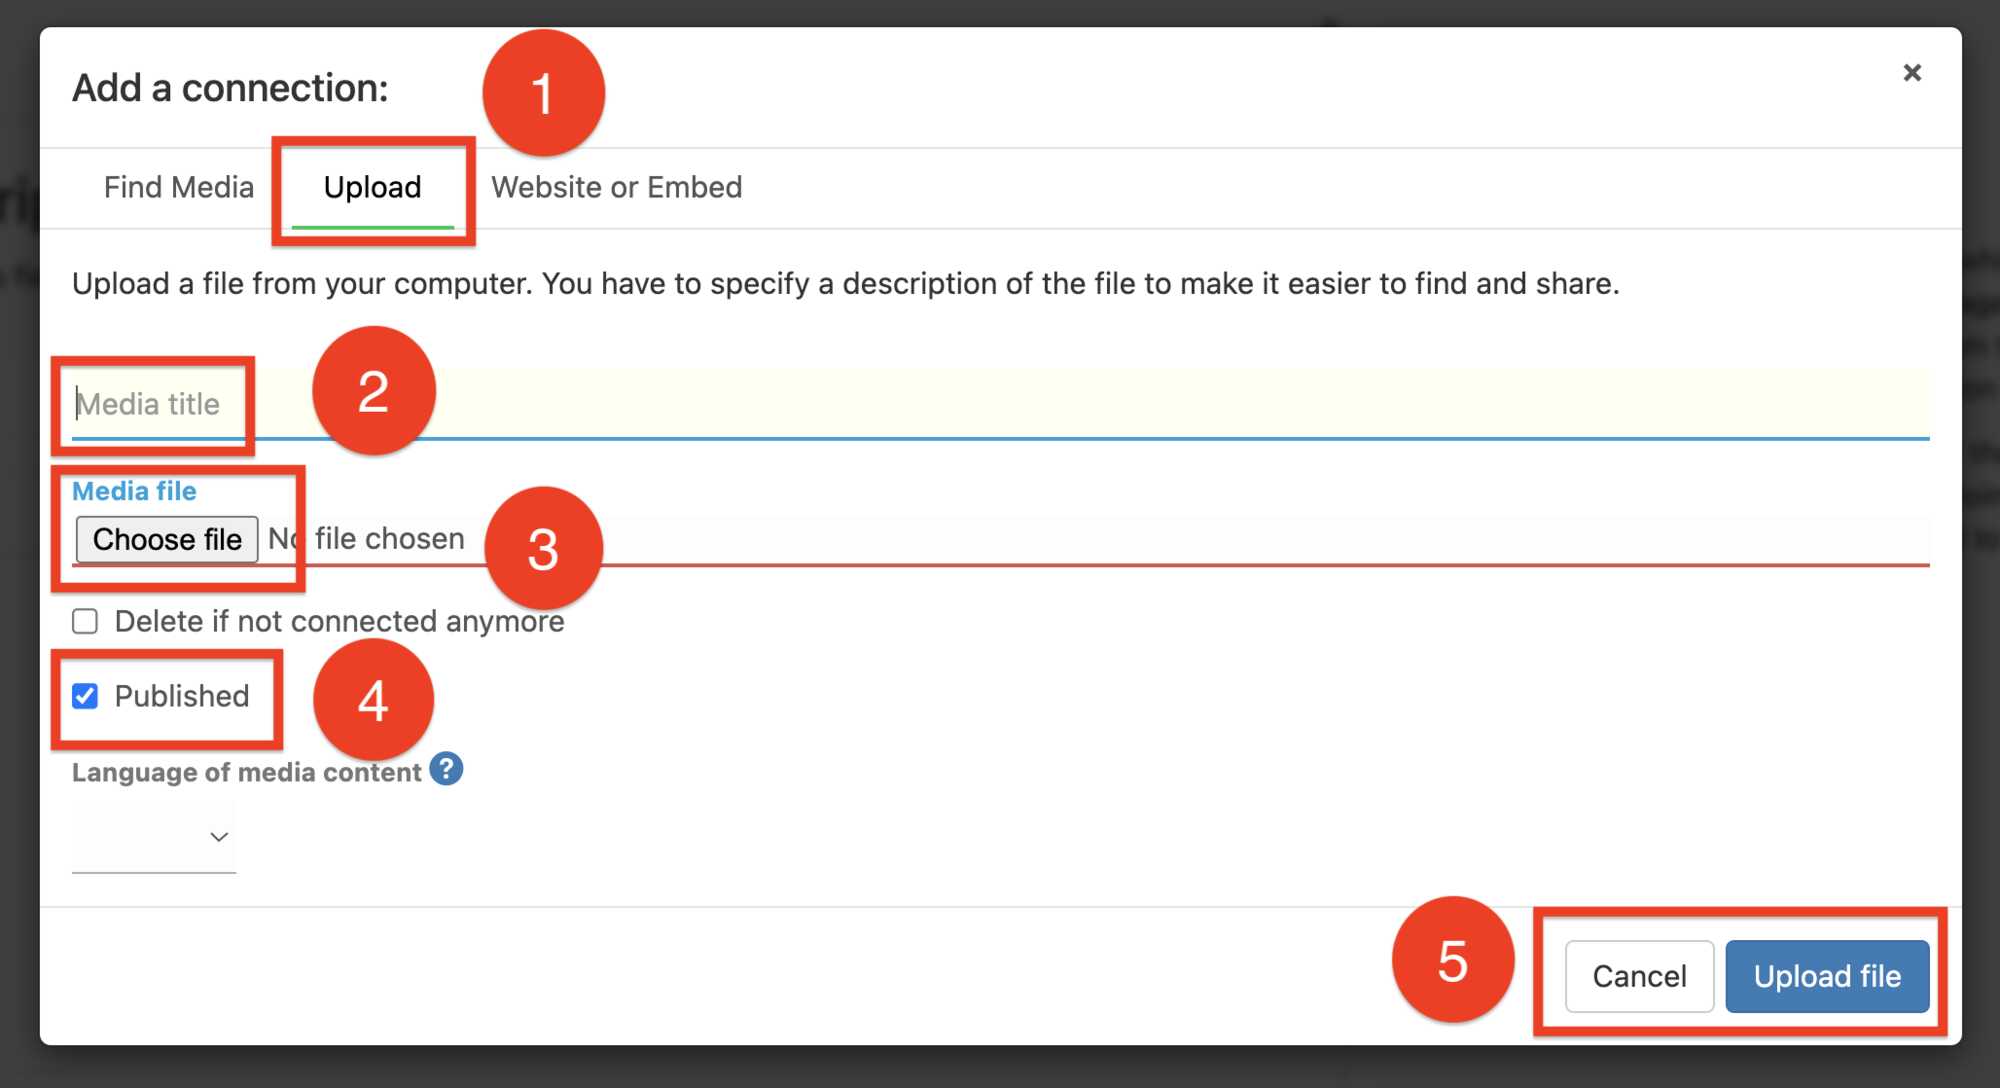
By clicking theUploadbutton in the red box marked number 1, under theAdd a connectionlabelshown in the diagram above. You will notice that the green line will slide over underneath thisUploadbutton in the red box, above, to indicate that you are now going to upload a new photo.
You can also search for an existing photo in the site memory by clicking on theFind Mediabutton situated to the left of theUploadbutton, again, marked by the number 1
Place a unique title or name of your photograph underneath the wordsMedia title, in the red box marked by the number 2 in the diagram above, so that you can search for your photograph by name if required.
Please notice the blue check mark beside the title;Publishedin the red box marked number 4, in the diagram above. You can use this to "Publish" a picture, which means to make it visible on the website, or you can click on the checkmark beside thePublishedbutton and "un-Publish" this picture. This means that after you have uploaded the picture to the website, it will still stay in the memory on the website, but will not be visible for anyone to see. By default, this box is blue and shows a checkmark inside it.
Now, let's go back to uploading the photo for your event. In the Add a connection window shown above we confirm that we are going to Upload media, Number 1, and we have placed the unique Media title in the text box, number 2.
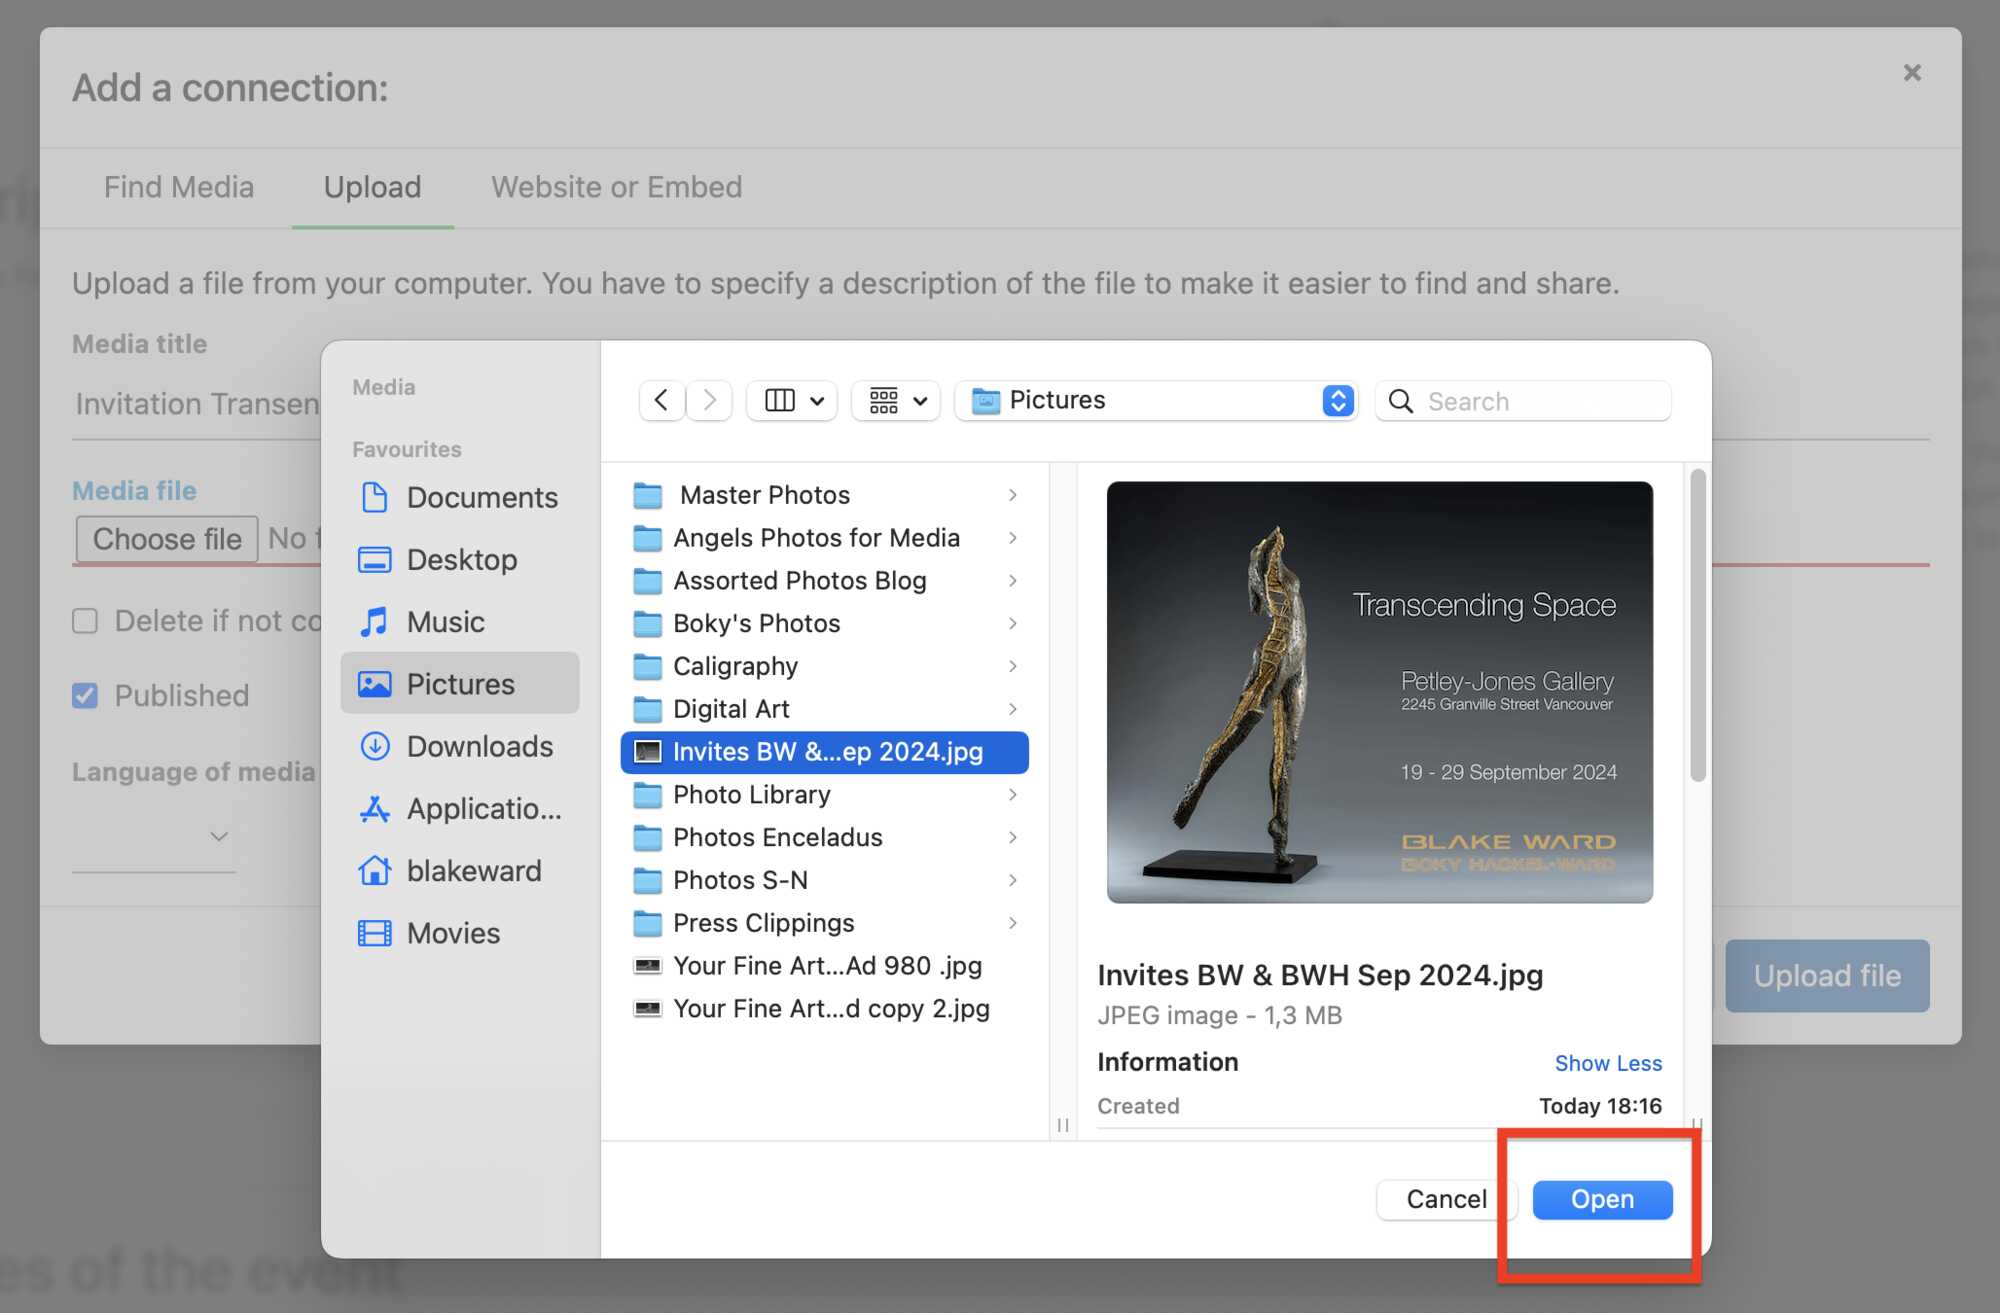
Next we click theChoose fileButton indicated by the number 3, under the blue titleMedia filein order to upload a Picture from your computer. Clicking on the Choose filebutton, above, will open a "Finder window" on your computer. As shown in the diagram below.
Click on the Open button in the lower right hand corner of the "Finder window" on your computer, as shown above and the selected photograph will be transferred to the Add a connection window, as shown in the diagram below.
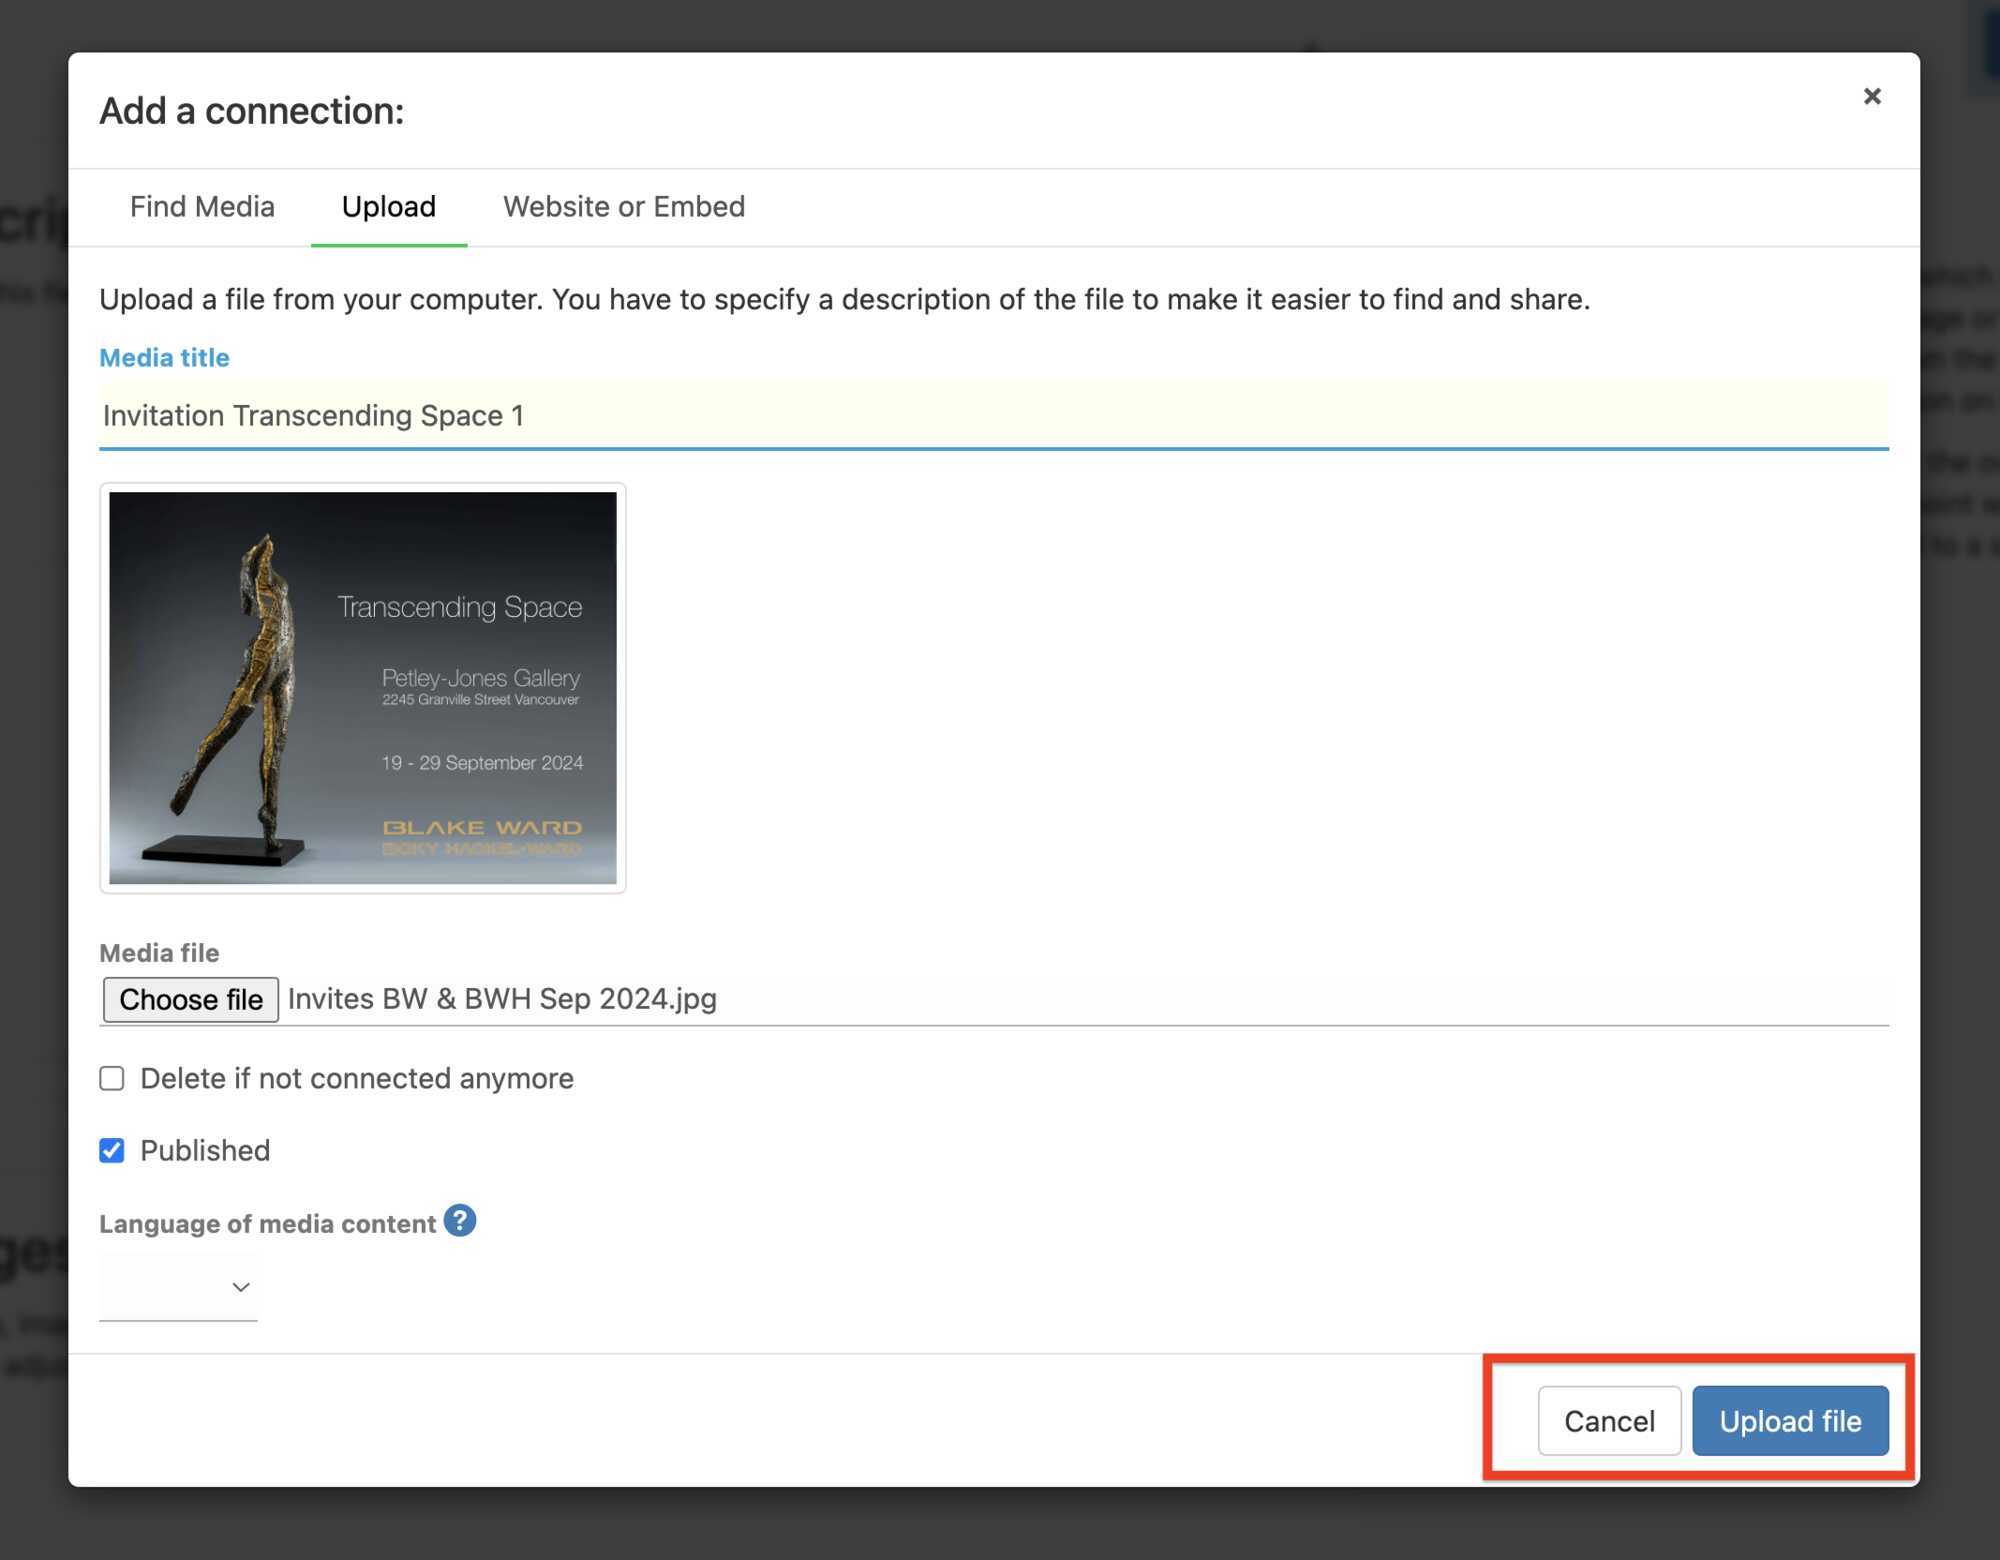
Above, you can see that there is a copy of the photograph that you have choosen from your computer, in this case; titled "Invited BW & BWH Sep 2024.jpg", which is ready to be uploaded onto the Sculpture Newtwork website.
Clicking on the Upload file button, in the lower right-hand corner of the Add a connection window, indicated in the red box above, will upload the chosen photograph from your computer, and store a copy of your photo on the SN website.
Now we will have a window like the one below confirming that the photograph that we uploaded will be available on the website, as shown below.
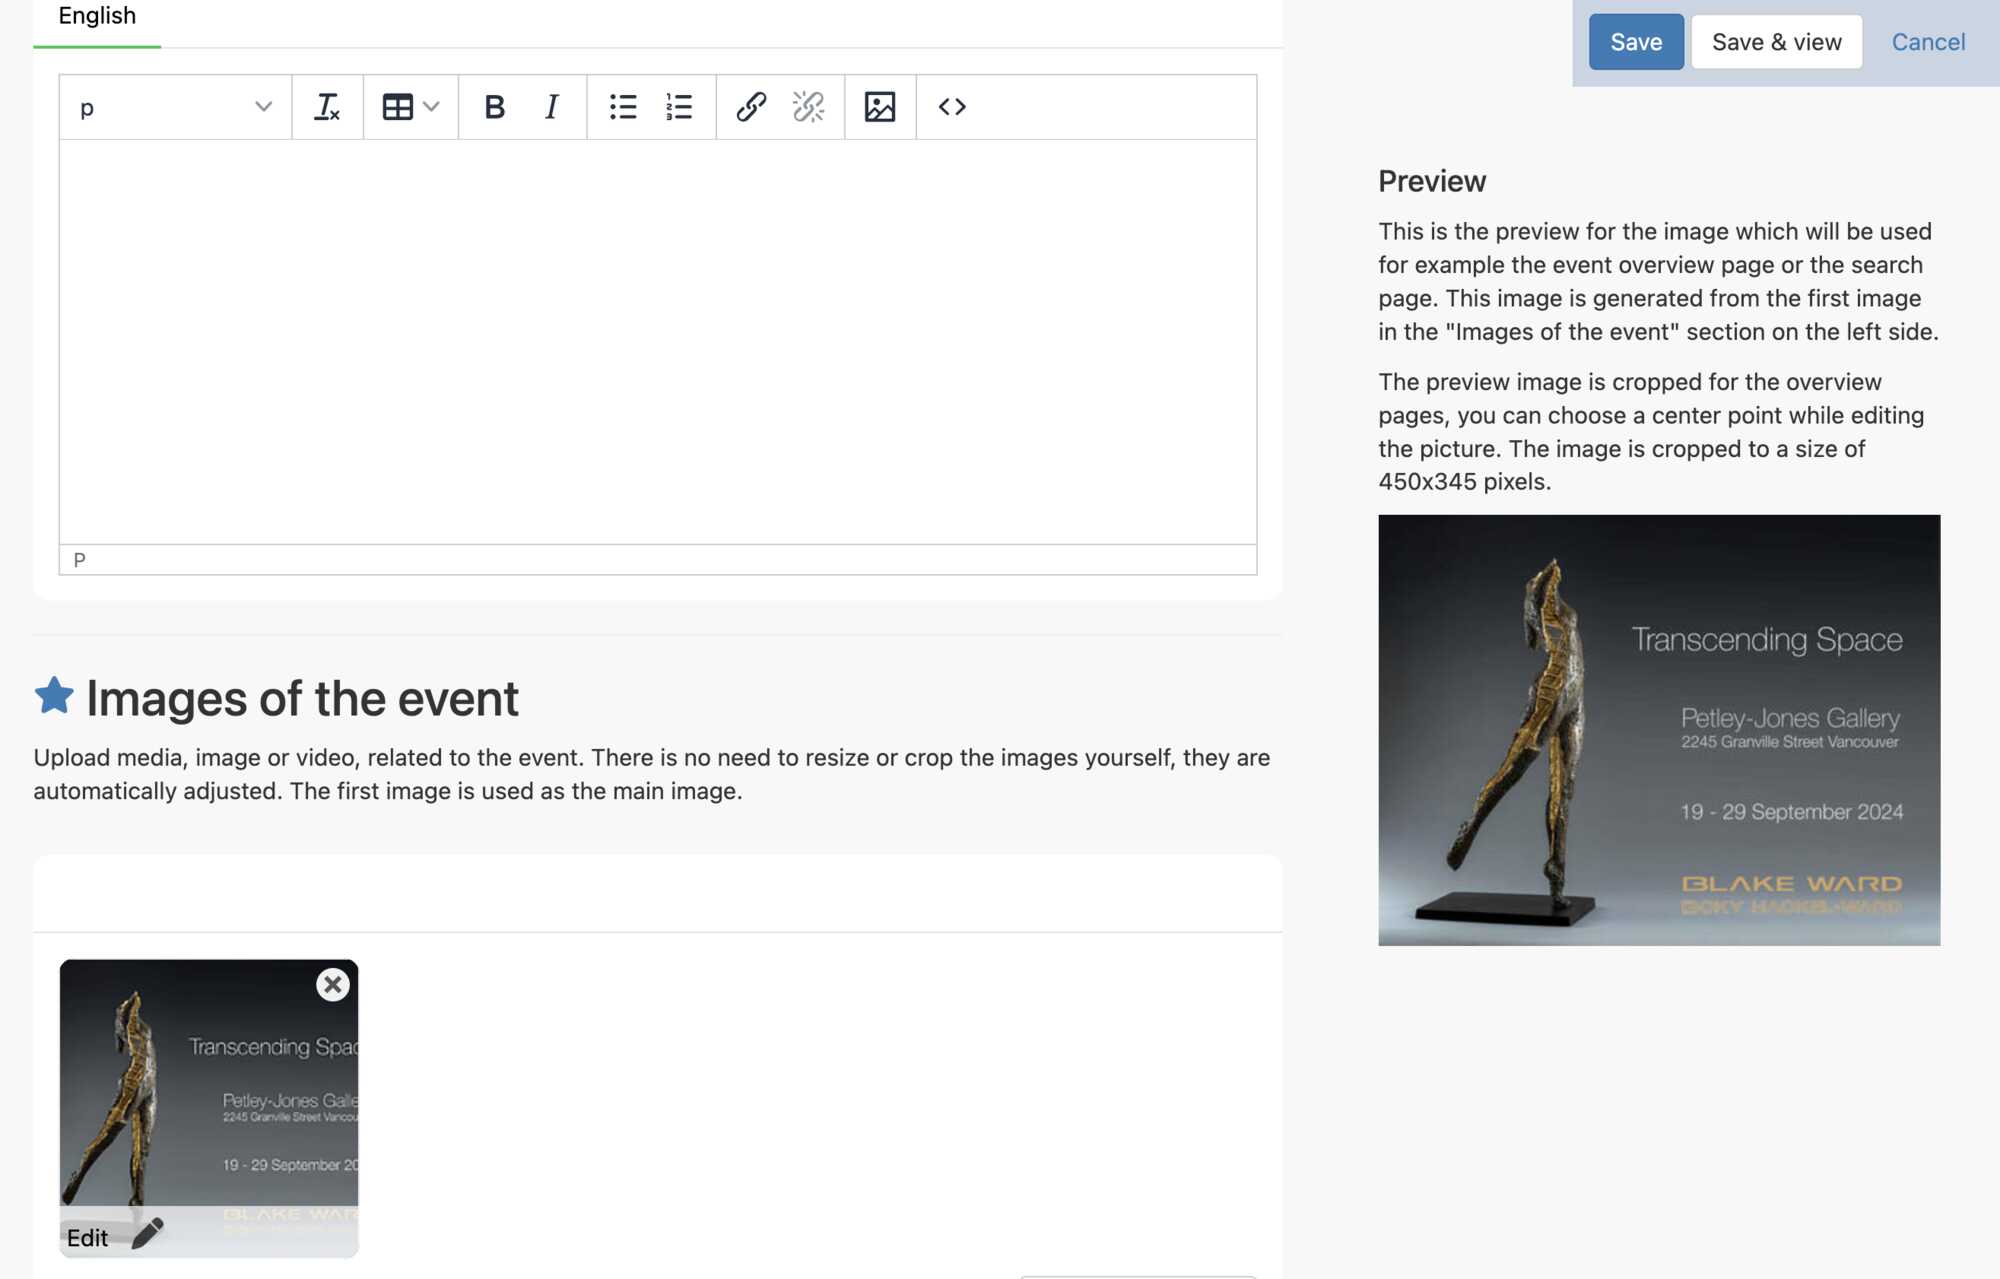
In theImages of the eventwindow shown in the diagram above, you will see one photo of the artwork that you have chosen to upload to your portfolio, and a larger one on the right, under the titlePreview.
This is the "Preview" photo, and is included here to indicate how you photograph will look on the "'front end" on the website. You can see that the photo is correctly framed in the photo window.
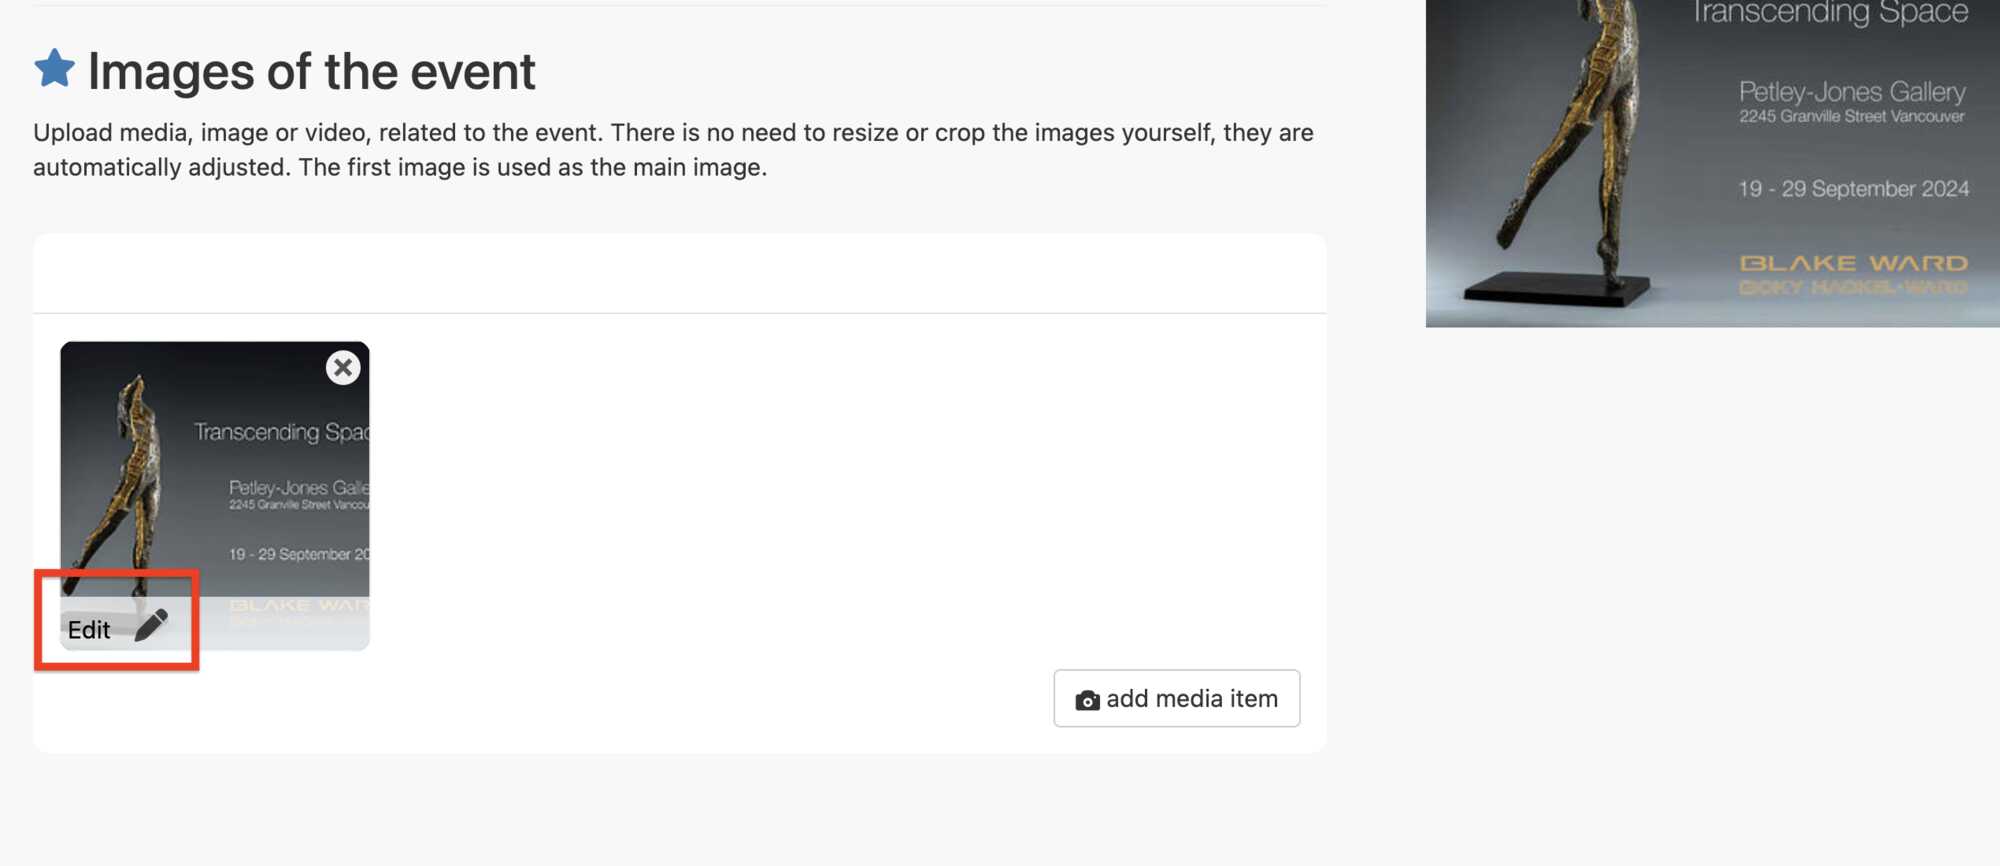
If the photo is not correctly framed in the picture window, if some text is cut off or the sculpture is not placed as you would like we can edit the photo by going to the smaller photograph on the left hand side of theImages of the eventwindow. You will notice on this smaller copy of your photograph there is anEditbutton with a small pencil showing along the bottom of the photo, marked by the red box in the diagram below. Clicking on thisEditbutton will open a new window in which we can edit the photo.
There is also a circle with an "X" in it in the upper right hand corner of the photograph, this will delete this photo from your portfolio page, but the photo will not be removed from the memory in the website, only from your portfolio page. You can always go back and find the photo and palce it back in theImages of the eventwindow and thus back into your event page.
The first photo uploaded into theImages of the eventwindow, will be considered the "Preview" photo, and will take a prominent place on the "front end" Art Agenda page showing your event.
Resize your Photos
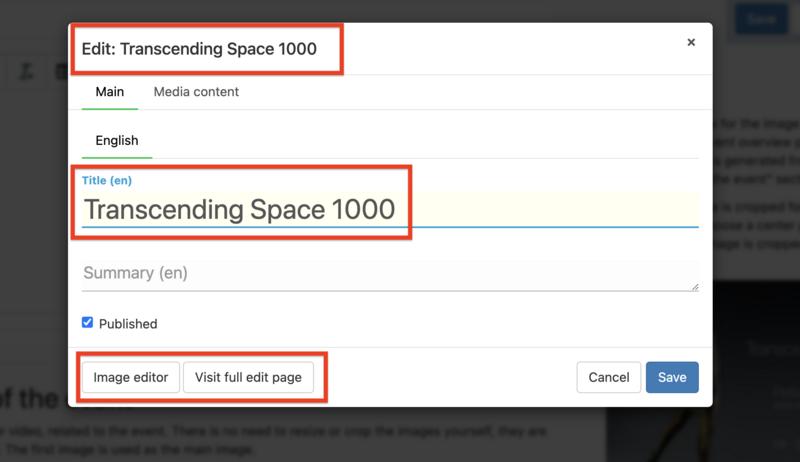
When we click on the Edit button beside the small pencil, shown in the red box above, we are taken to a Edit: "your photo title" window shown below. In this example, I called the photo "Transcending Space 1000", because I edited the photo to be 1000 pixels by 700 pixels reather than the recomended size of 450 x 345 pixels. This was because at the lower resolution the letters on the photo were pixelated and did not look good.
If you go to a higher resolution than this you will find that the photo may not upload properly. It may look alright in the Images of the event window, however, when you click on the Save and View button at the top right hand corner of the page, and actually see your event page on the "front end" of the site; in the window where the photo should be, there will be blank white box with a thin 'X' through the space. If you see this, then you will know that the photograph that you uploaded was too big, and you will have to go back and make it maximum 1000 by 700, but try the recommended resolution of 450 x 345 first.
Below you will see the Edit: Transcending Space 1000 window, with my event photograph entitled "Transcending Space 1000". In the window you can edit the title if I want, or just go down to the red box at the bottom of the window and click on the image editor button, which will take you to an editing page where you can change the "centre point" of the photo in order to frame the photo differently on the page. You can aslo crop the photo in order to change the postition of the photo in the frame as well.
A detailed explaination of this editing process is found in the HELP document titled Add artwork to your profile under the category Edit images of the Artwork if you would like more information on how to edit any of your photographs on the website.
Now that we have the photograph about the event in the website memory, we need to create a banner photograph for our Event page. For this we need a photo in Landscape view, rather then Portrait view. You can do this in a Photo Editing program if you have one, but I here we will use a "Preview' type of program, as you should have access to this type of program on most computers.
I want to use the invitation photo for my banner, so I will open that photo in the "Preview" application on my Mac, as shown below.
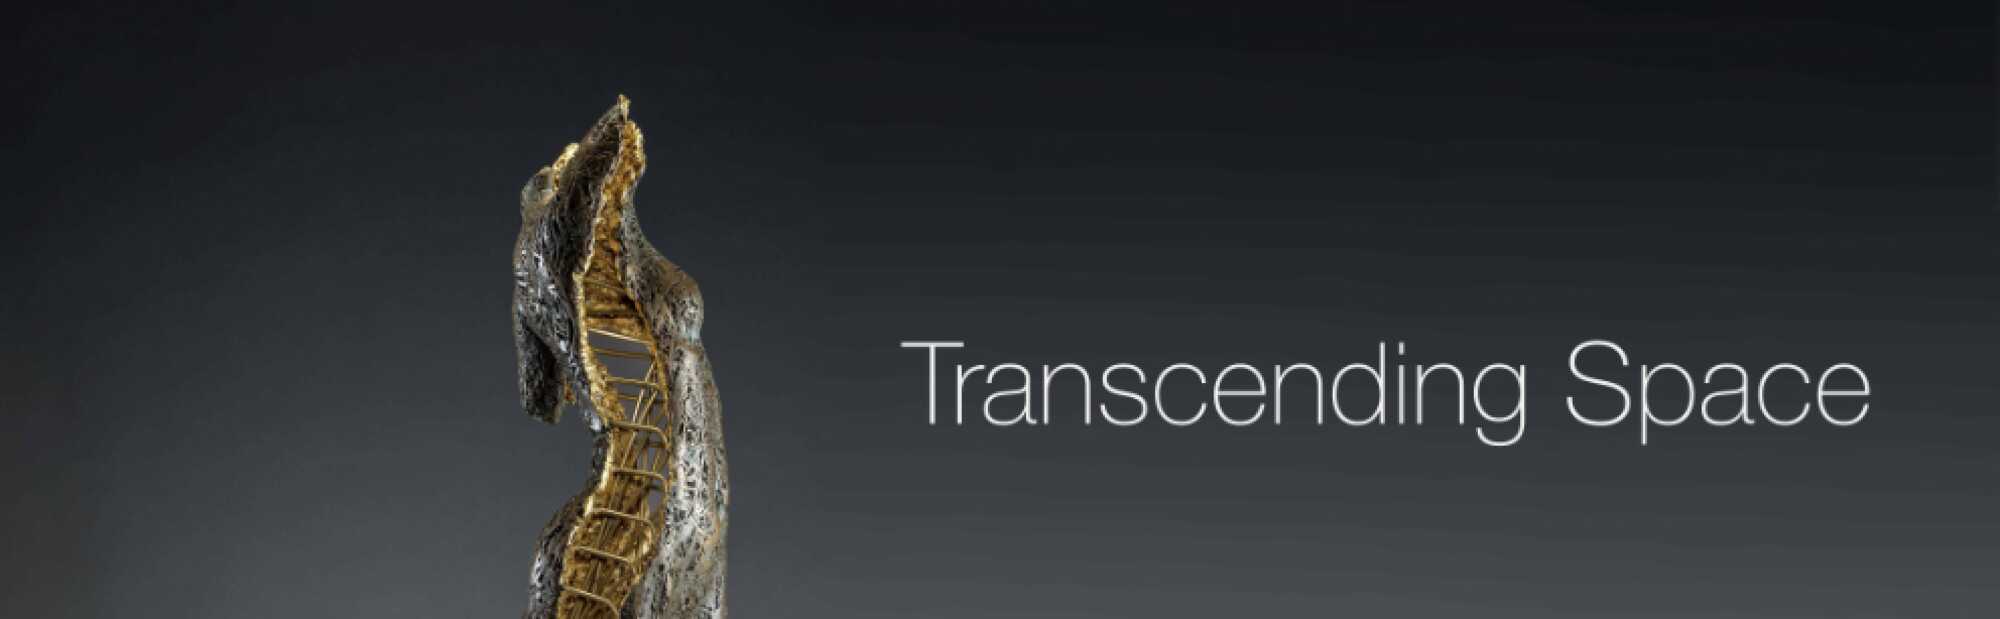
To create a landscape view of this photograph, I will simply take a screen shot of a part of the photo and use that as the banner photo.
Above is the ScreenShot of the photo, I will upload this ScreenShot into the media memory on the website, by going back to the Images of the event window, shown below, where we will click on the add media item button in the red box, located in lower right hand corner of the window, and Upload the banner photo, just like we did with the previous photographs.
See: Add a Photo to your Event page, for instructions.
Once we have uploaded the banner photo into Images of the event box, the banner photo will show in this window, there is an example of how the window will look below.
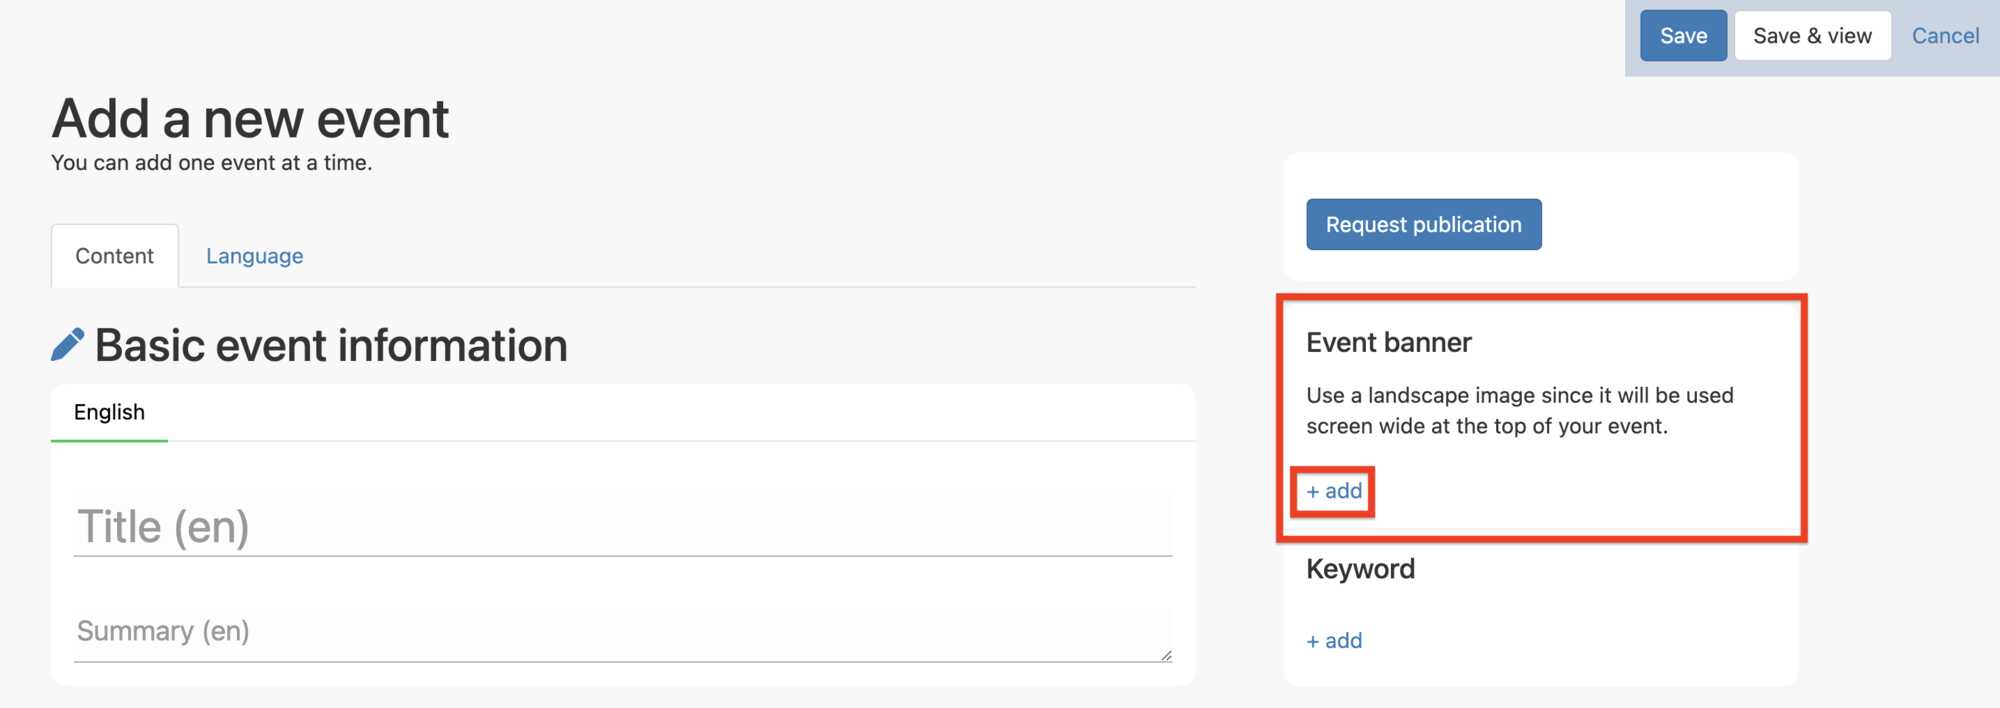
Once our event invitation photo and banner photo are uploaded to the site and showing in the Images of the event window, we can scroll up to the top of the page to the Event banner window in the red box shown below, and click on the +add button indicated in the small box at the bottom left hand corner of the Event banner box below.
Having clicked on the + add button in the Event banner box, shown in the diagram above, we will be taken to an Add a connection: Header window, as shown below, where you can chose the banner photo that we uploaded. You may notice that I needed to upload several invitation photos before I found one that was the correct resolution and looked good on the page, often you need to experiment a bit before you get it right.
However, the correct banner photo is in the left hand corner of this window entitled " Transcending Space Banner", so I will click on that photo and a confirmation note will appear on the top right hand side of this window indictating that I have; "Added the connection to Transcending Space Banner".
If you click on the photo a second time, then you will remove the connection to the photo and the confirmation will read "Removed the connection to Transcending Space Banner", letting you know that the photo has been removed, but not deleted from memory.
As you can see in the diagram below it is difficult to remove a photo from the website memory, so don't worry about loosing your photos, just be careful to give each photo a unique name so that you can find them again if you need to.
Once you have the connection to your banner photo confirmed you can close the Add a connection: Header window by clicking anywhere outside of the window.
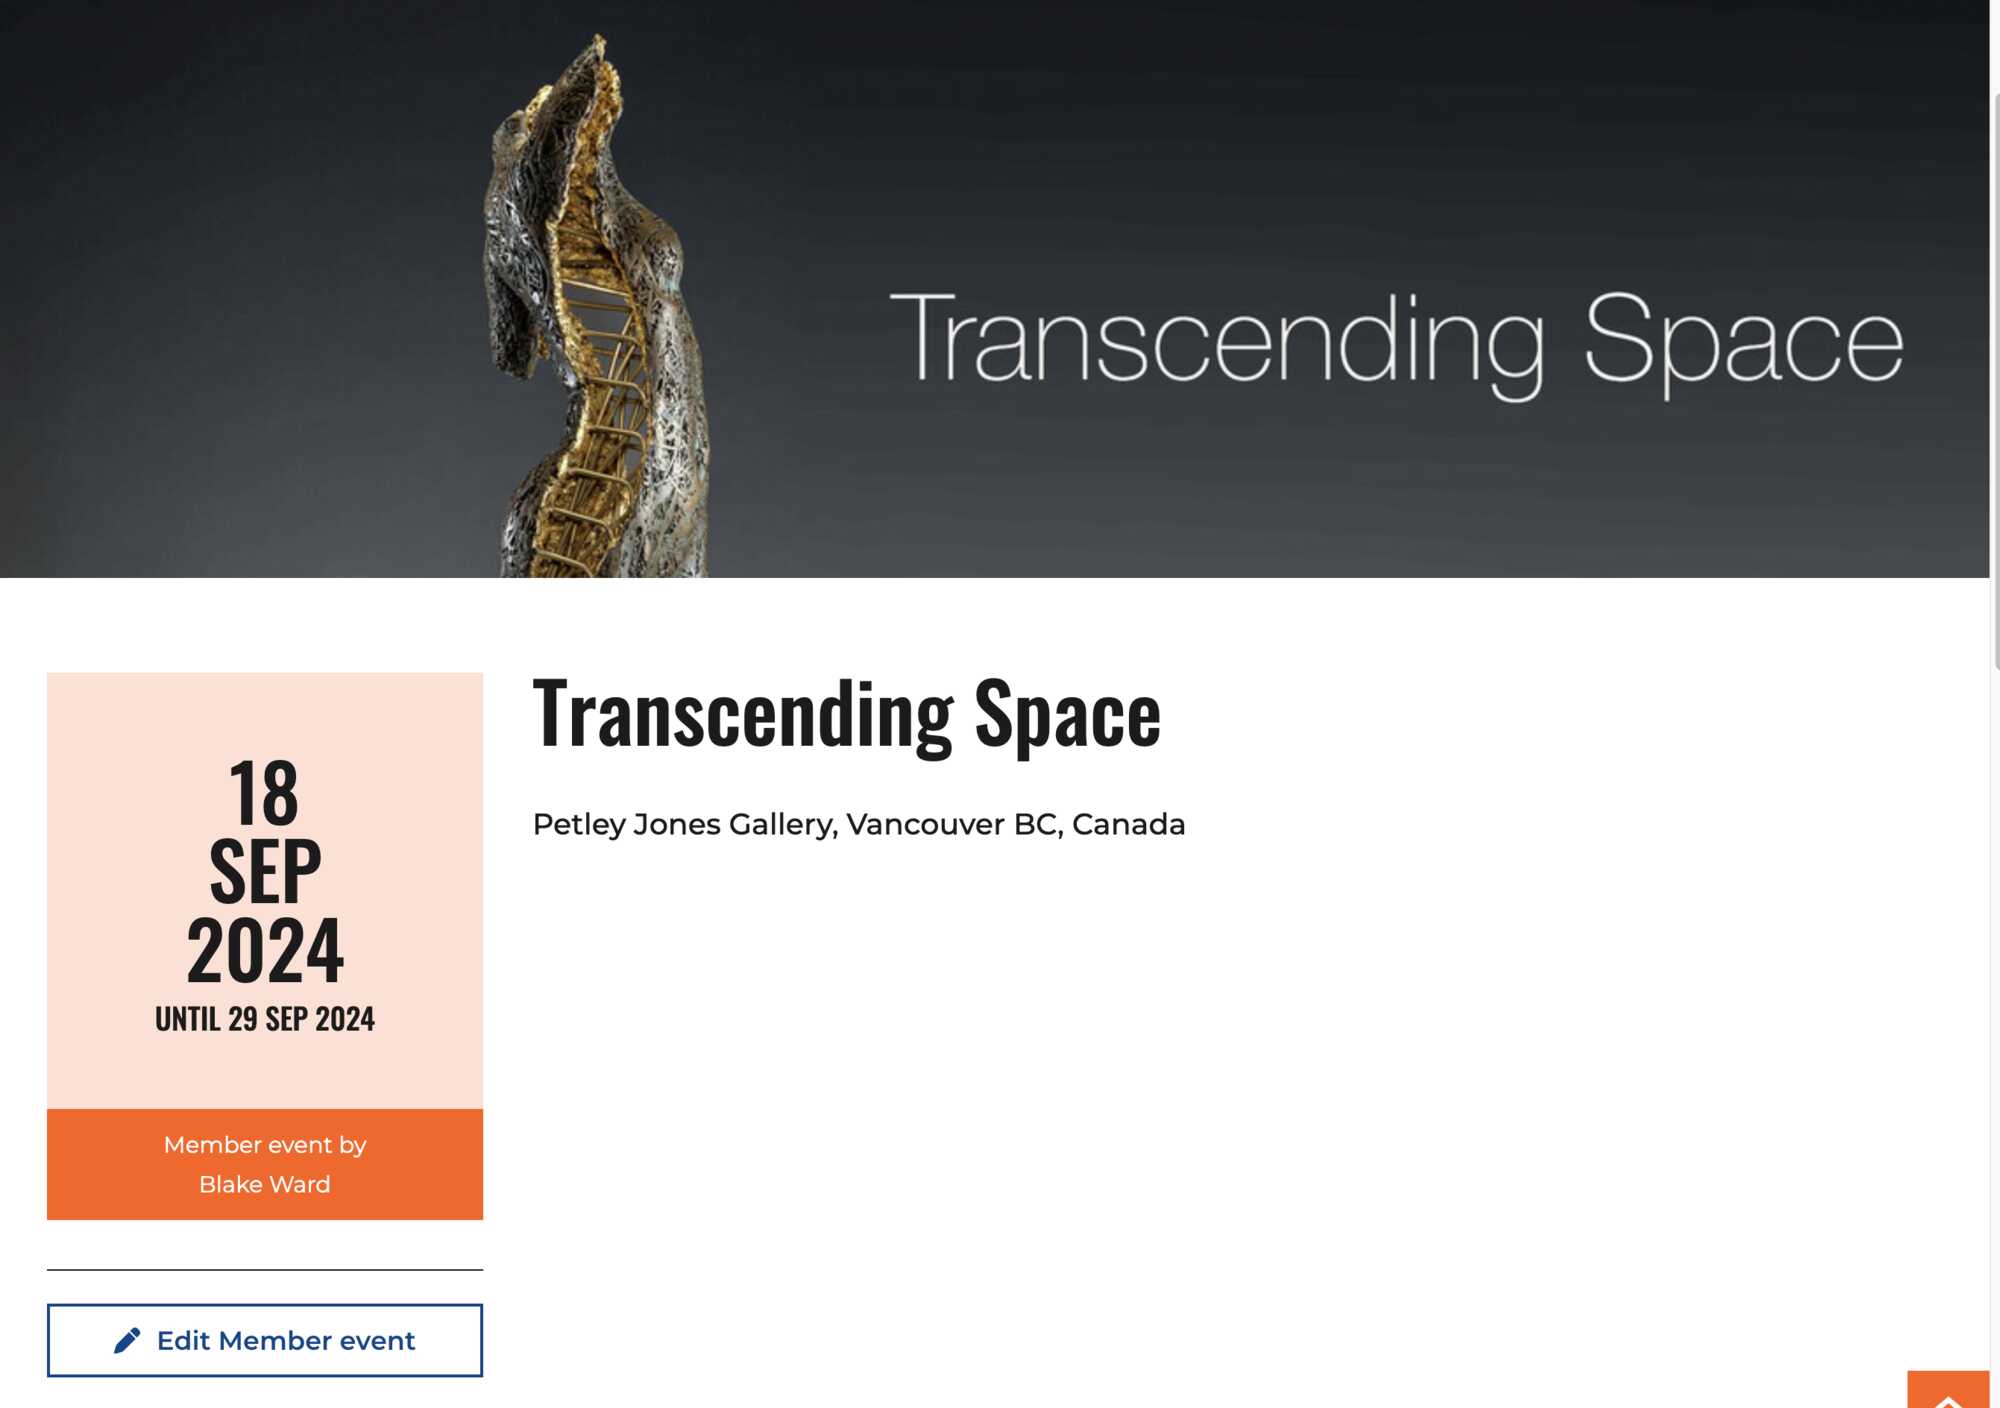
Now we have connected the event banner photo, lets go to the "front end" of the website to see how our Event page will look!
Add an Address and Description to your Event
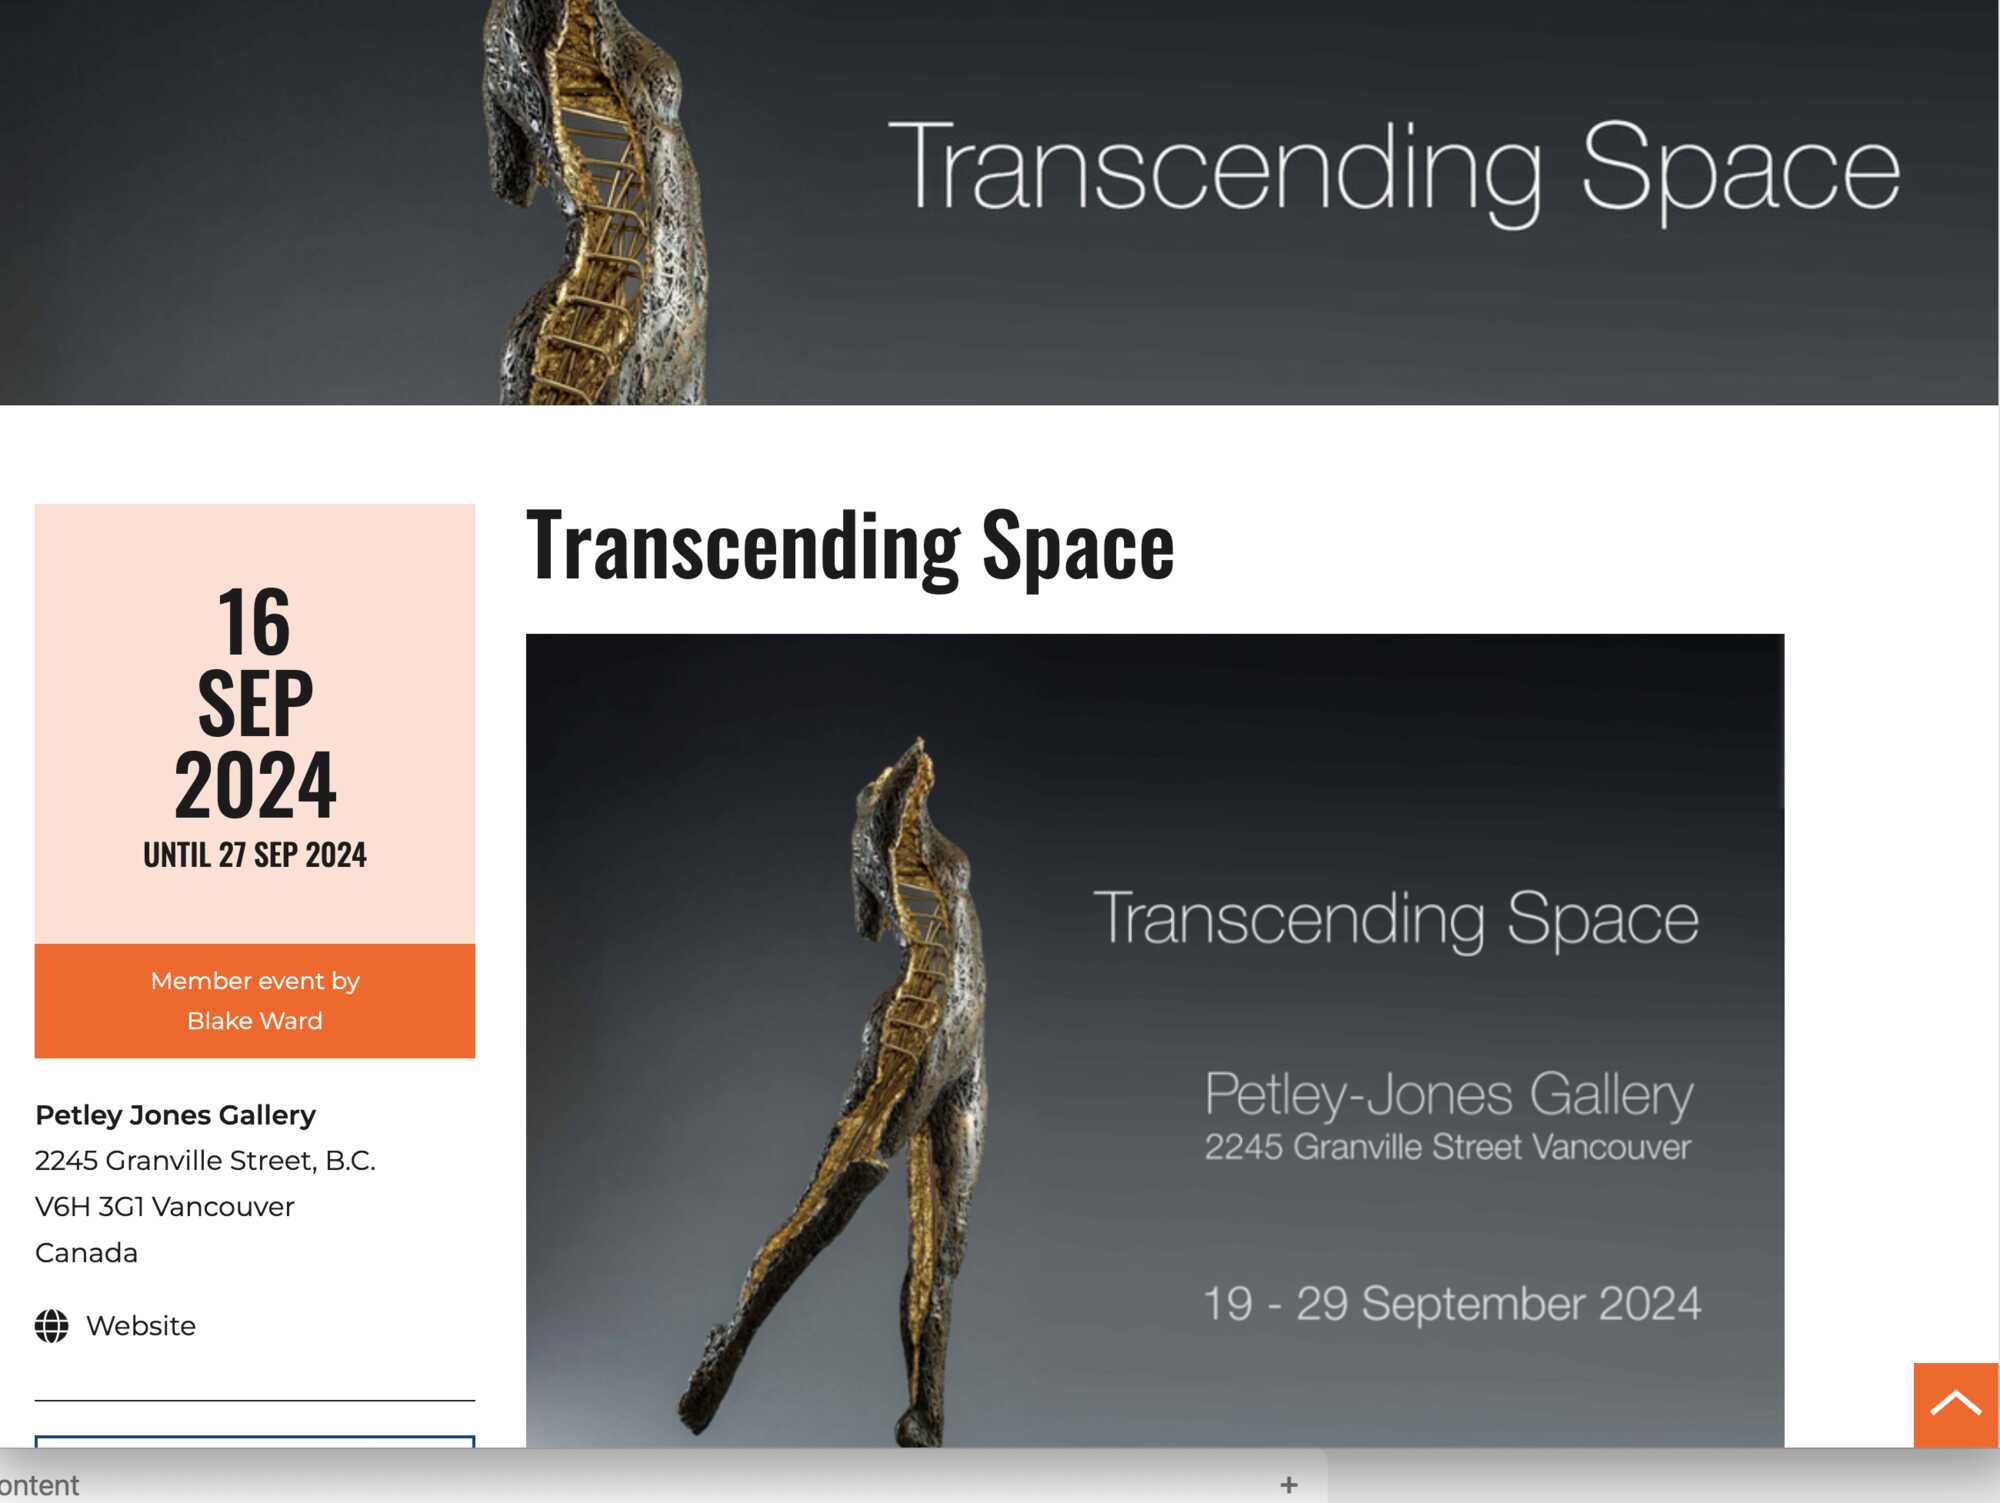
Well, it is coming along, we have a Banner and the date, but we had better add some written details. If you scroll down you will see the Gallery, where smaller versions of the invitation photo and the banner photo are posted.
At this point we need to add the written details about our event so, lets go to the "back end" again, and you can get there by clicking on the Edit Member event button, just below the date window in the lower left hand corner of the diagram above.
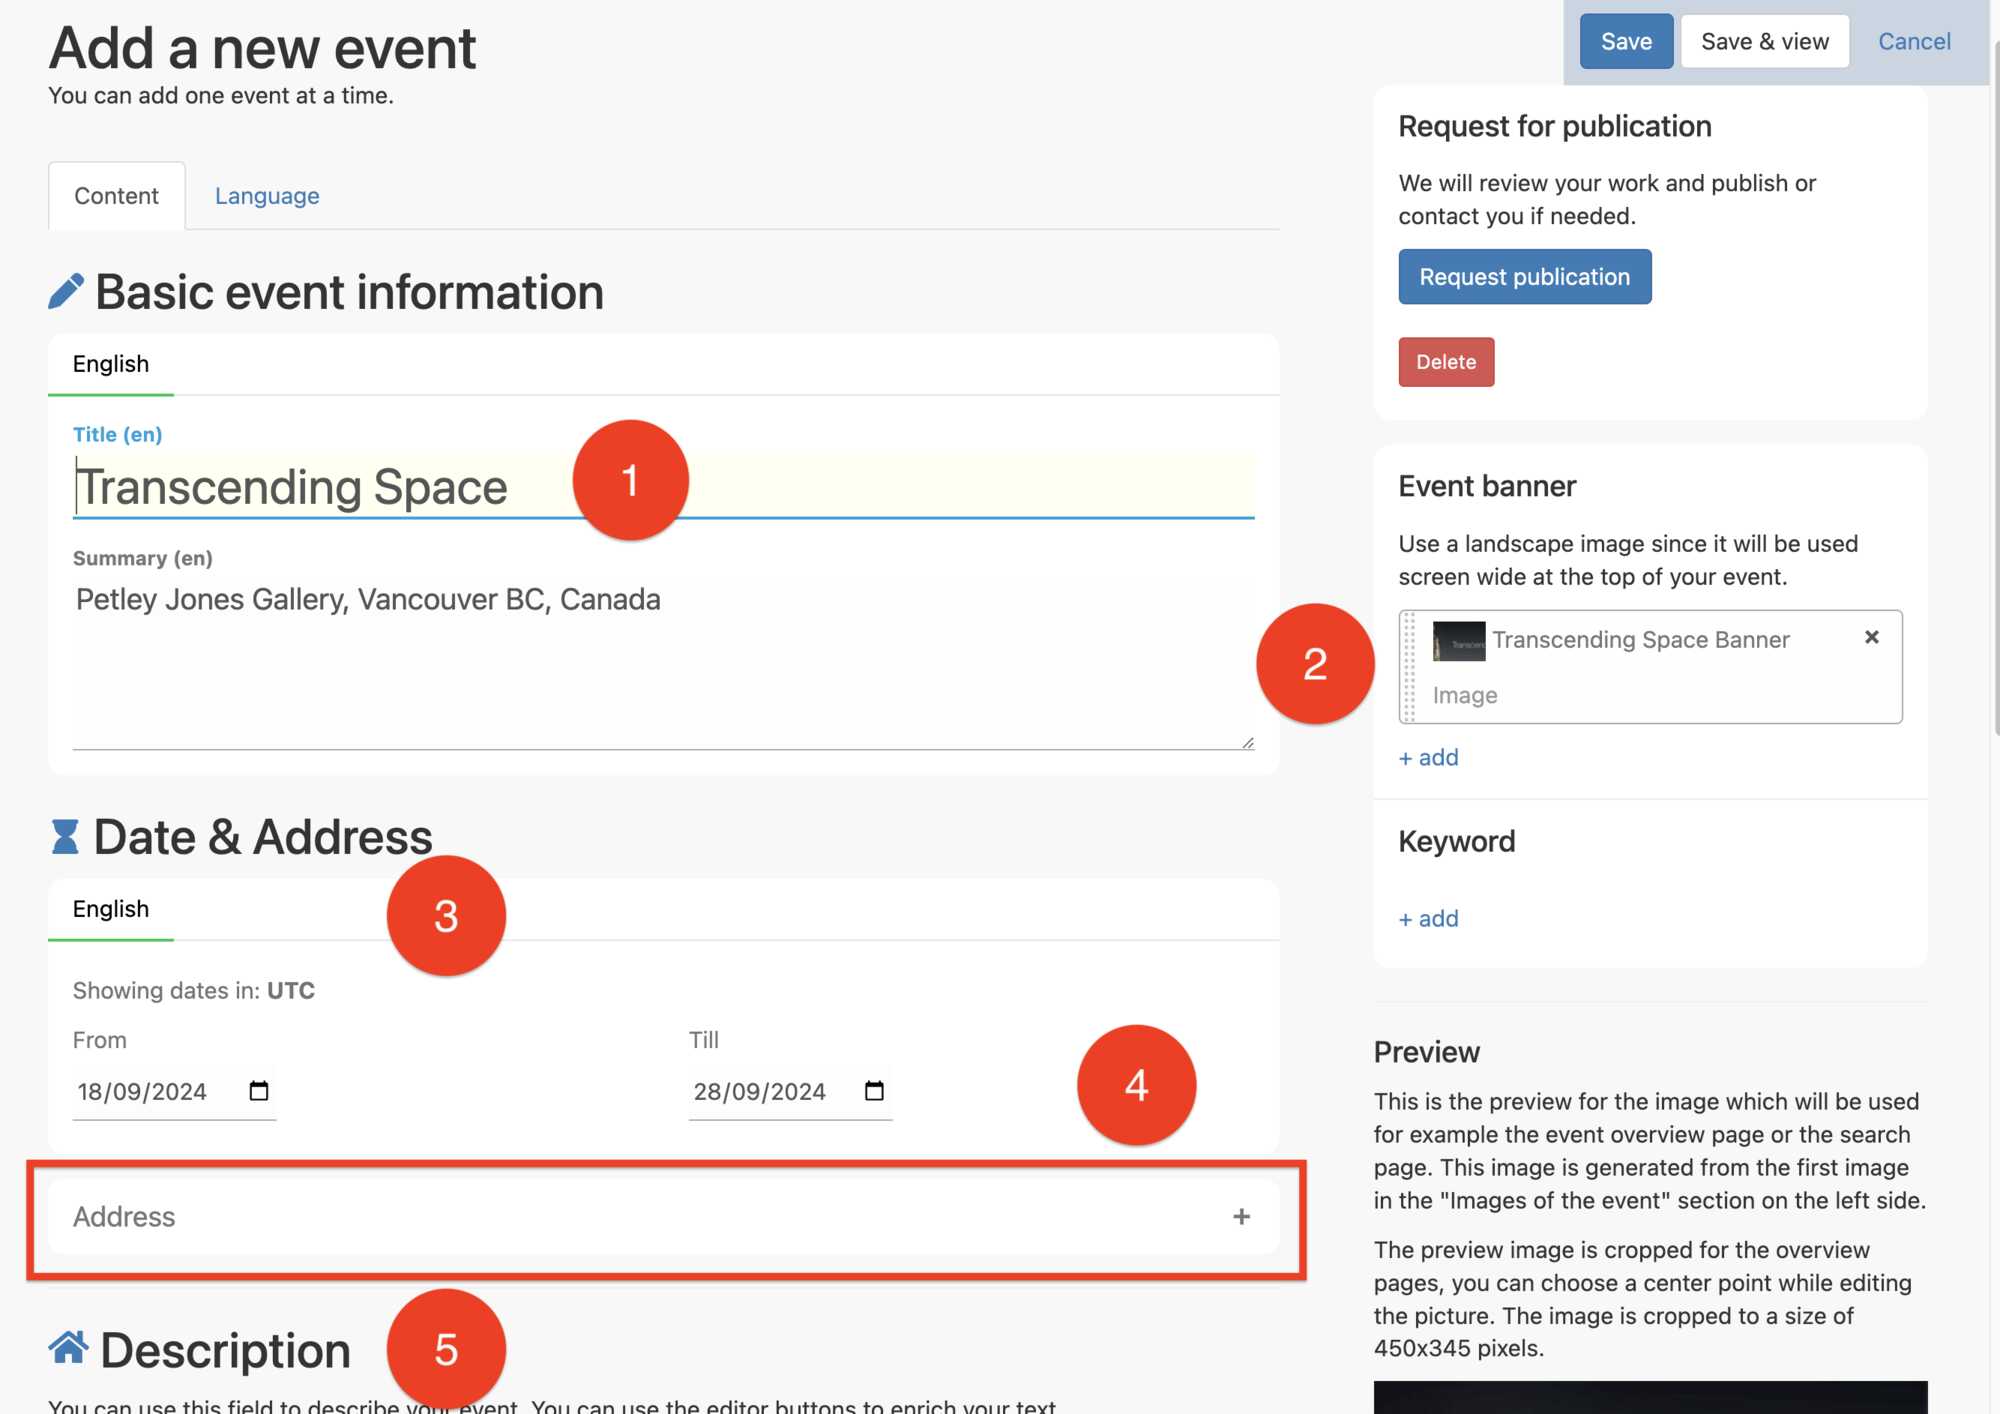
When you click on the Edit Member event button, the main Add a new event page will open. Here we can see that we have most items done; we have our Exhibition title, at number 1, below, and we have our Event banner, marked by number 2, and at number 3, we have the date, in the format that the website can read.
We now need an address that will go in the Address window, at number 4, and a Discription marked by the number 5.
For the address at number 4, we will need to open the Address window, so lets go to the plus sign "+" in the red box, just beneath and to the right of the number 4 circle, and click on that + sign to open up the Address window.
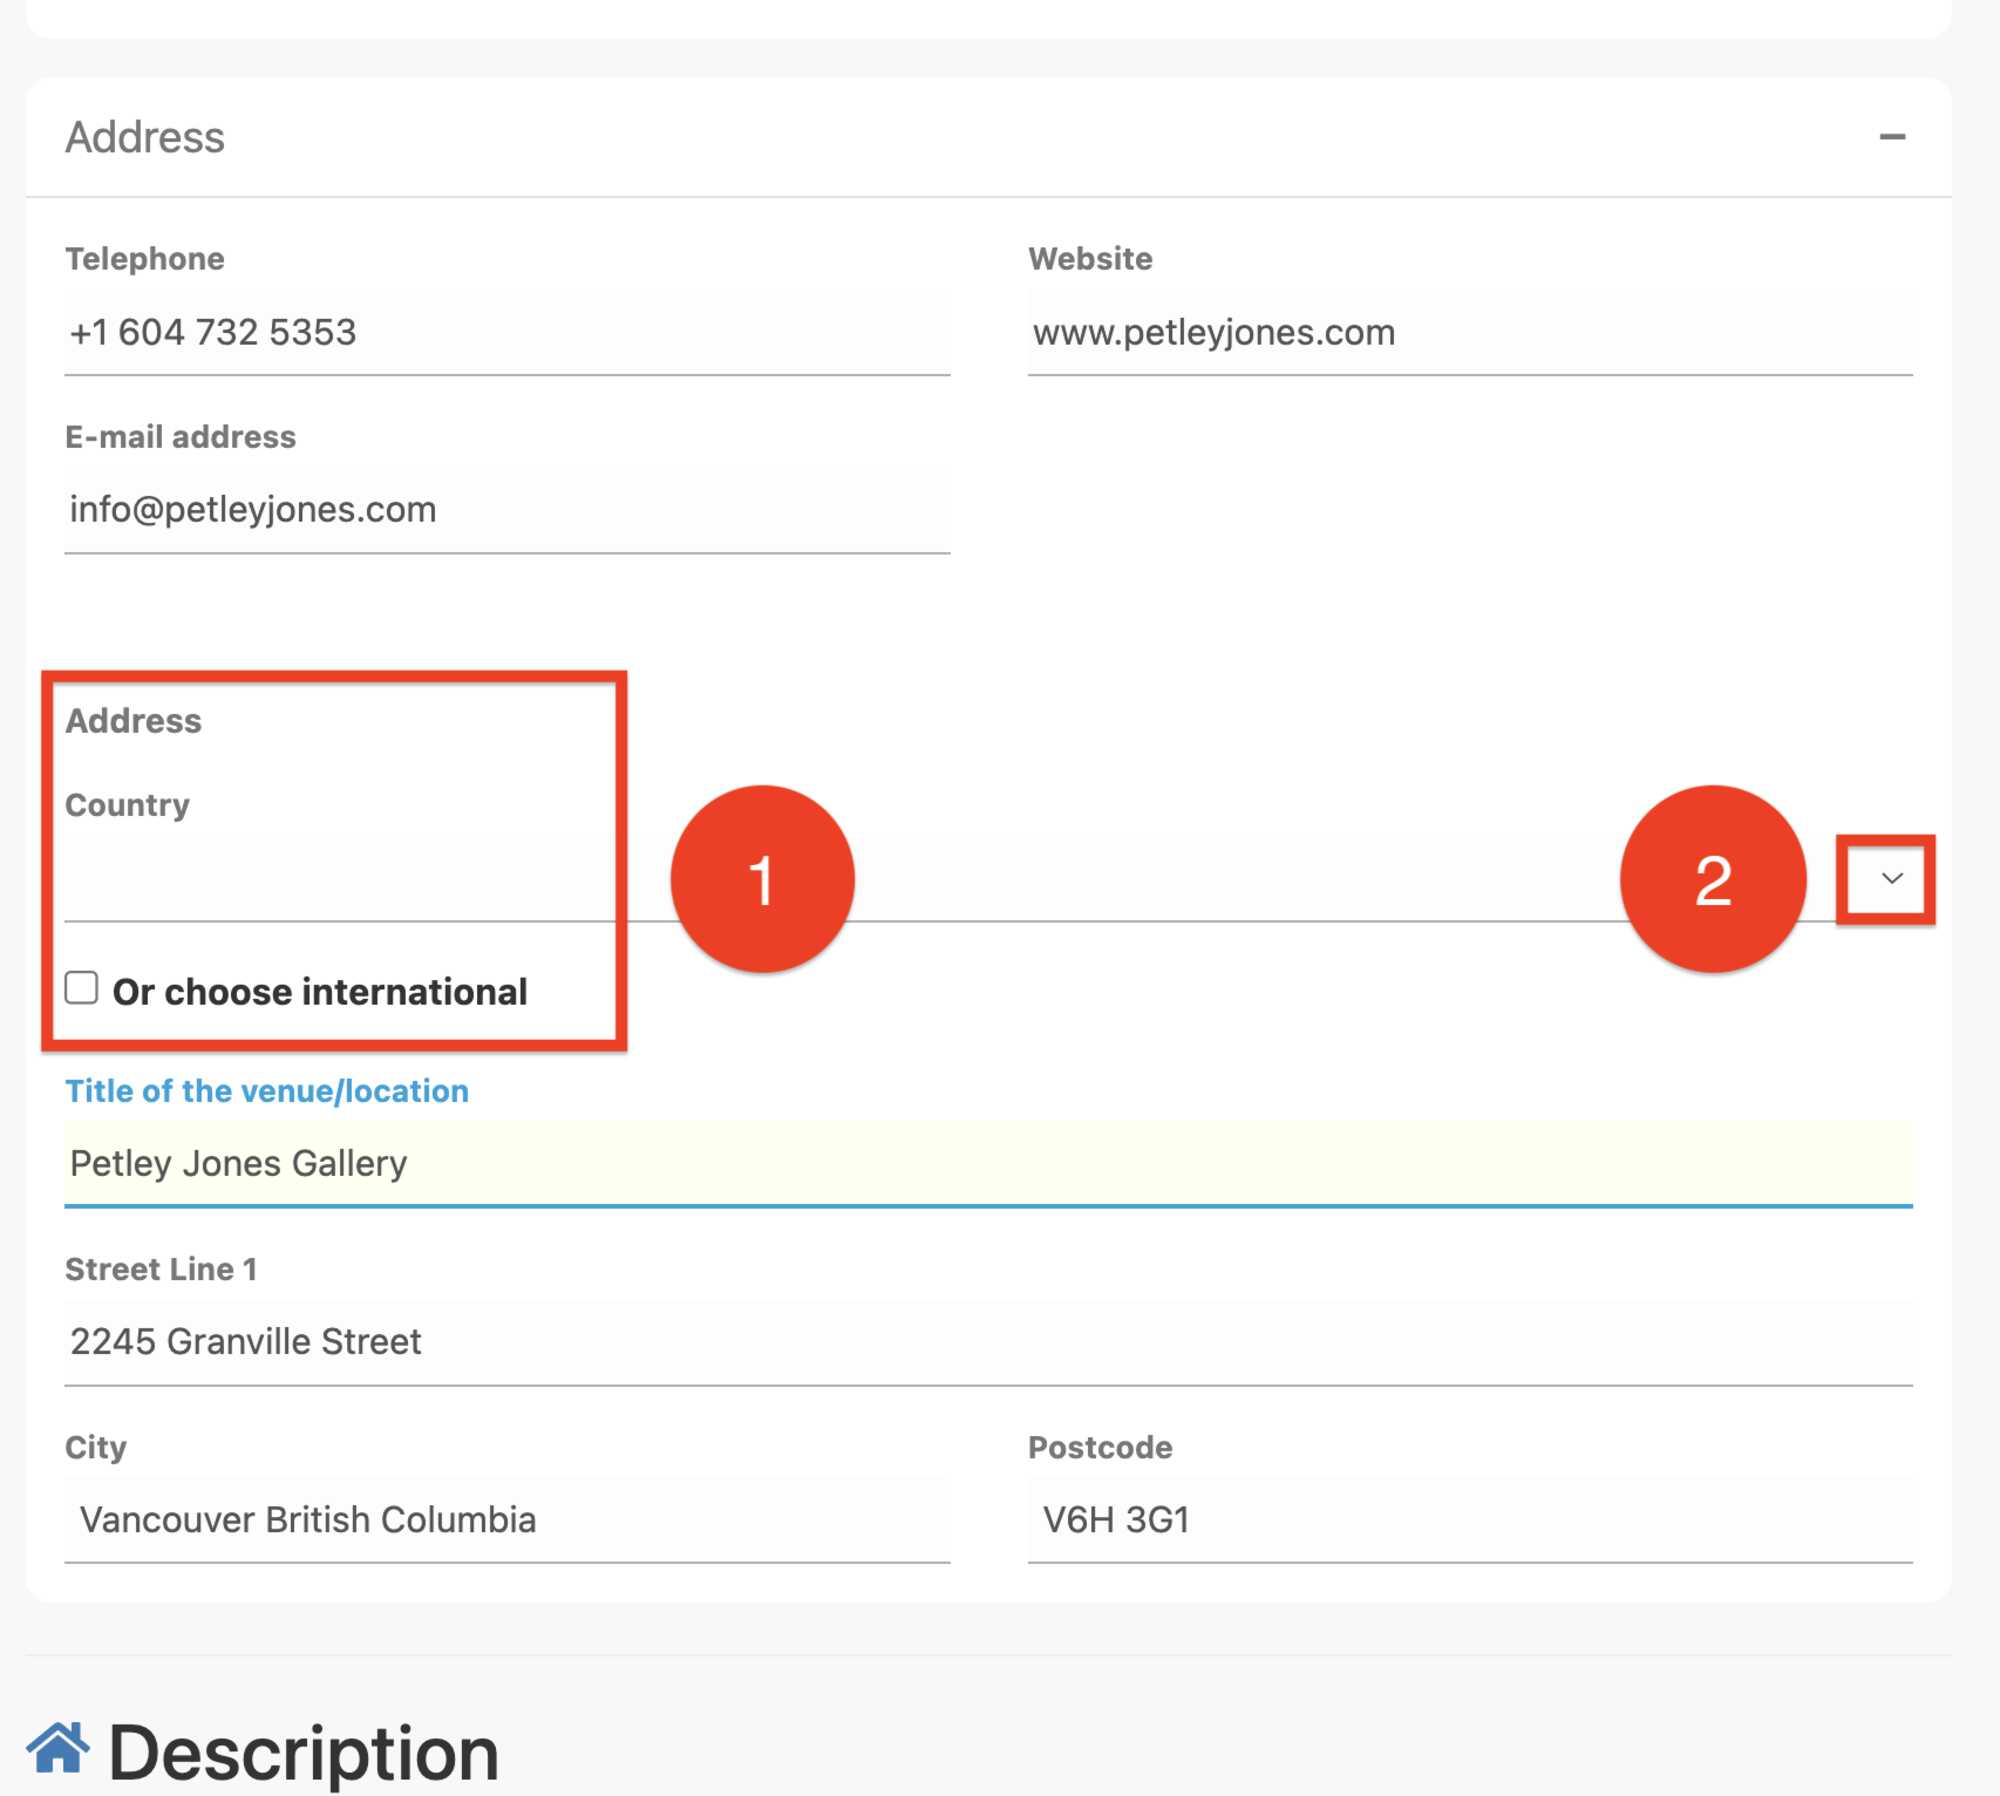
The Address section is straight forward, the website address is important and will be seen on the public Event Page.
The telephone and email address will not be viewed on the public Event page nor the address or country, if you check the Or choose international check box, identified by the number 1, in the diagram below.
If you want to show your address and country, do not check Or choose international check box and click on the small arrow pointing down in the red box marked by the number 2, to select your country in an alphabetical list.
The Description of the Event is up to you, personally I like to include a Press Release type of paragraph. Below there is some informaion about the Text Bar marked by the red box in the diagram above. All text, media, photographs or text documents that you place in the Description text box, will appear on the “front end” of your Event page.
The Text Bar, outlined by the long red rectangle, in the diagram above, offers some tools relating to this Introduction window text box, they are as follows, from left to right:
The small "p" stands for paragraph and if you click in this area, there are some tools you can use to insert larger text i.e., h2 and h3, as well as, some other text options, should you want to put bigger titles into your description.
The symbol "T" with a small x beside it Tx, is a Delete Format button that might help you when pasting copied items into your “Description” text box. In some Text Bars on the website, this can be found on the far right this row.
If you paste your text into the text box and you get a very small column of five words per line, or something like that, then try highlighting your text once you have pasted it in and click on the delete format button and see if that helps. If that does not work, try removing the text paste it another program, like MS Word, and click on "Keep Text Only" and remove the format that the text was in.
This is followed by an Insert Table setting for creating tables with rows and columns.
"B" stands for Bold text, and "I" for Italics.
Next you will find two icons for two different types of Bullet points.
The Chain link icon will allow you to put a “link to” an external webpage, remember to include (https://) in the URL address.
The “Broken link” beside the Chain symbol will remove or break that link.
If you would like to add a picture or a .pdf document to your text in this Description section, click on the little square icon with a drawing of a mountain and a sun in it, (at least that is what I think that icon represents). It is found just after the “brake chain link” symbol. Any media; photographic: .jpg or .png, can added here using the same method as you used for your Profile pictures.
The last symbol < > is for “source code” for those who know what you are doing… otherwise please ignore this symbol. Thanks.
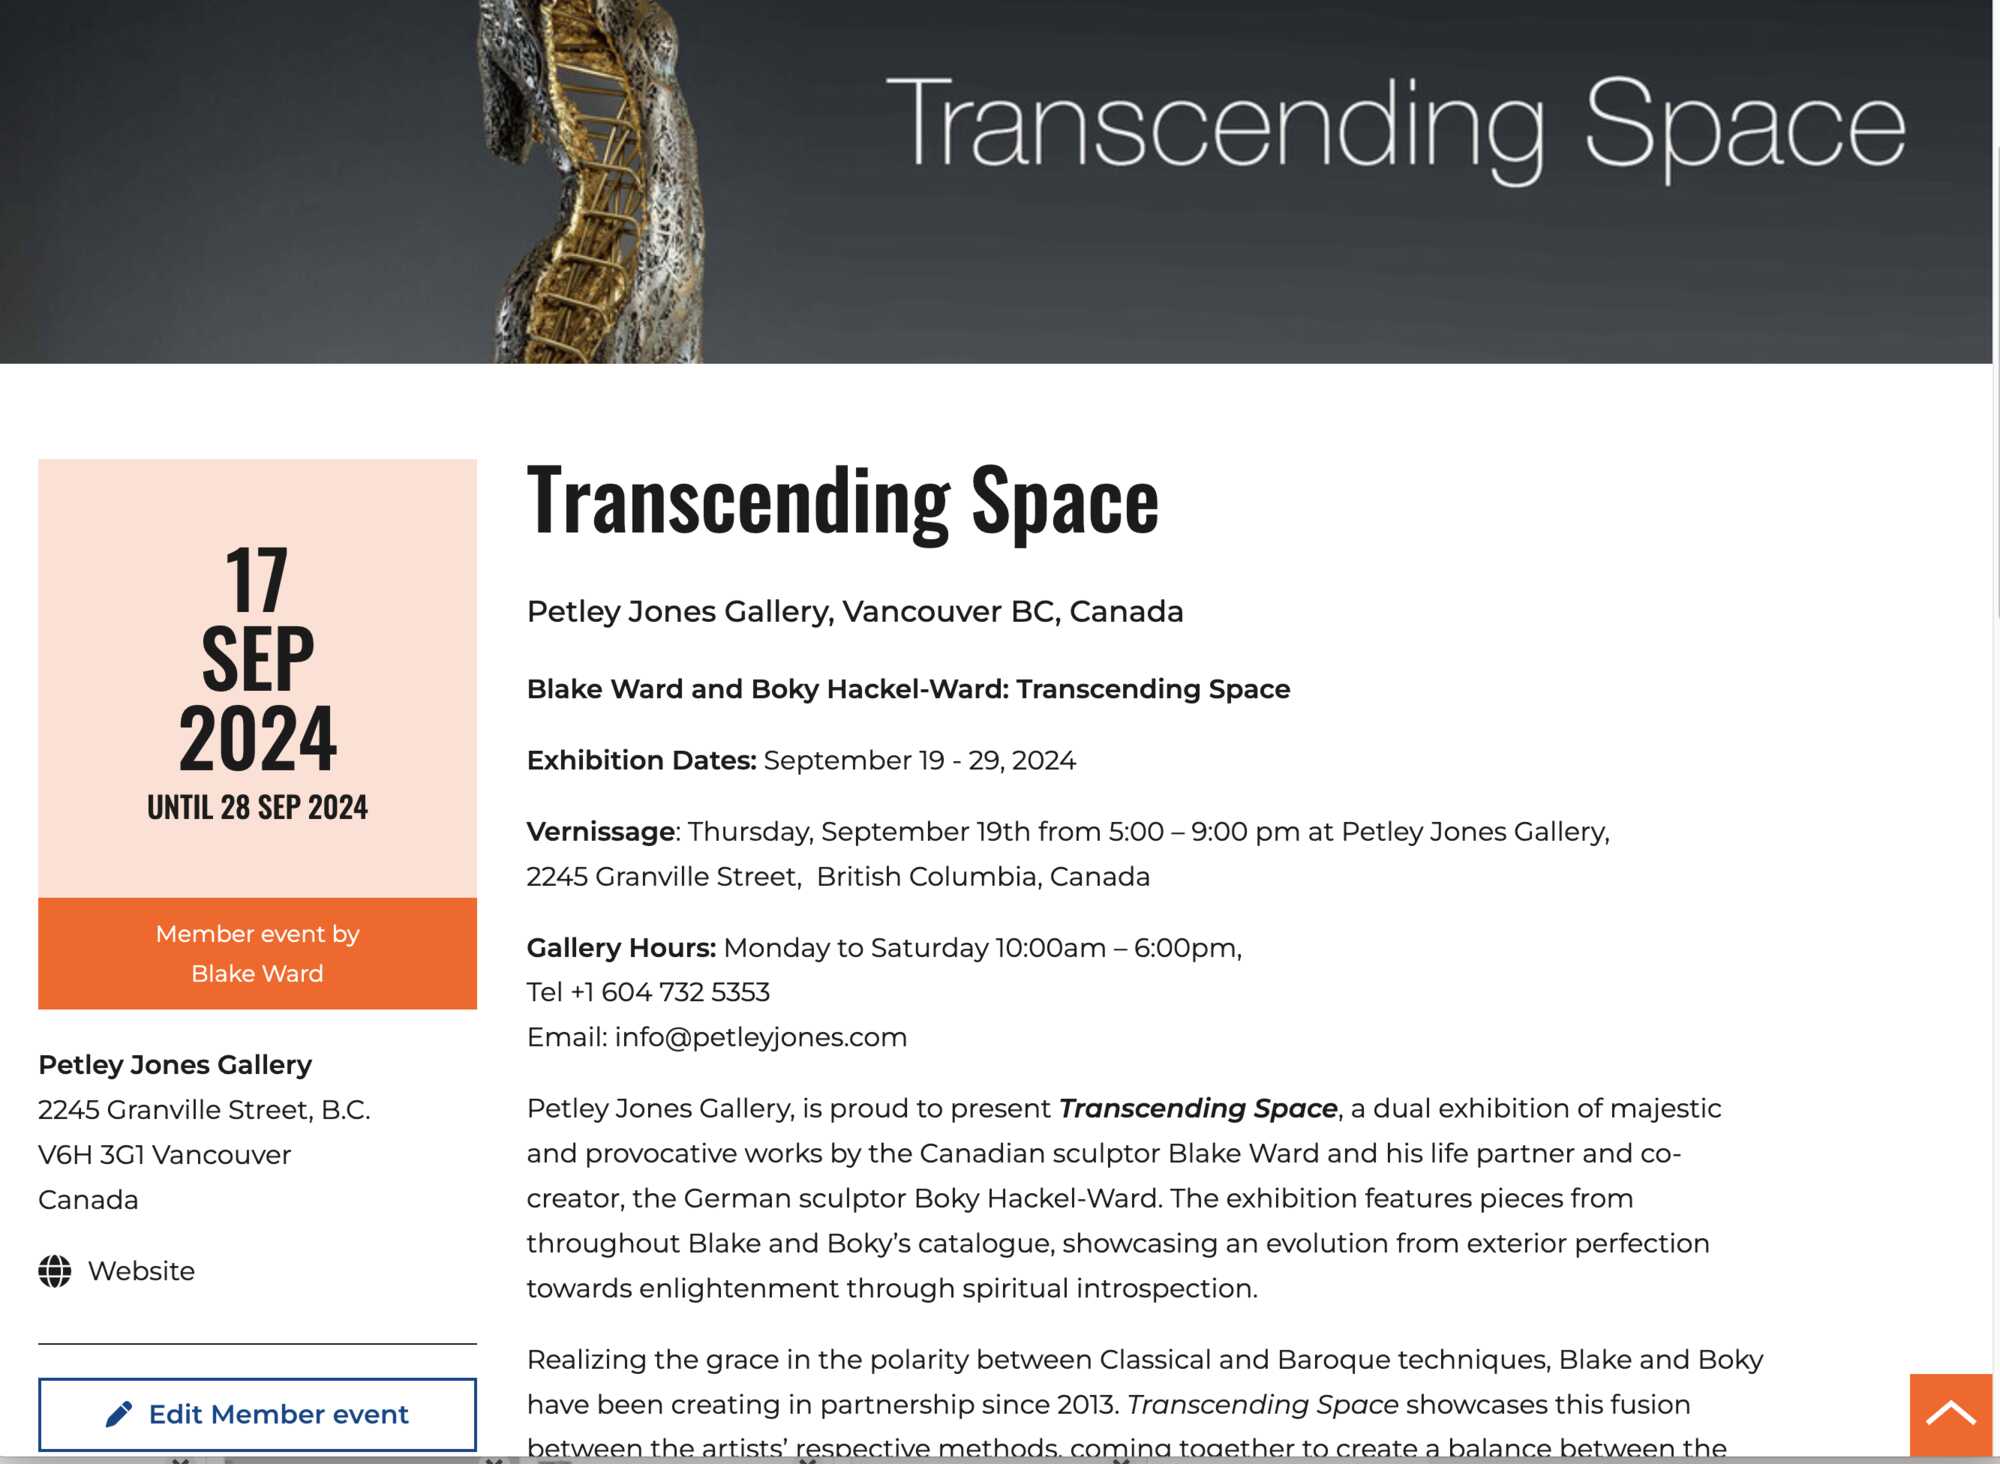
At this point I would go to the Save and View button in the top right hand corner of the Event page and take a look at your Event, to see that it looks good and there are not typos or other mistakes. Below is the example that I have created with you.
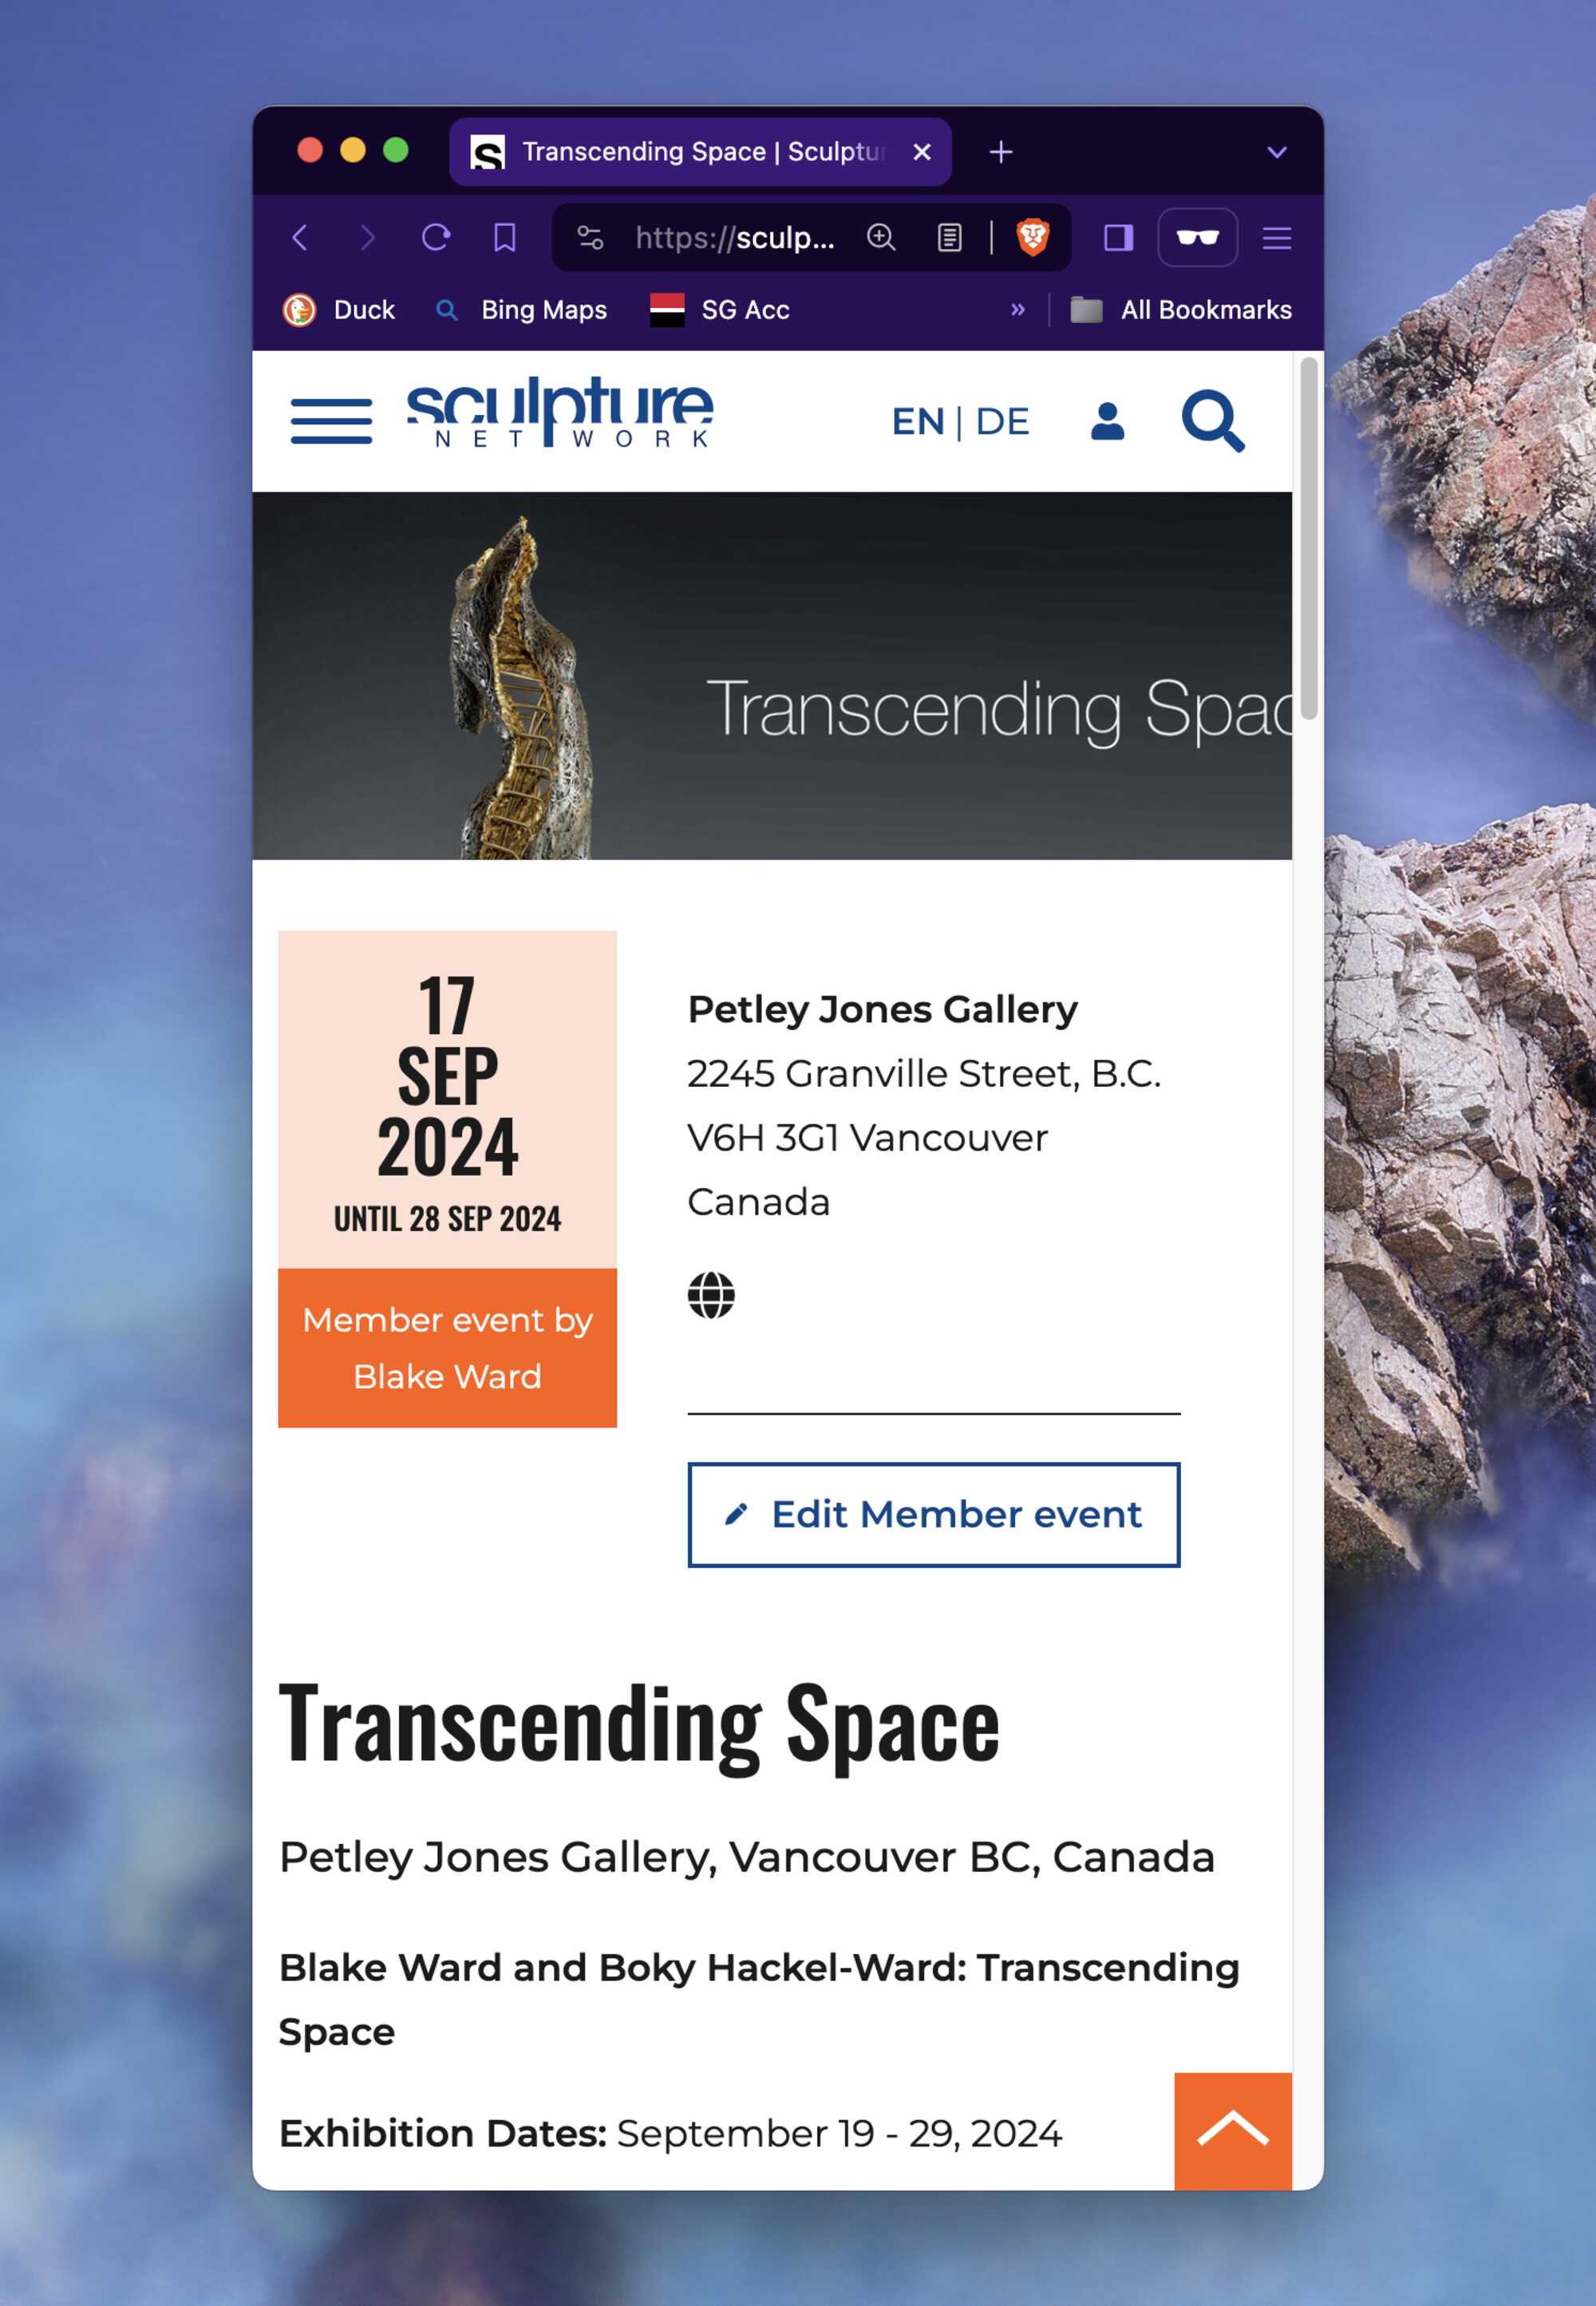
If you would like to see how it looks on a mobile phone, all you need to do is to drag the edge of this window over to make it as small as it will go and that is how the page will look on a phone.
After reviewing my Event page for a while I decided to make some changes in order to make my invitation, that I spent a lot of time creating, more evident, so I added the Preview photo to the Description text box by clicking on the little picture icon in the text bar to add a picture to the Description text box.
If you would like to add a picture or a .pdf document to your text in this Description section, click on the little square icon with a drawing of a mountain and a sun in it, (at least that is what I think that icon represents). It is found just after the “brake chain link” symbol. Any media; photographic: .jpg or .png, can added here using the same method as you used for your Profile pictures.
Any media; photographic: .jpg or .png, or .pdf can added here using the same method as you used for your media pictures. You already have the invite photo in the media memory, so just click on the picture icon and choose you invite photo and it will paste into the Description text box. I had to paste the photo a couple of times before I found the right place for the photo at the very top of the Description text box.
Now my Event page looks like this; below,
Perhaps, I don't need the Exhibition title three times, so I thought that I could go in and delete the main title, however if you do that then the website does not know what the title is, and that will cause your Event page to get lost, so you have to keep the main Title. So I would need to change the banner picture...... maybe later?
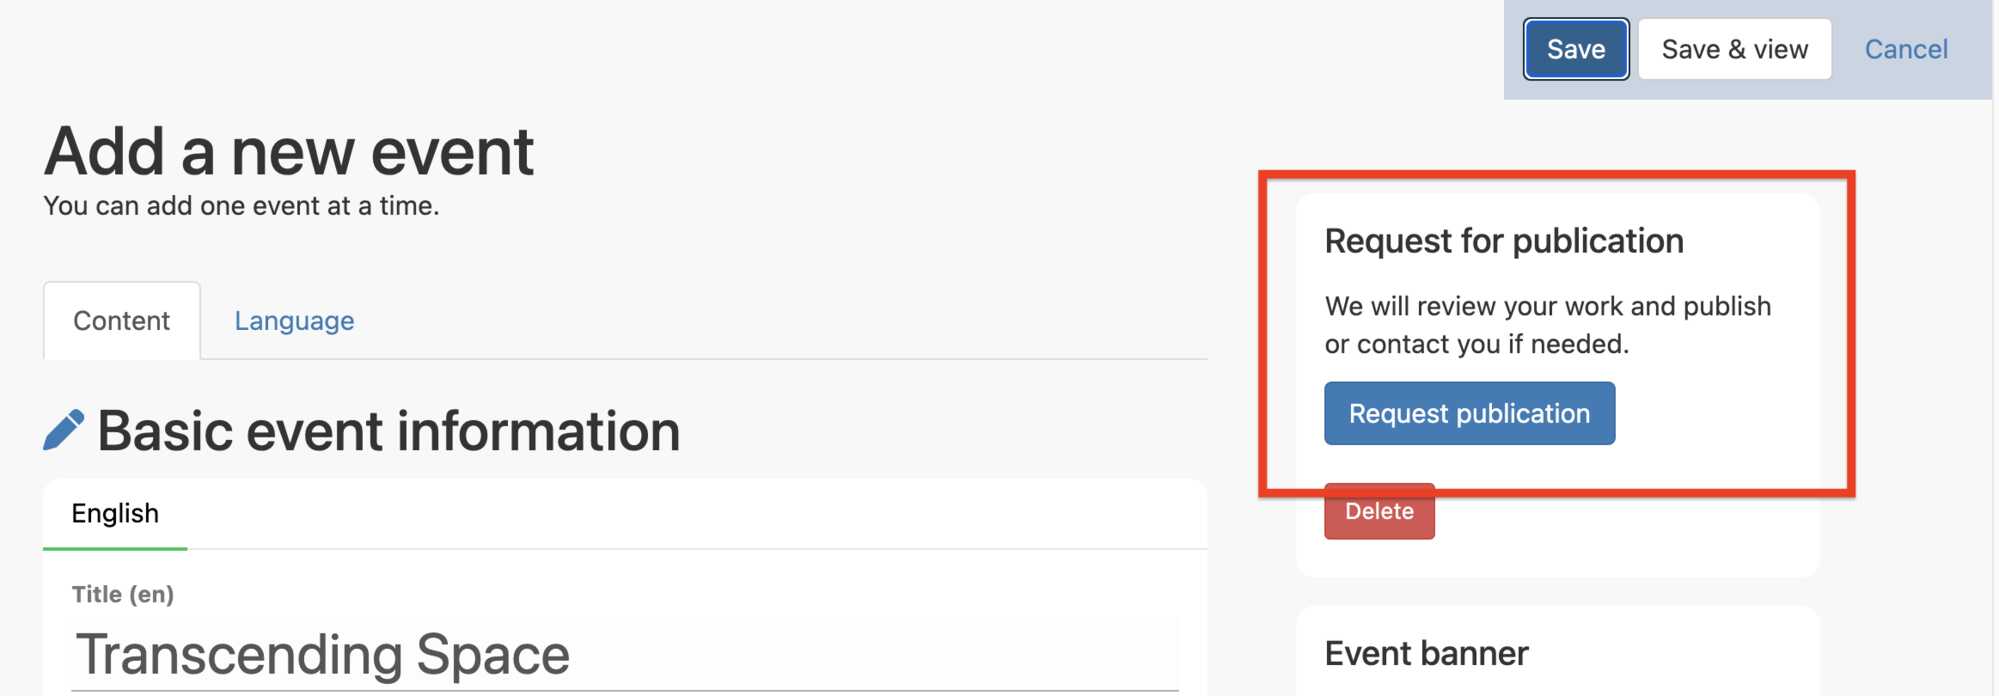
Once you are finished creating you Event page and have checked it and edited it and are completly satisfied that it is truely fantastic, then you need to click on the Edit Member Event button, one more time and go to the"back end" Add a new event page and click on the Request publication button in the Request for publication window, shown in the diagram below.
This will send a notification to the office and the wonderful staff will have quick look to ensure that all is well and then they will publish you Event on the Art Agenda page.
So wait a day or two and then go check out the Art Agenda page to ensure that it is there, you many have to go back a few pages to find it if there are a lot of Member Events on.
If after a couple of days you don't find your Event write the office at info@sculpture-network.org and mention it to the office staff... and if that doesn't work write me at blake@sculpture-network.org , and I will look into for you as soon as I can.
Find your Lost Event
Alright, you created your event, it was done but you didn't quite finish it and you closed your computer and now you can't find your event!. All you have to do is scroll all the way to the bottom of your Profile page and you will see your event at the very end, above the Footer. Even if you have not asked for it to be published, it will be waiting for you.
If you get this far, and have a few moments, please drop me a note to let me know where this document needs more work, if there are some areas that are not clear, or if I have repeated myself just too many times, or you found typos, mis-spellings, or corrections, or if you have any comments or ideas of how we can many this document better!