HELP: Add Artwork to your Profile
How to Add photographs of your sculpture to your Membership Profile
Video Tutorial at: http://youtube.com/watch?v=uN9muVgnt7o
Video tutorials:
How to add your artwork
Overview
- Add artwork to your profile
- Material Style and Theme
- Artwork factsheet
- Dimensions of multiple parts
- Description
- Text Bar
- Upload Images of the artwork
- Edit images of the Artwork
- Change the centre focal point, change preview image
- Change Picture Order
- Creating Collections of Artworks
- Find a Lost Photo
Add artwork to your profile
Sculpture Network Help Page: Add Artwork to your Profile.
Once you are a member of Sculpture Network you can add Photographs of your sculpture to your Profile, first Log In on the Sculpture Network website using the Log In button shown below.

When you are logged in this button will be replaced with the word Profile, click on this Profile button at the top of the page, it is shown in the red box in the image below.

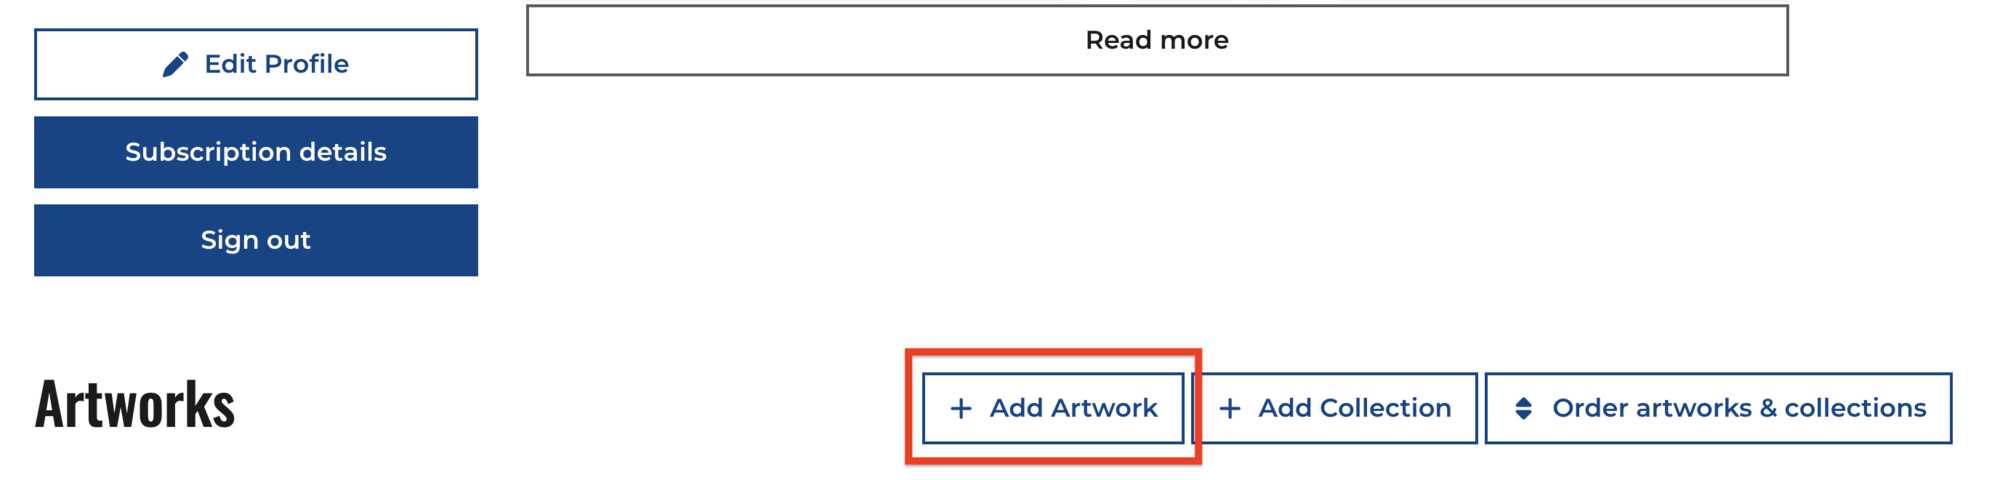
To Add Artworks to your Profile scroll down to the + Add Artwork button.
This is not where you put information about yourself, your personal information goes on your Profile Page. See the Sculpture Network Help Page: “Fill in your Profile".
This is all about your photographs.
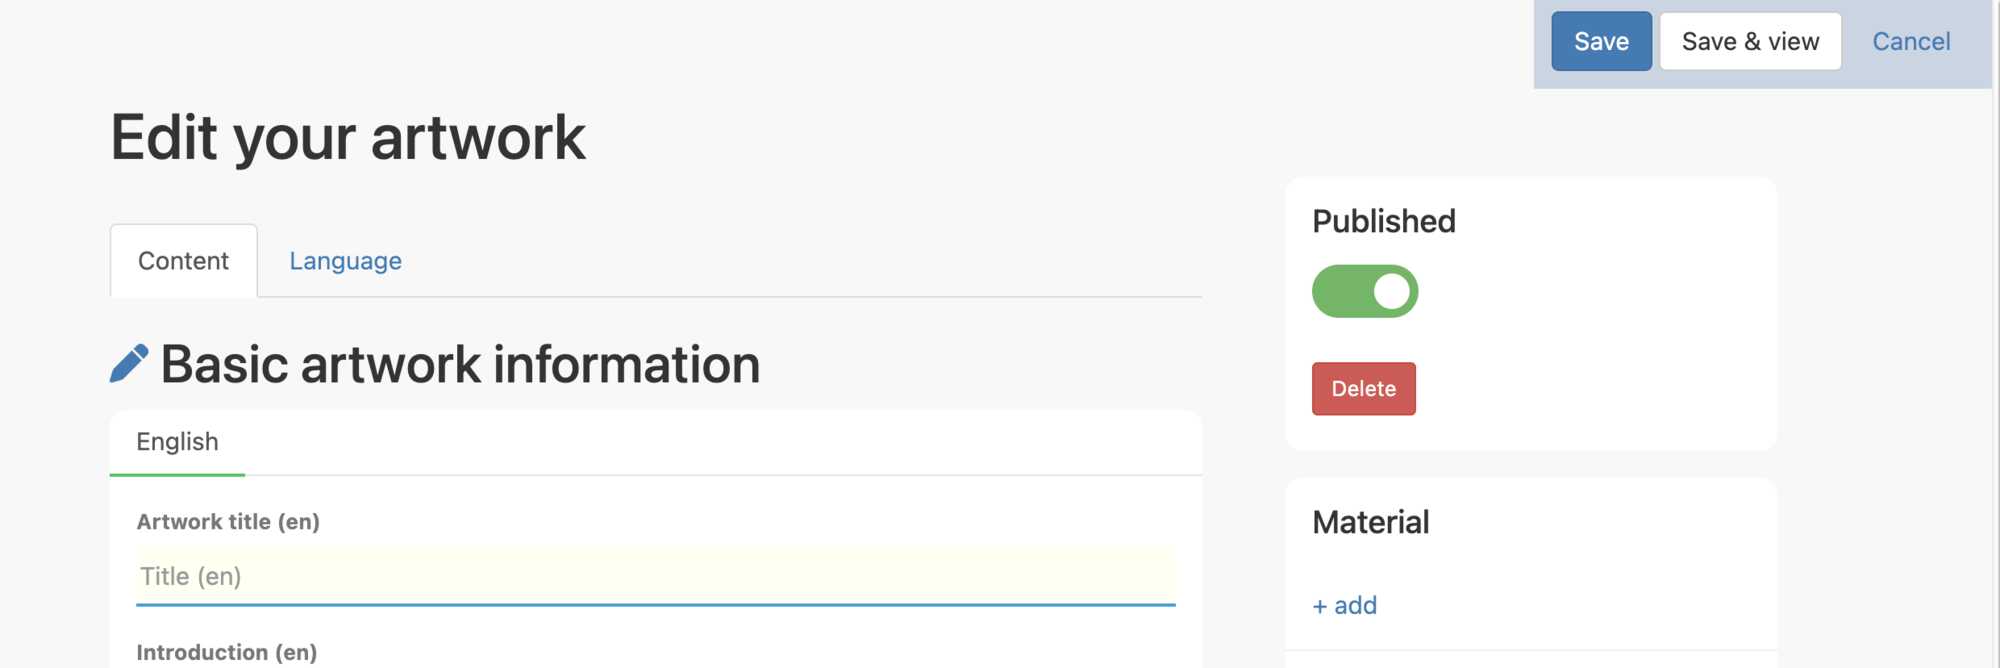
When you click on the + Add Artwork button down the page under the Read more button on the "front end" of your Profile page shown below, you will be taken to the "back end" of you Profile page.
The first section in the Add a new artwork window is marked by the number 1, under Basic artwork information we start with the title of the Sculpture, and just below we will add a summary in the introduction text box. Because this text will appear at the top just under the title of the artwork, I was careful to use this area to explain a few important details that I want the viewer to know. The first thing I wanted the viewer to know is that the sculpture is for sale. The other important message is how to contact me, so I added my email address, just in case they want to buy the sculpture. :)
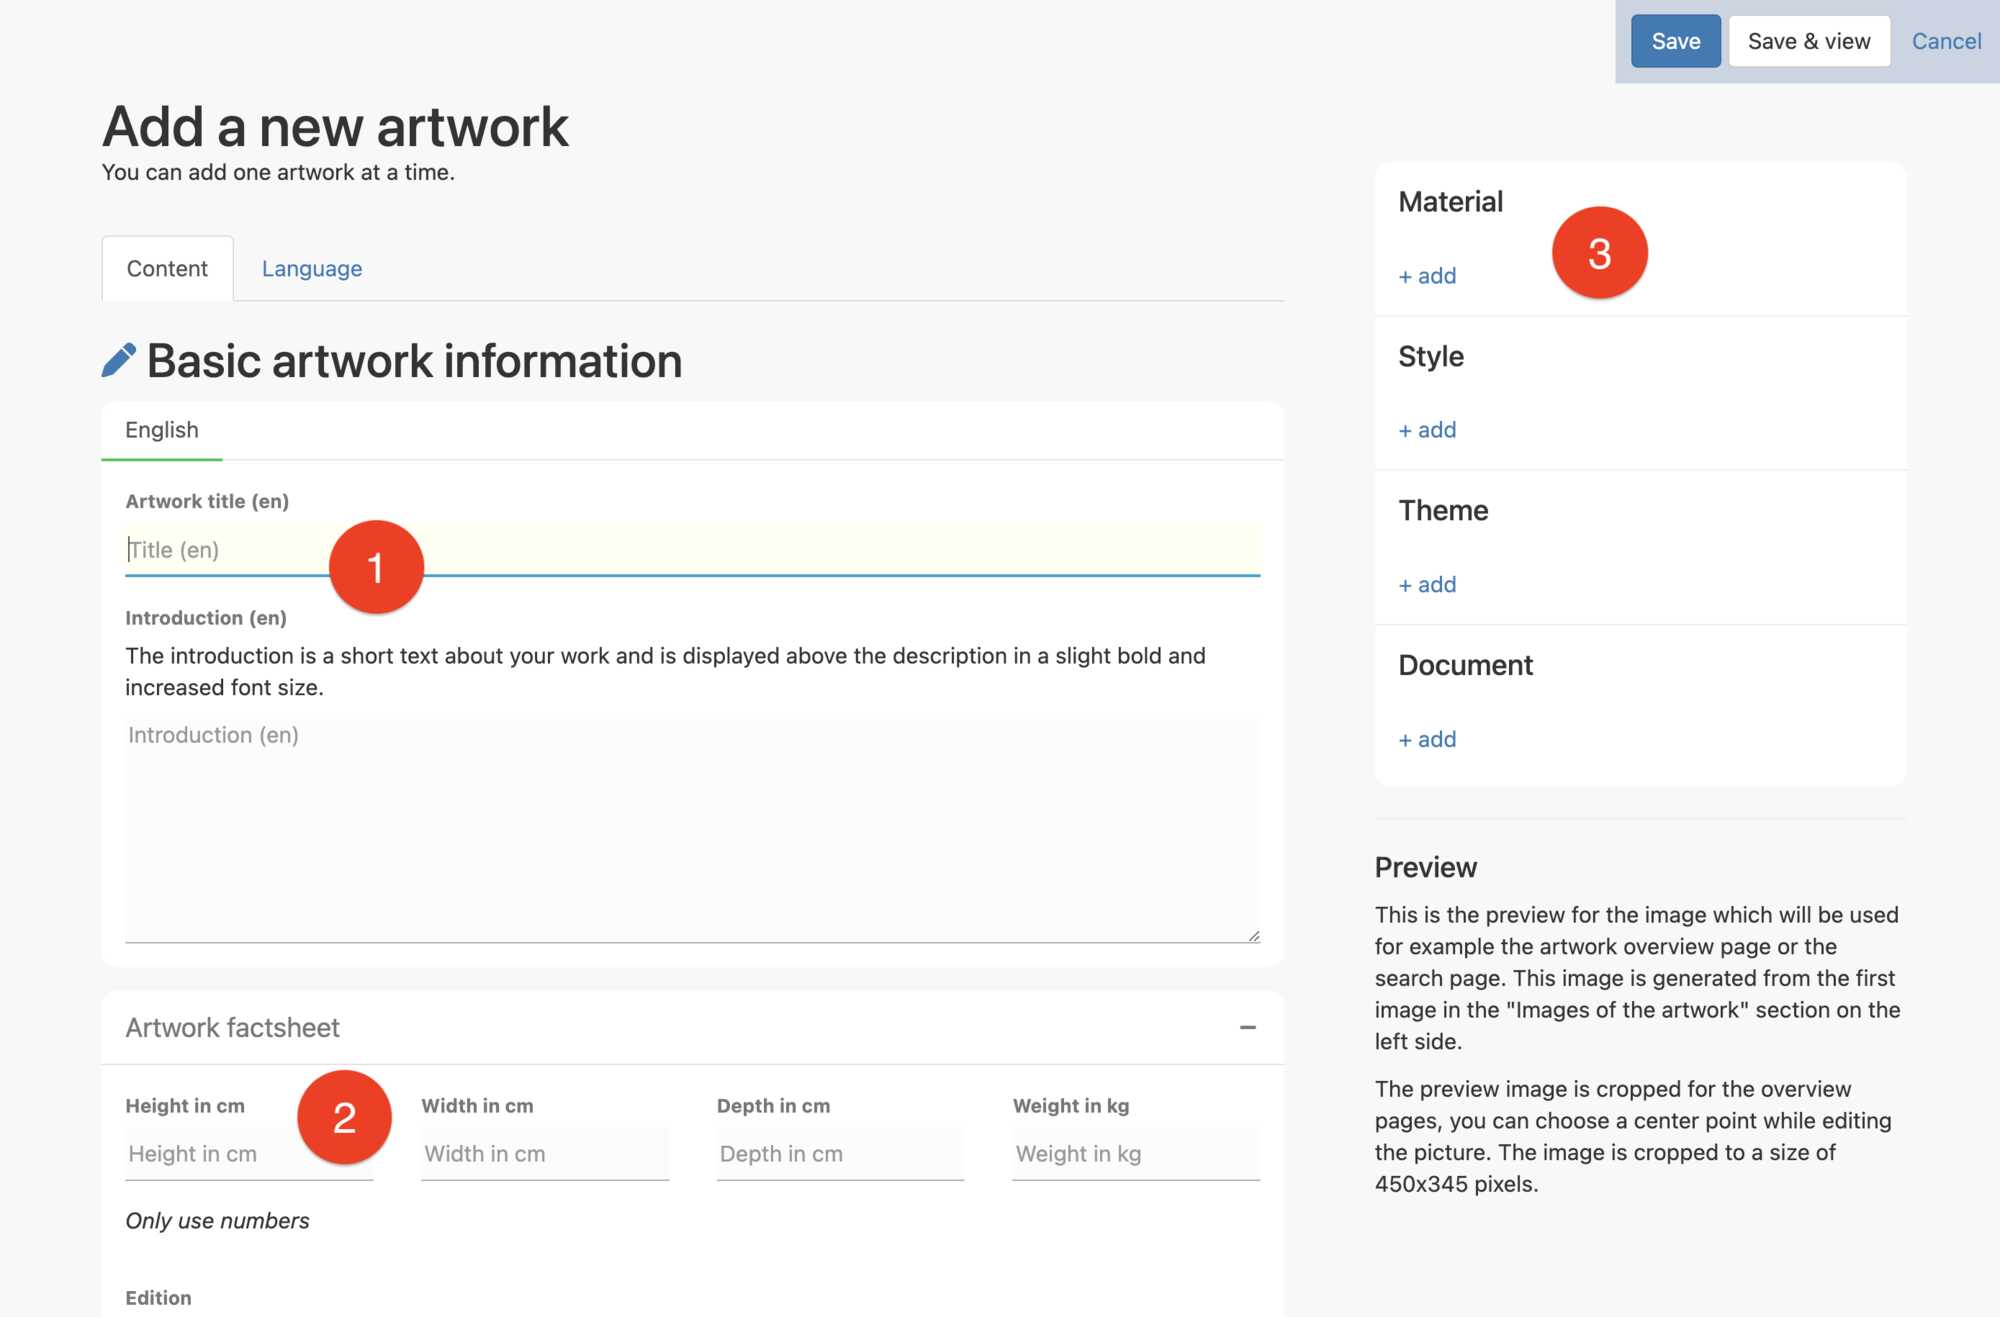
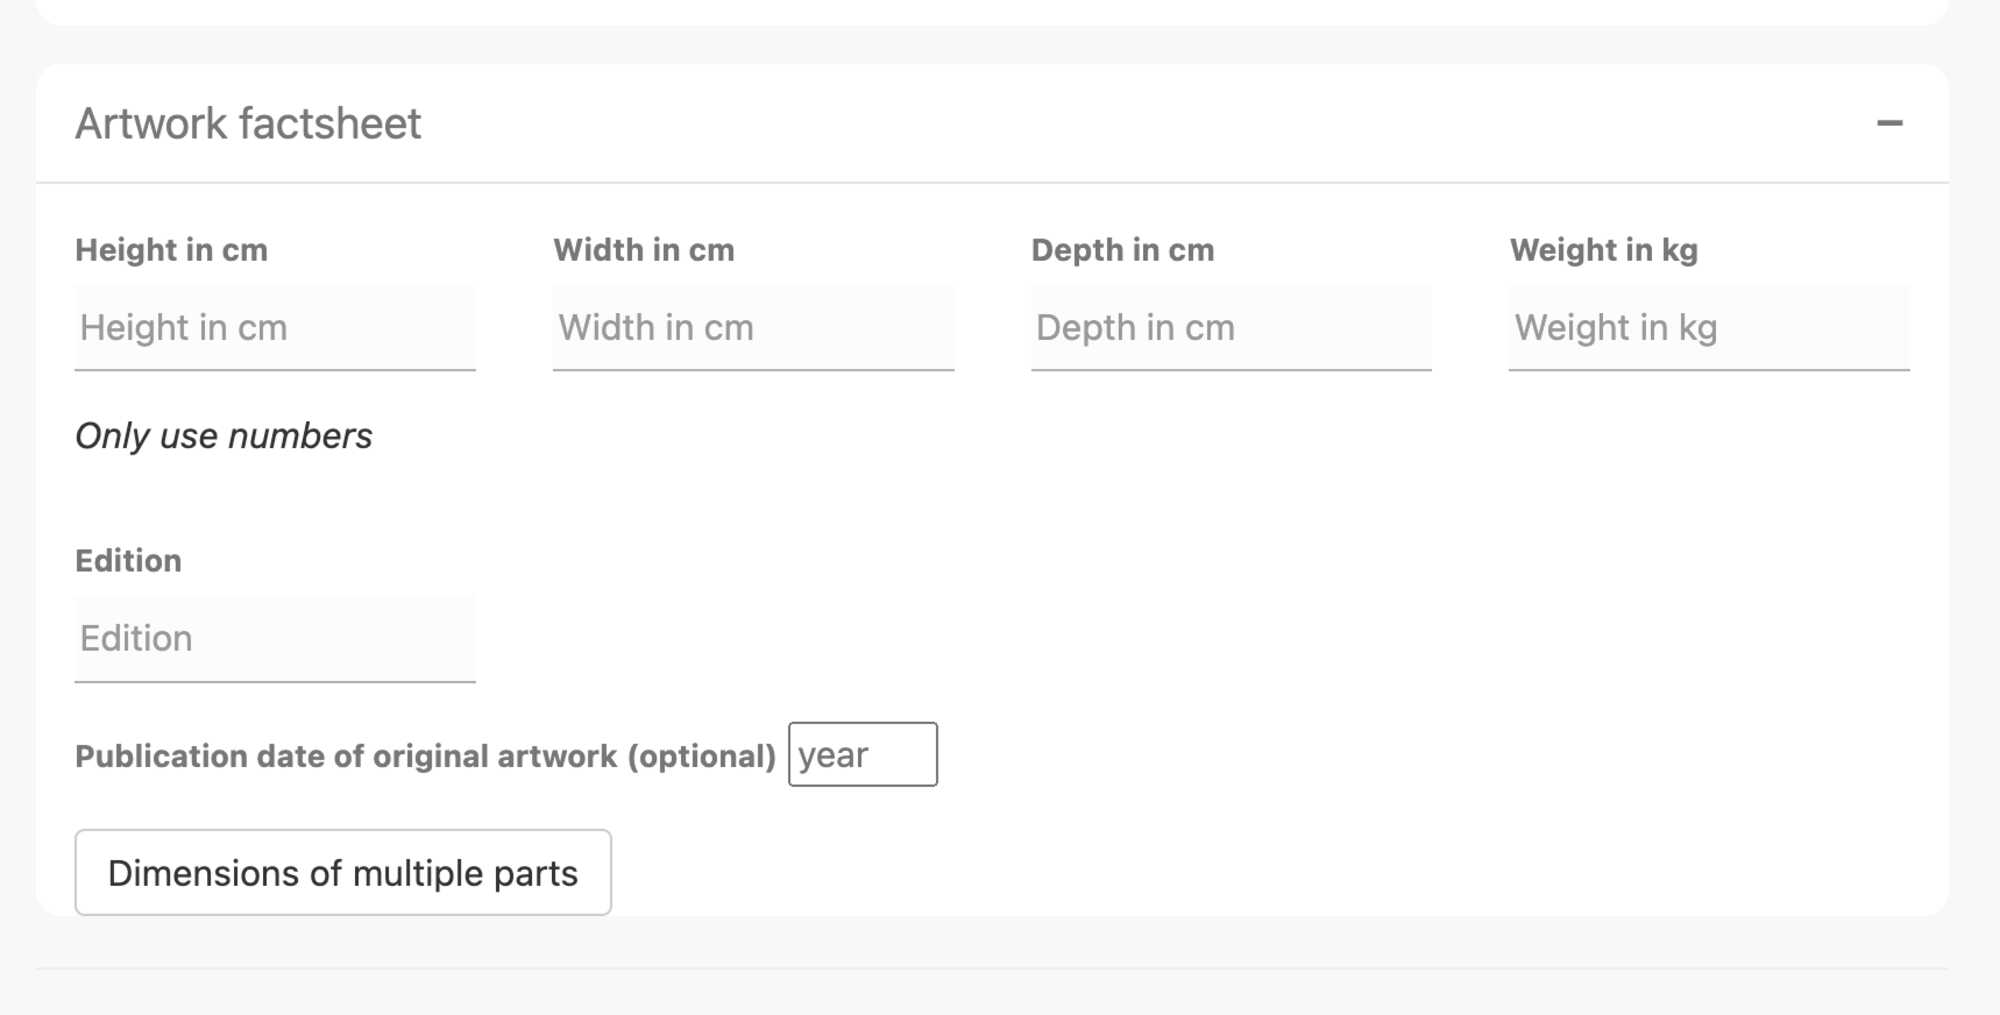
Next, the area marked as number 2, in the Artwork factsheet you will find a place for the dimensions of the sculpture. This information is important to complete so that interested viewers can tell actually how big the sculpture is, as it is often difficult to know from a photograph. There is also a place for the weight of the sculpture if you want to include this information. We will come back to the Artwork factsheet again later.
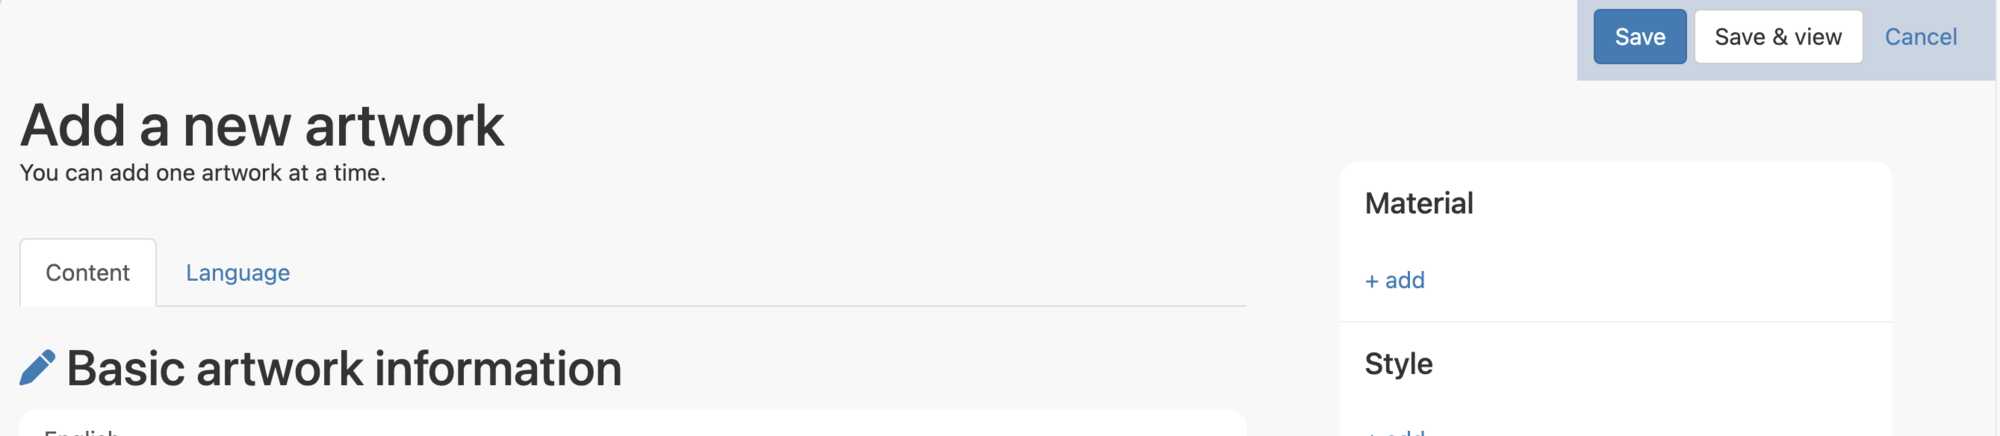
Material, Style, and Theme
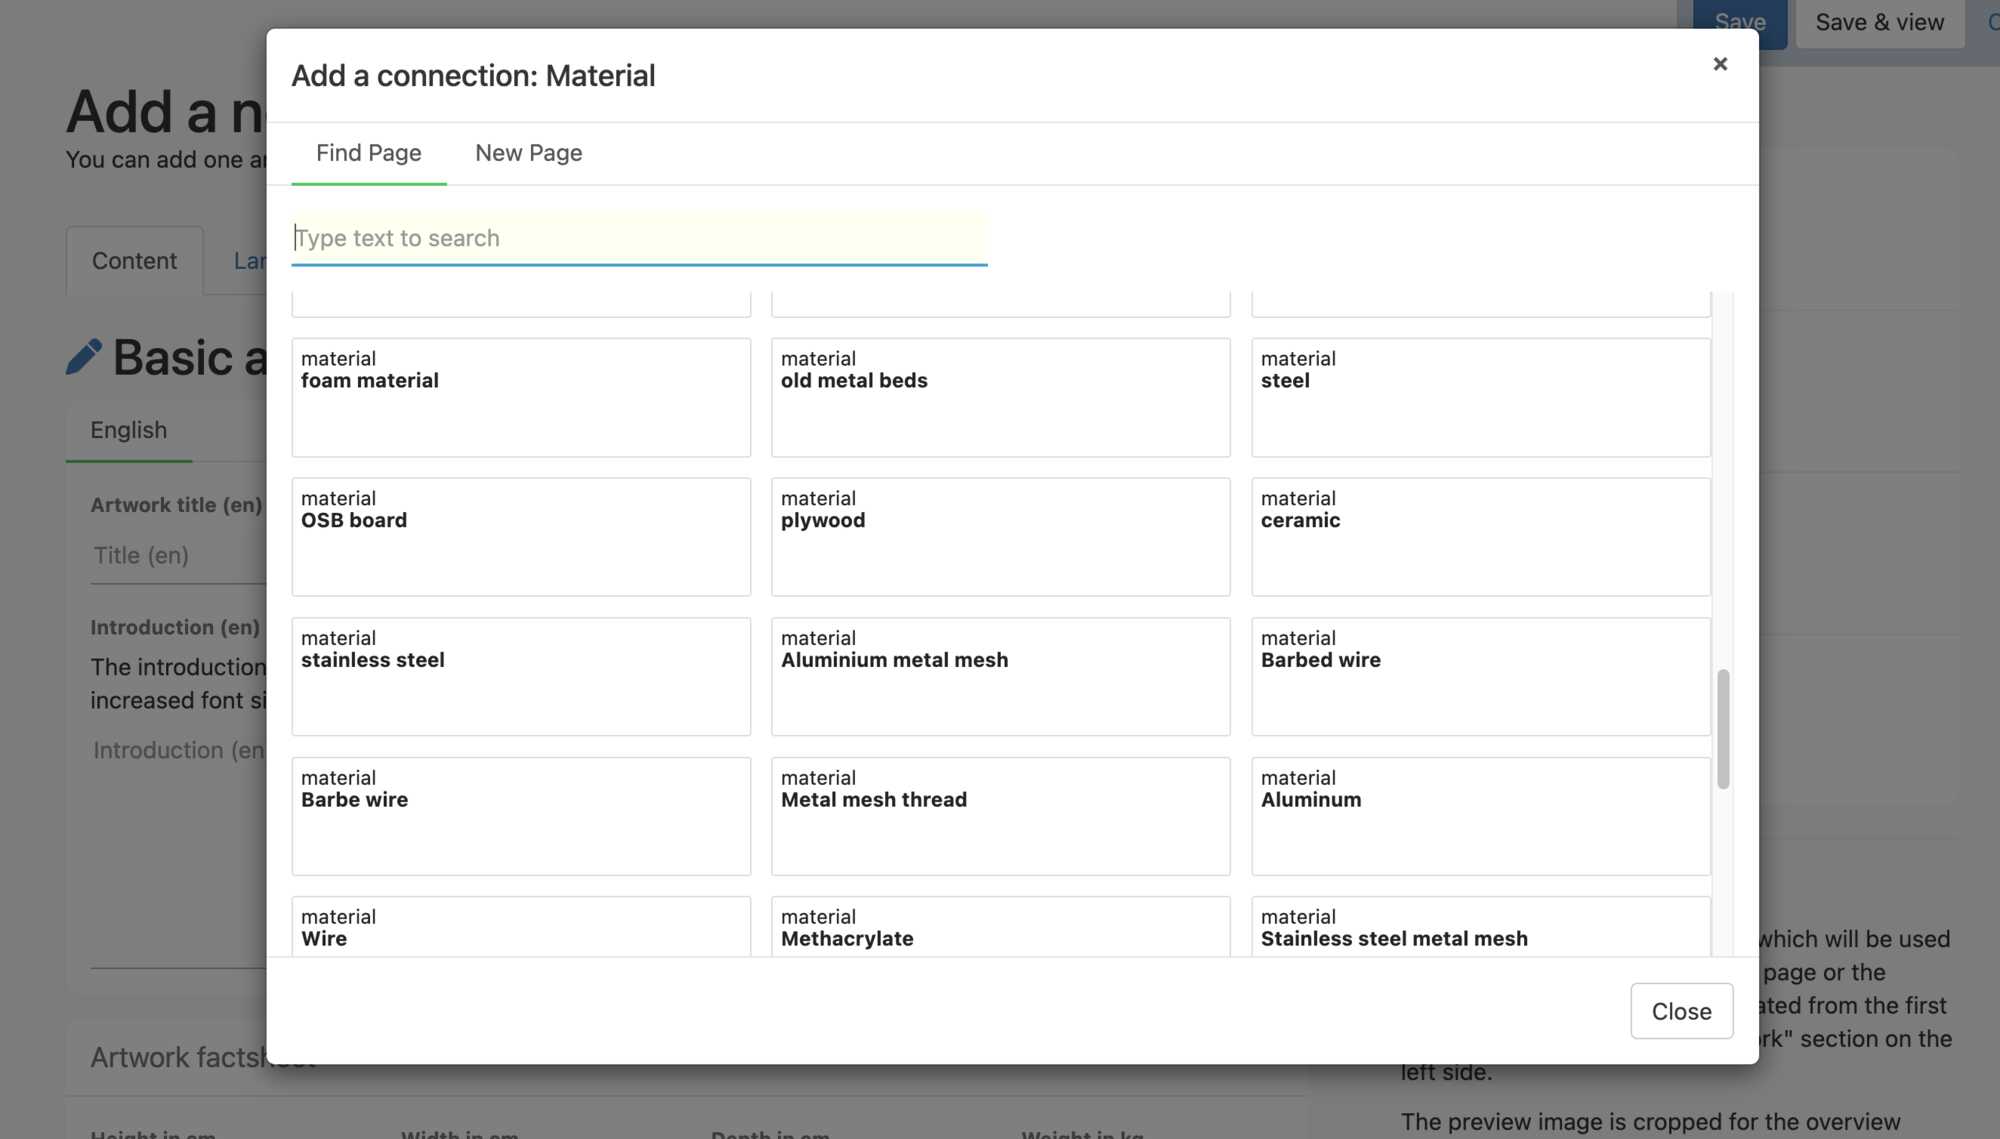
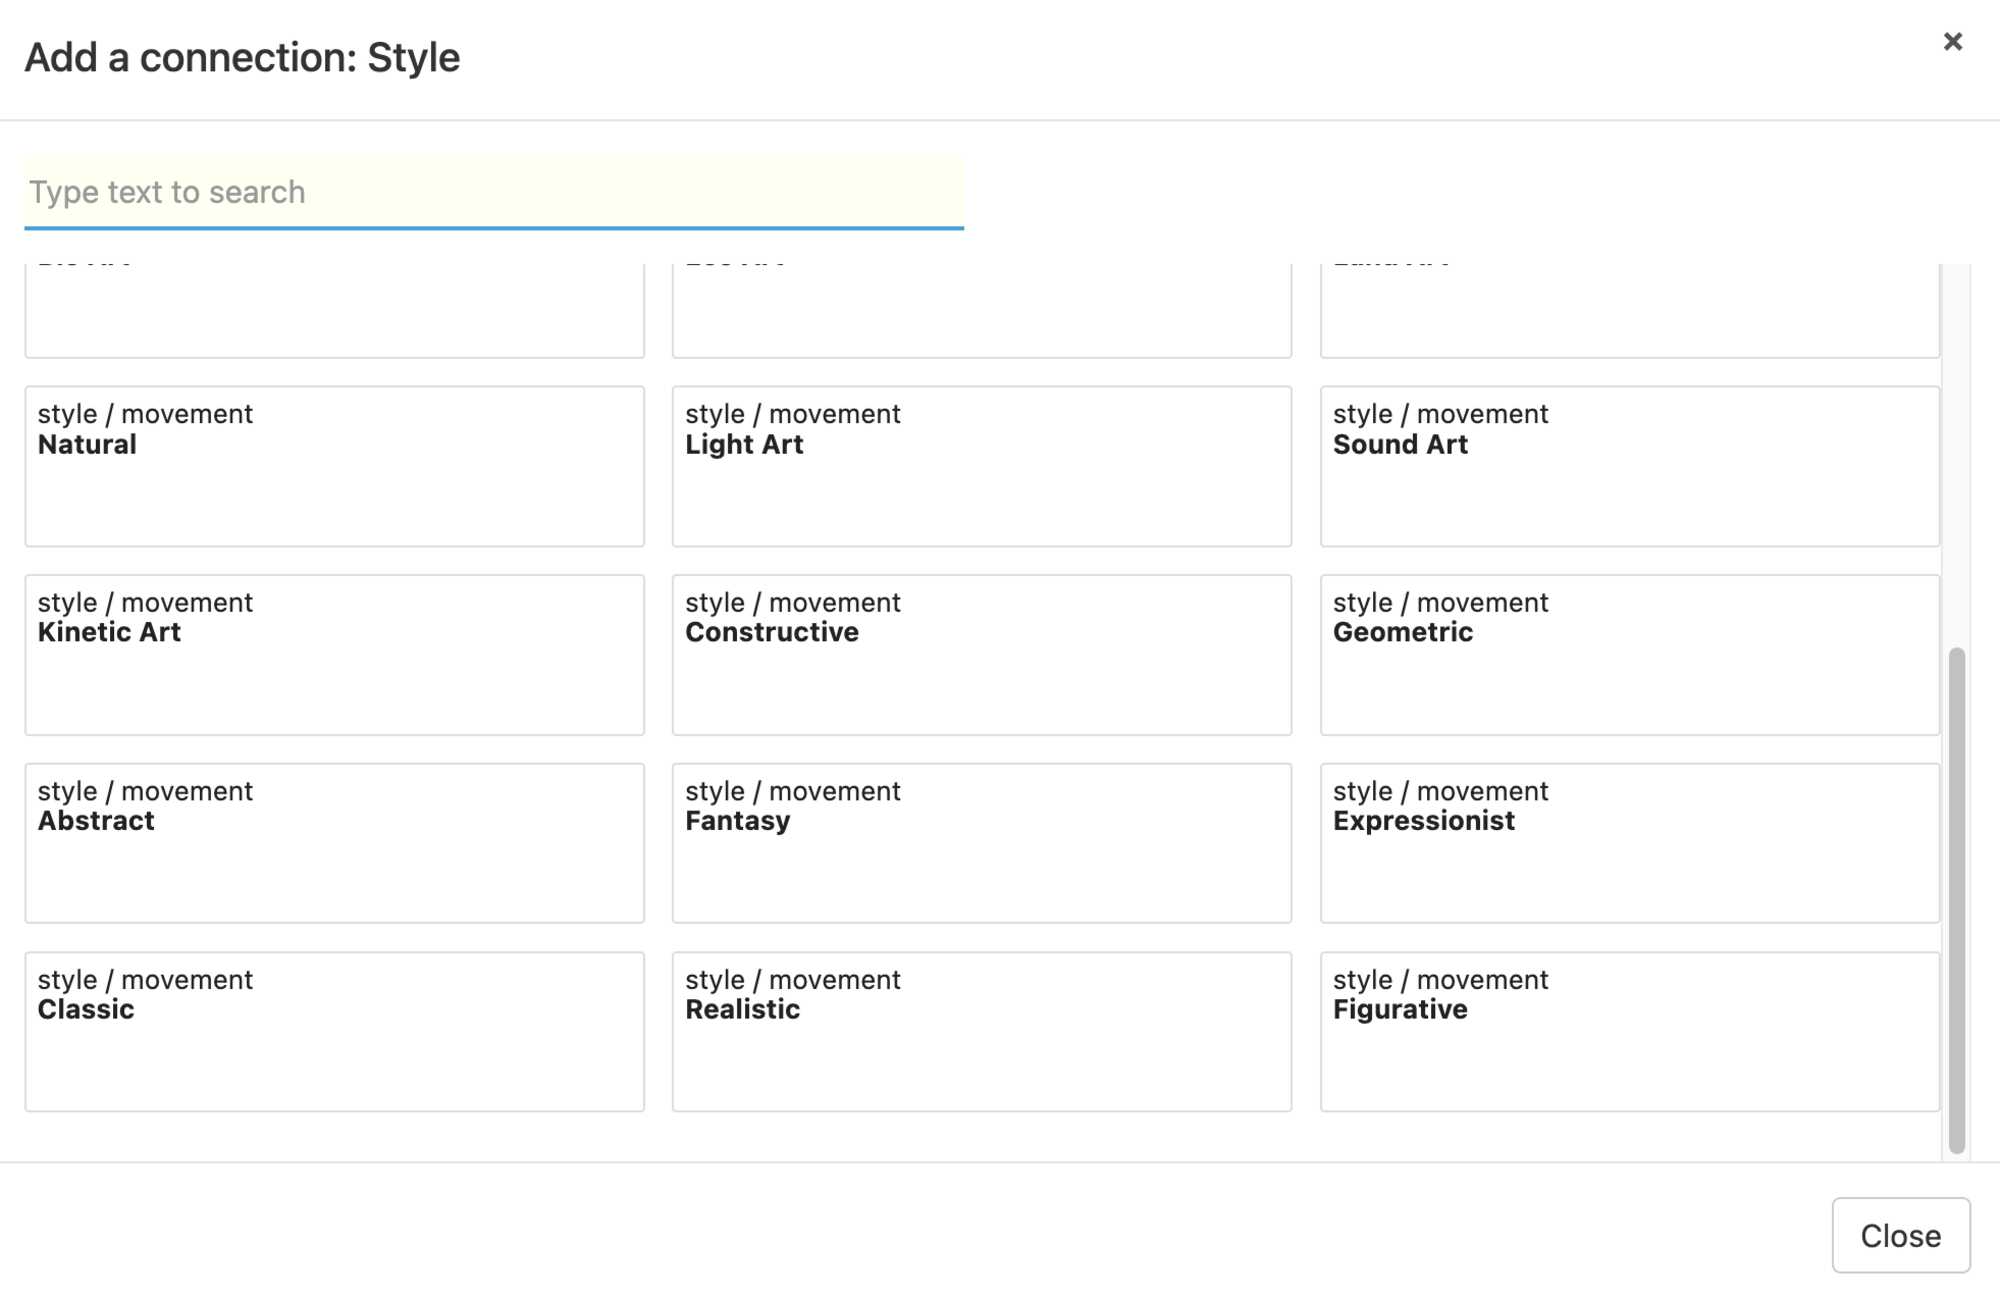
The area marked by the number 3 we can describe the Material, Style, and Theme to describe your artwork. When you click on the + add button, underneath each of the headings you will get a drop- down window that will list a number of materials, styles and themes that are used in creating your unique and personal artworks.
Choose one or more as you feel is appropriate. Why is this important?
You might think that this is an unnecessary step, after all the viewer can see that my sculpture is figurative and in bronze.
However, these “keywords” are not there for the average viewer, they are there as part of the search function on our website, further, just as important, they are there for the Google search engines, so that our website becomes easier to find on the Internet in general.
They are also important because Art Critics and Curators and even Collectors, often want to search for a specific types, styles or themed sculpture for their upcoming exhibitions or to buy for their homes.
So please help Sculpture Network to become easier for the search engines to find on the internet and the “go to” site for Curators and Buyers.
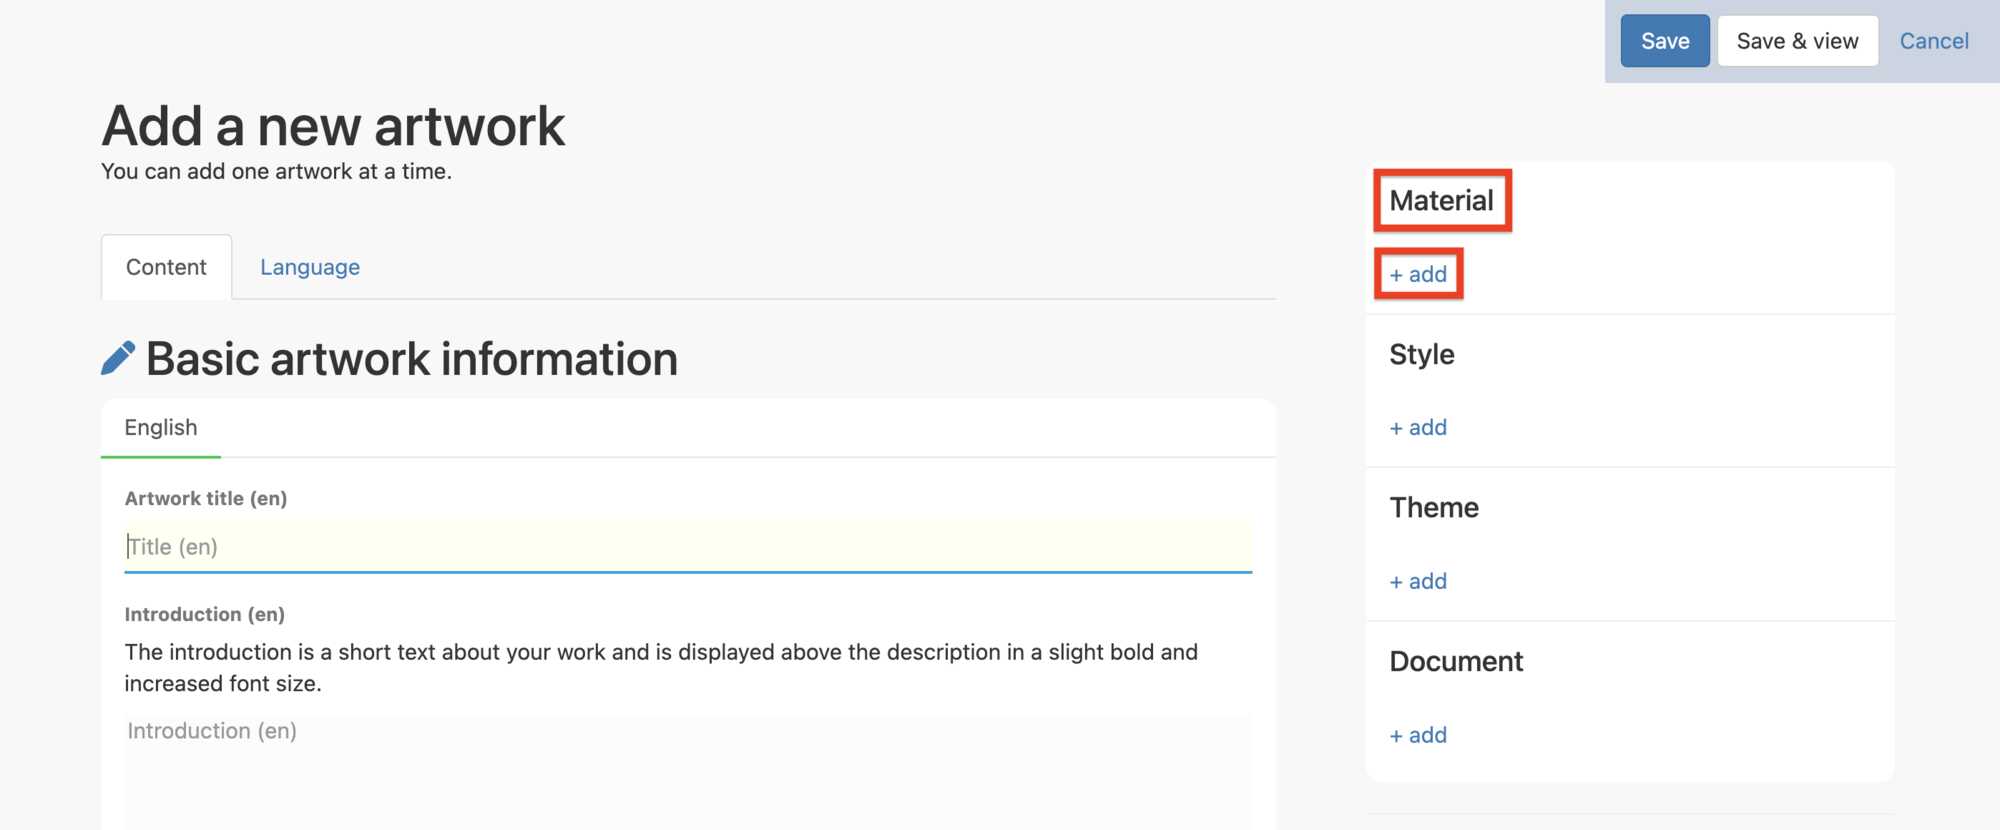
When you click on the +add button below each of the section Titles, a menu appears with a great selection to choose from.
Under Material, for example, there are 114 materials listed, you can choose as many as you think are appropriate from the list, to describe the materials that you have used to build you artwork.
The Style button provides 24 different "styles" to choose from, please use as many as you think apply to your work.
Likewise for the category of Theme, by clicking on the +add button you will be offer a window containing 12 different categories of subject matter to choose from, again these “keywords” are an important part of the search function on our website and will help visitors to our site find your sculpture.
The last category offered is Document, where you can upload .pdf files concerning the artwork, such as press articles or invitations. As well, videos can by upload to this section for display on your profile.
Artwork factsheet
Coming back to the Artwork factsheet shown below, as we said earlier, the first area describes the size and weight of the sculpture, below this there is another important section where you can add information concerning the number of examples in each edition, and the year in which the work was created. "Edition numbers" are important to include for perspective clients, as they indicate how many examples of a sculpture have been made, or if your sculpture is a "Unique piece", and there is only one exampl existing.
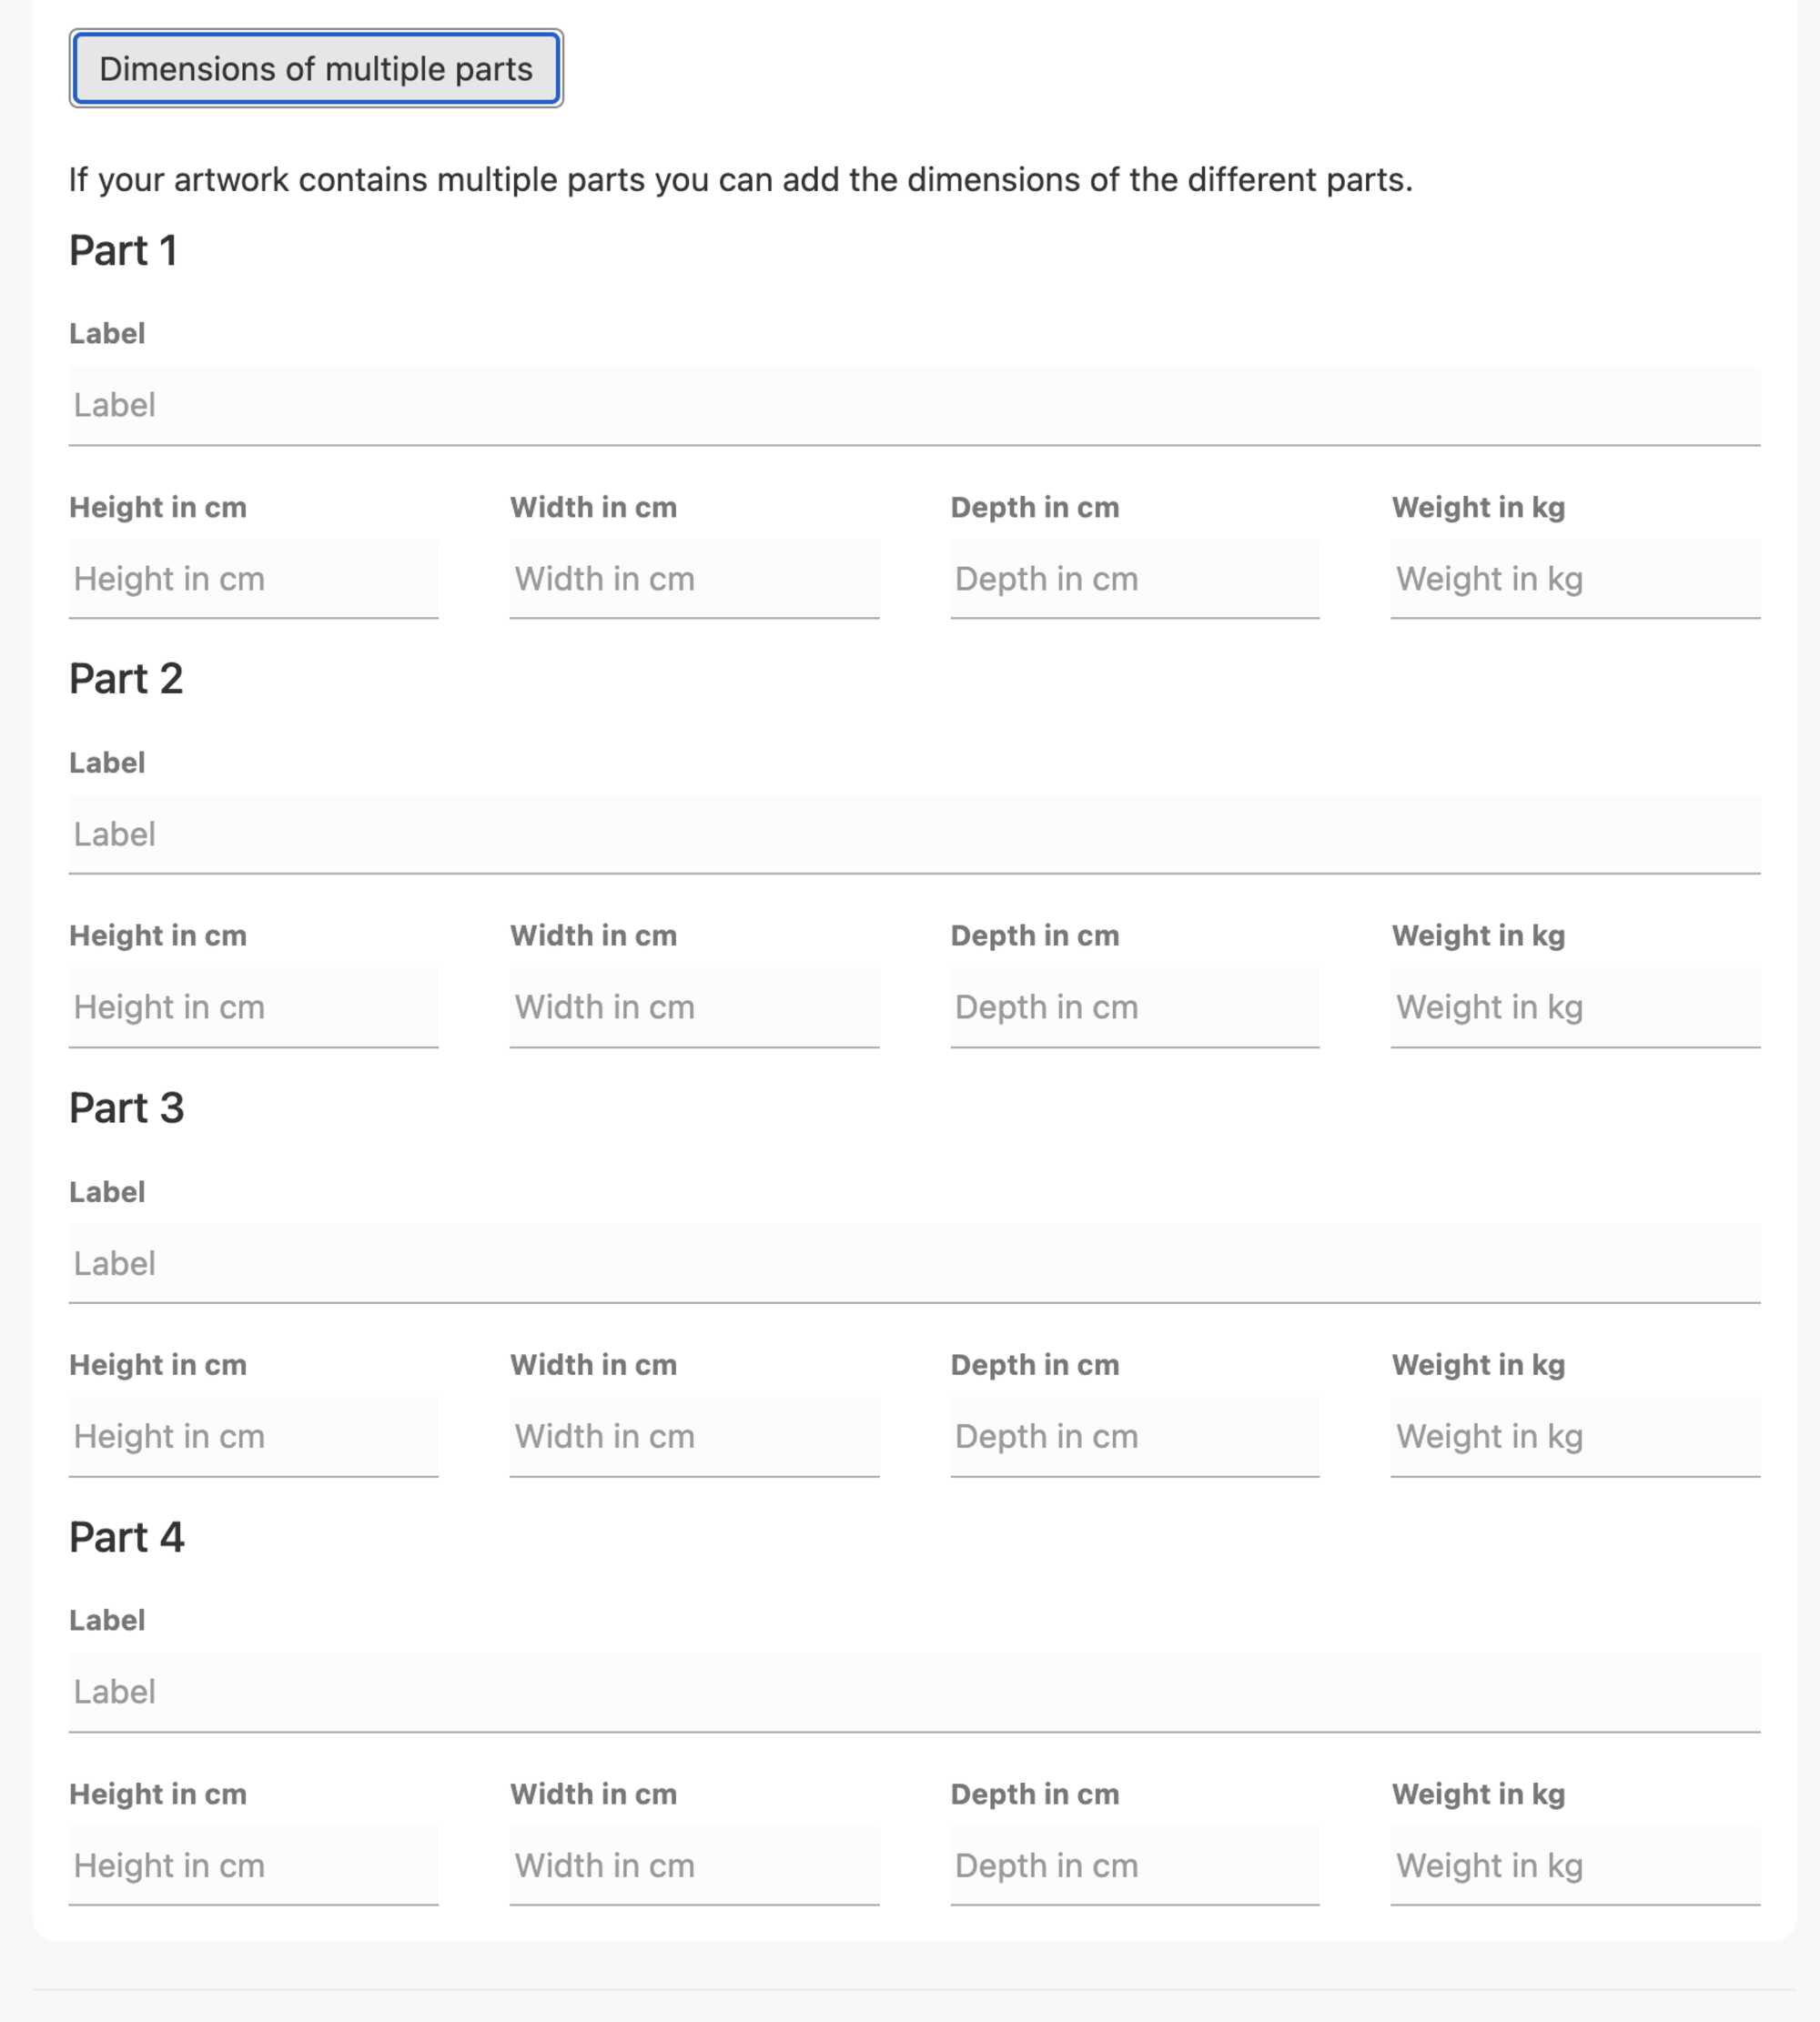
In the case that your artwork consists of multiple pieces, the last area Dimensions of multiple parts will give you a window in which you can include the Height, Width, Depth and Weight of up to 4 parts.
Dimensions of multiple parts
Description
The last section of the Basic artwork information that you will want to include is the Description of your artwork.
In the area beneath the "Text Bar" outlined by the long red rectangle and identified by the number 1, in the diagram below, is the section where you can copy and paste an almost unlimited amount of text describing the specific sculpture that you are posting.
Text Bar

The Text Bar offers some editing tools relating to this Description window text box, they are as follows, from right to left:
The small p stands for paragraph, if you click in this area, a pop up window offers some tools you can use to insert larger text i.e., h2 and h3, as well as, some other text options, should you want to put bigger titles into your description.
The capital "I" with a small x beside it, is a Delete Format button that might help you when pasting copied items into your “Description” text box.
If you paste your text into the text box and you get a very small column of five words per line, or something like that, then try highlighting your text once you have pasted it in and click on the delete format button and see if that helps. If that does not work, try removing the text and pasting it another program, like MS Word, and click on "Keep Text Only" to remove any formatting that was programmed into the text.
This is followed by an Insert Table setting for creating tables with rows and columns.
"B" stands for Bold text, and "I" for Italics.
Next you will find two icons for two different types of Bullet points.
The Chain link icon will allow you to insert a “link to” an external webpage, remember to include (https://) at the beginning of the URL address.
The “Broken link” beside the Chain link symbol will remove or break that link.
If you would like to add a picture or a .pdf document into your text, click on the little square icon with a drawing of a mountain and a sun in it, (at least that is what I think that icon represents). It is found just after the “brake chain link” symbol. Any photographic media; .jpg or .png, can added here using the method that is used in the "Upload Images of the artwork" section found in the following section of the document.
The last symbol; <> is for “source code” for those who know what you are doing… otherwise please ignore this symbol. Thanks.
Upload Images of the artwork
Starting on the "front end" of your Profile page click on the + Add Artwork button as shown on the page below, under the Read more button, and you will be taken to the "back end" of you Profile page as shown on the next diagram below.
You land on the Add a new artwork page, shown below.
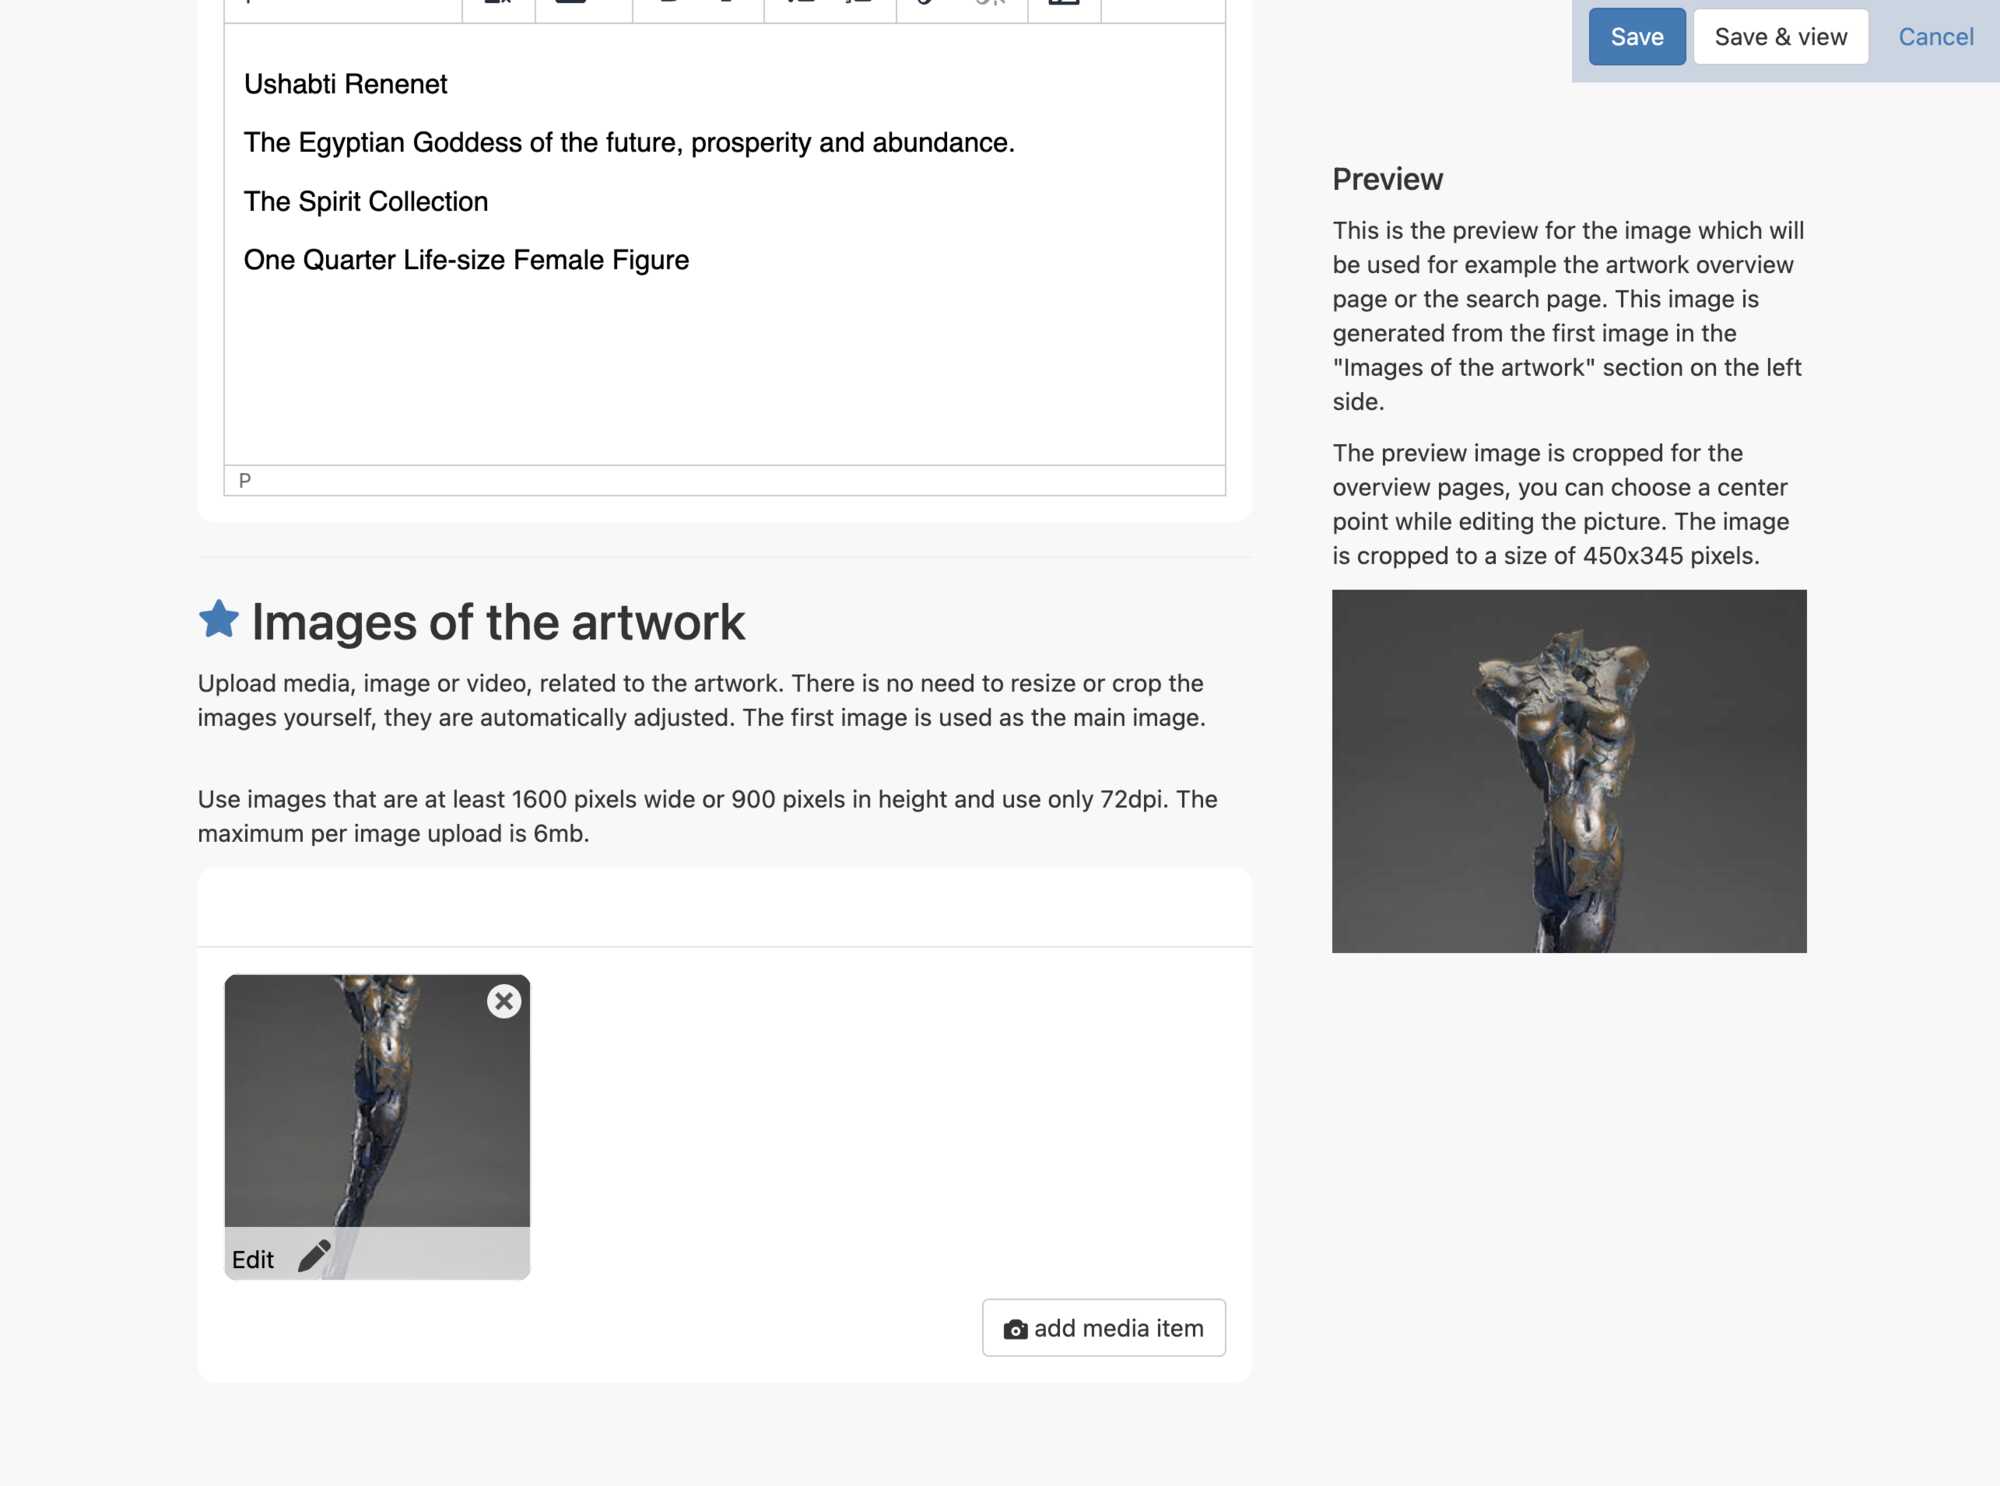
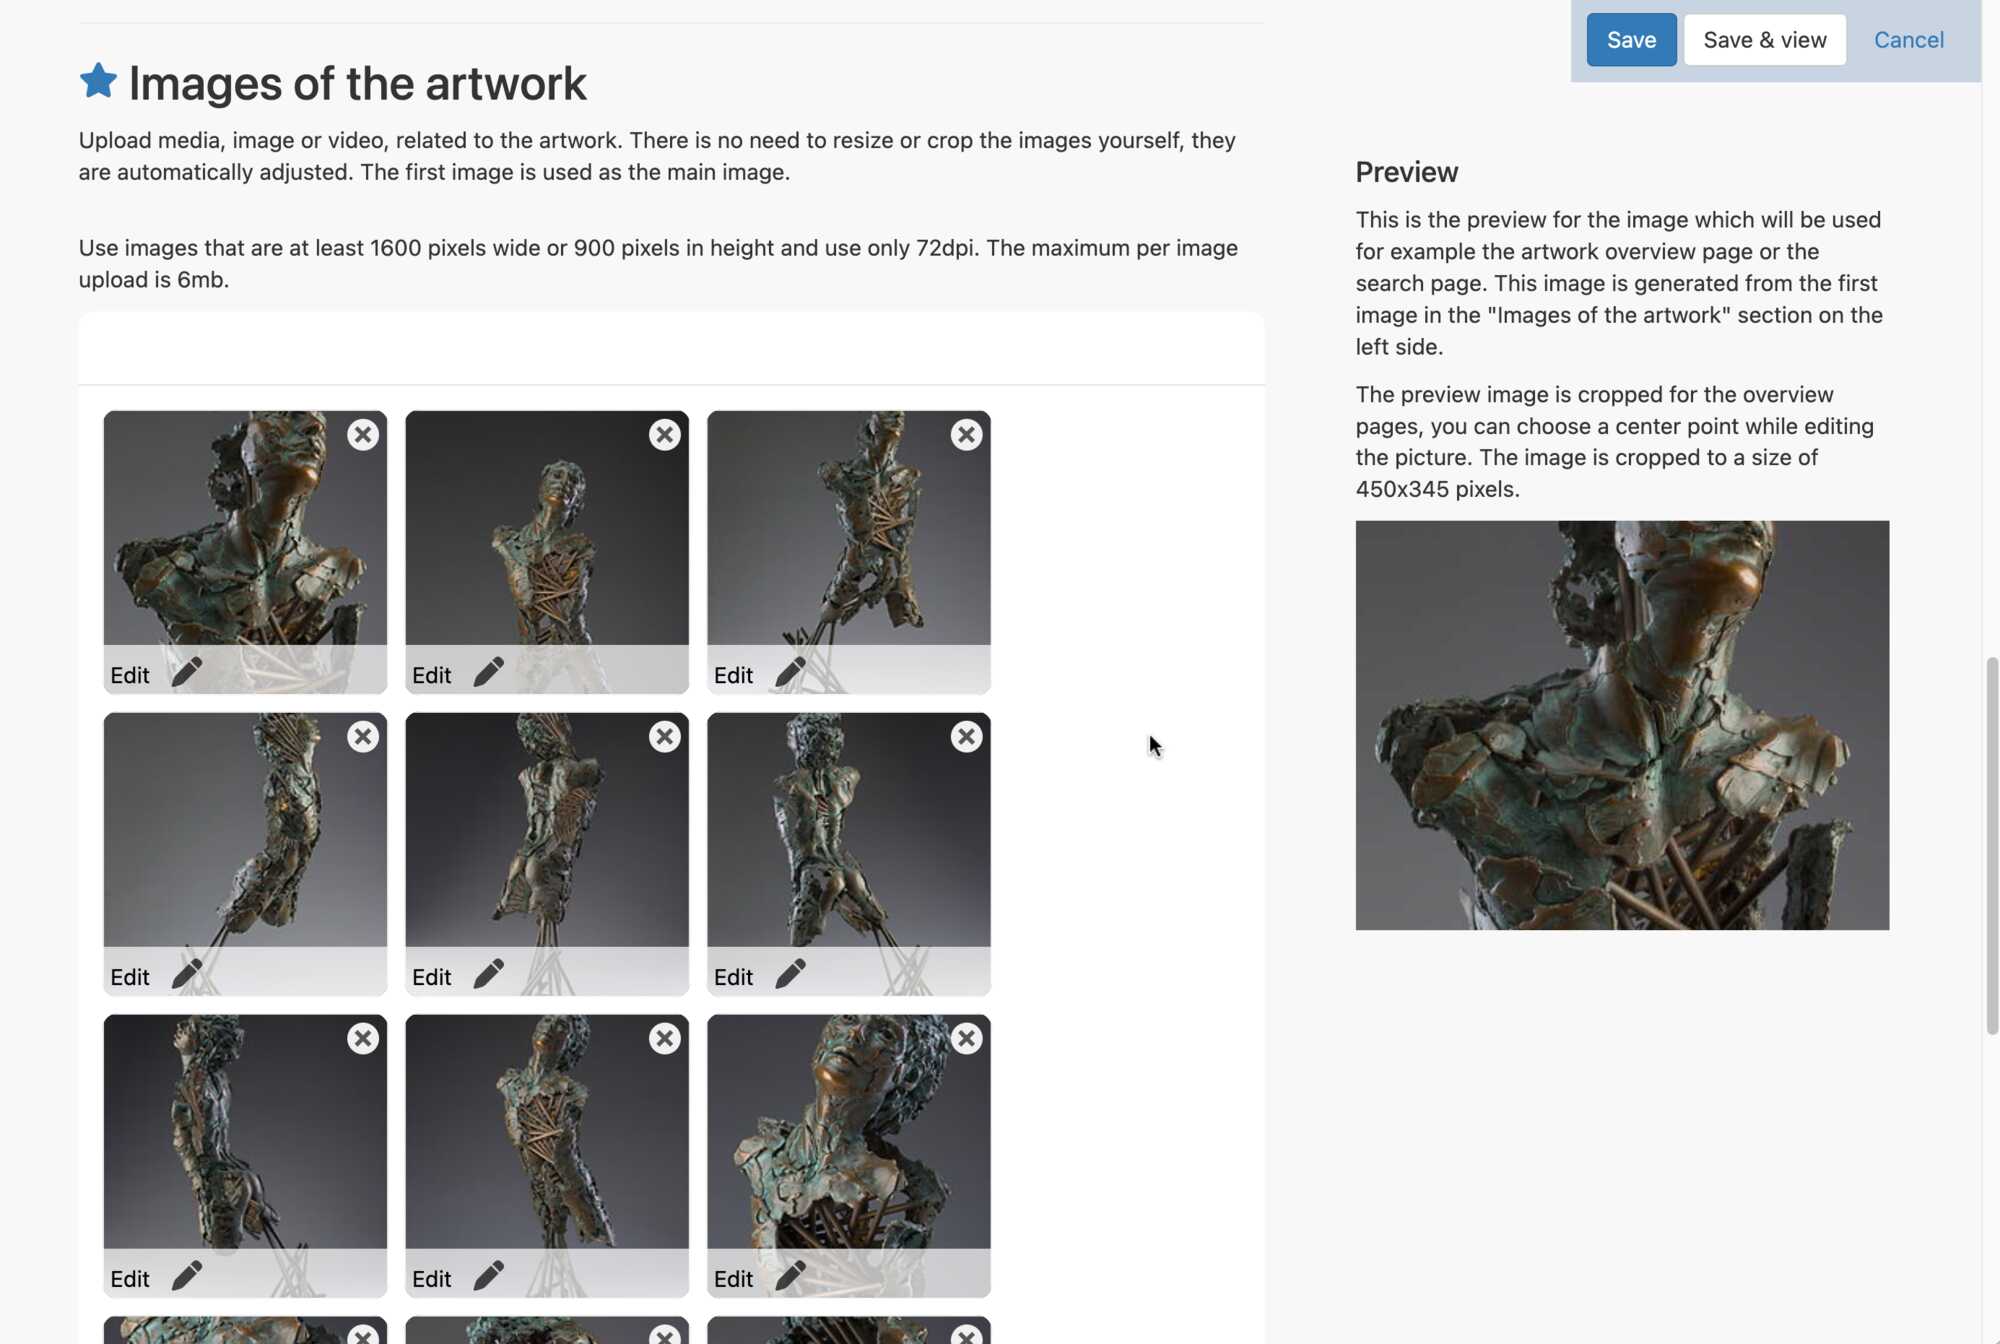
Scroll down the paqe until you find the Images of the artwork window, this is where you will place photographs of your sculpture into your Profile Portfolio on the website, shown in the diagram below.

In order to add photographs to your Profile Portfolio click on the Add media item button in the bottom right hand corner as indicated in the diagram above, and you will be taken to a new Add a connection window shown below.

By clicking the Upload button in the red box marked number 2, under the Add a connection label shown in the diagram above.
You will notice that the green line will slide over underneath this Upload button in the red box, above, to indicate that you are now going to upload a new photo.
You can also search for an existing photo in the site memory by clicking on the Find Media button situated to the left of the Upload button, again, marked by the number 2
Place a unique title or name of your photograph underneath the words Media title in blue, marked by the number 3 in the diagram above, so that you can search for your photograph by name if required.
Next, I will click the Choose file Button indicated by the number 4, under the blue title Media file in order to upload a Picture from my computer. Clicking on the Choose file button, above, will open a "Finder window" on my computer. As shown in the diagram below.
The Upload file button, in the lower right-hand corner of the Add a connection window, marked above by the number 6, will upload the chosen photograph file, once a connection to that file, on your computer, has been confirmed.
You must click the Choose file Button and actually select a photograph from your computer before you can use the Upload button. When you click the Choose file Button the window shown below will appear.
Please notice the blue check mark beside the title; Published in the red box marked number 5, in the diagram above. You can use this to "Publish" a picture, which means to make it visible on the website, or you can click on the checkmark beside the Published button and "un-Publish" this picture.
This means that after you have uploaded the picture to the website, it will still stay in the memory on the website, but will not be visible for anyone to see.
By default, this box is blue and shows a checkmark inside it.

The diagram above, shows my "Mac Finder Window," where I have selected a Jpeg file called 1Renenet1921.jpg. When I click on the Open button shown in the red box, above in the "Mac Finder" window, the connection to that photograph is opened and the link confirmed.
Upon clicking the Open button we are taken back to the Add a conection window with a thumb nail photo of the artwork that we are going to copy from my computer to the Sculpture Network website, shown below.

To ensure that the photograph is viewable, once uploaded, the Published button must show a check mark in the small blue box in the lower left-hand corner of the Add a conection window, as shown in the diagram above.
When you click on the Upload file button in the Add a conection window, you will be taken to a new window thay shows the uploaded photo, that window is shown in the diagram below.

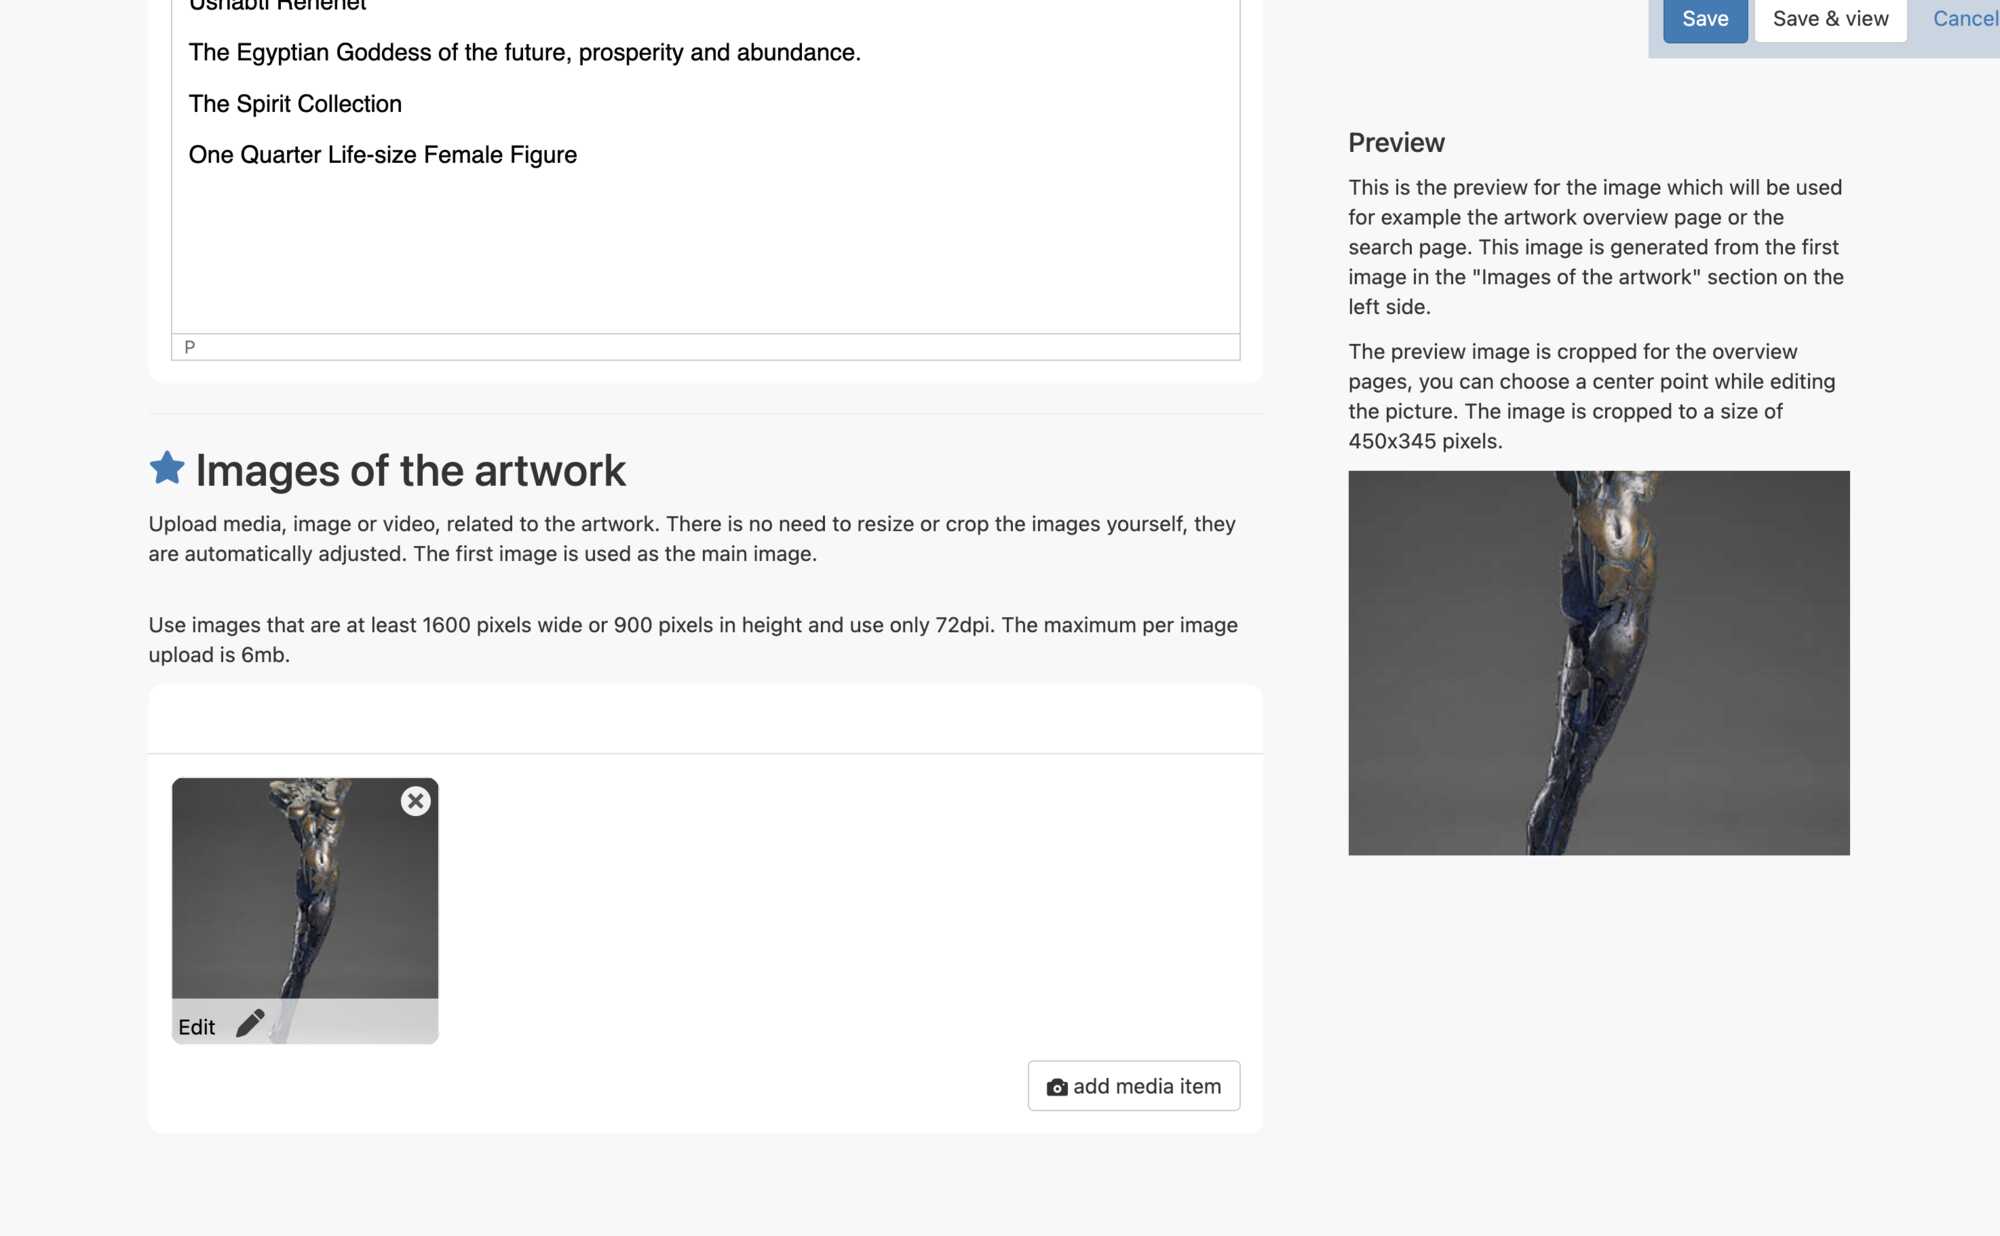
The photograph that you have chosen has now been copied into the website memory. In the Images of the artwork window shown in the diagram above, you will see two photos of the artwork that you have chosen to upload to your portfolio; a larger one on the right and a smaller one on the left in the Images of the artwork window.
The larger copy of your photo appears on the right hand side of the page, under the title Preview. This is the "Preview" photo, and is included here to indicate how you photograph will look on the "'front end" on the website. You can see that the top of the photo is cut off and the sculpture is not well placed, or "framed" in the photo window.
We will edit the photo by going to the smaller photograph on the left, in the Images of the artwork window. You will notice on this smaller copy of your photograph there is an Edit button with a small pencil showing along the bottom of the photo. We will click on this Edit button to open a new window in which we can edit the photo.
There is also a circle with an "X" in it in the upper right hand corner of the photograph, this will delete this photo from your portfolio page, but the photo will not be removed from the memory in the website, only from your portfolio page. You can always go back and find the photo and palce it back in the Images of the artwork window and thus back into your portfolio.
Further, the first photo uploaded into the Images of the artwork window, will be considered the "Preview" photo, and will take a prominent place on the "front end" Portfolio page representing each individual sculpture. However, the Preview photo will be shown in two different format types on the website.
The first format type of the "Preview" photo is shown in an example below. This format type is by far the most common format type found on the website and you will find many examples of this small rectangle photo format type.

To view the second format type that the "Preview" photo will be show in, click the Save and View button that is at the top of each page in the "back end", shown below.
After clicking the Save and View button, from any of the different "back end" editing pages you will be returned to the "front end" of the website.
For example if you are adding a new sculpture to your Portfolio you will be starting from the Add a new artwork page.
If you are adding more images of a sculpture that you have already put in your Portfolio you will find yourself working from the Images of the artwork window.
If you are editing one of the photos that you have already uploaded to your Portfolio, you will be working from the Edit your Artwork page. You don't have to worry about where you are, the website will direct you and the Save & View button will always take you back to the "front end" of your Profile Portfolio.
At the moment we are editing a photo that we have upload and want to change so we are working from the Images of the artwork window.
When we click on the Save & View button we will be taken to the "front end" of the specific page that contains the information about the individual sculpture that we are working on.
Presently, we will find ourselves on the page that contains the photo; (Jpeg file) that we have uploaded called 1Renenet1921.jpg, which we uploaded from my computer.
When we click on the Save & View button we will be taken to the second format type of the "Preview" photo, shown in the diagram below.
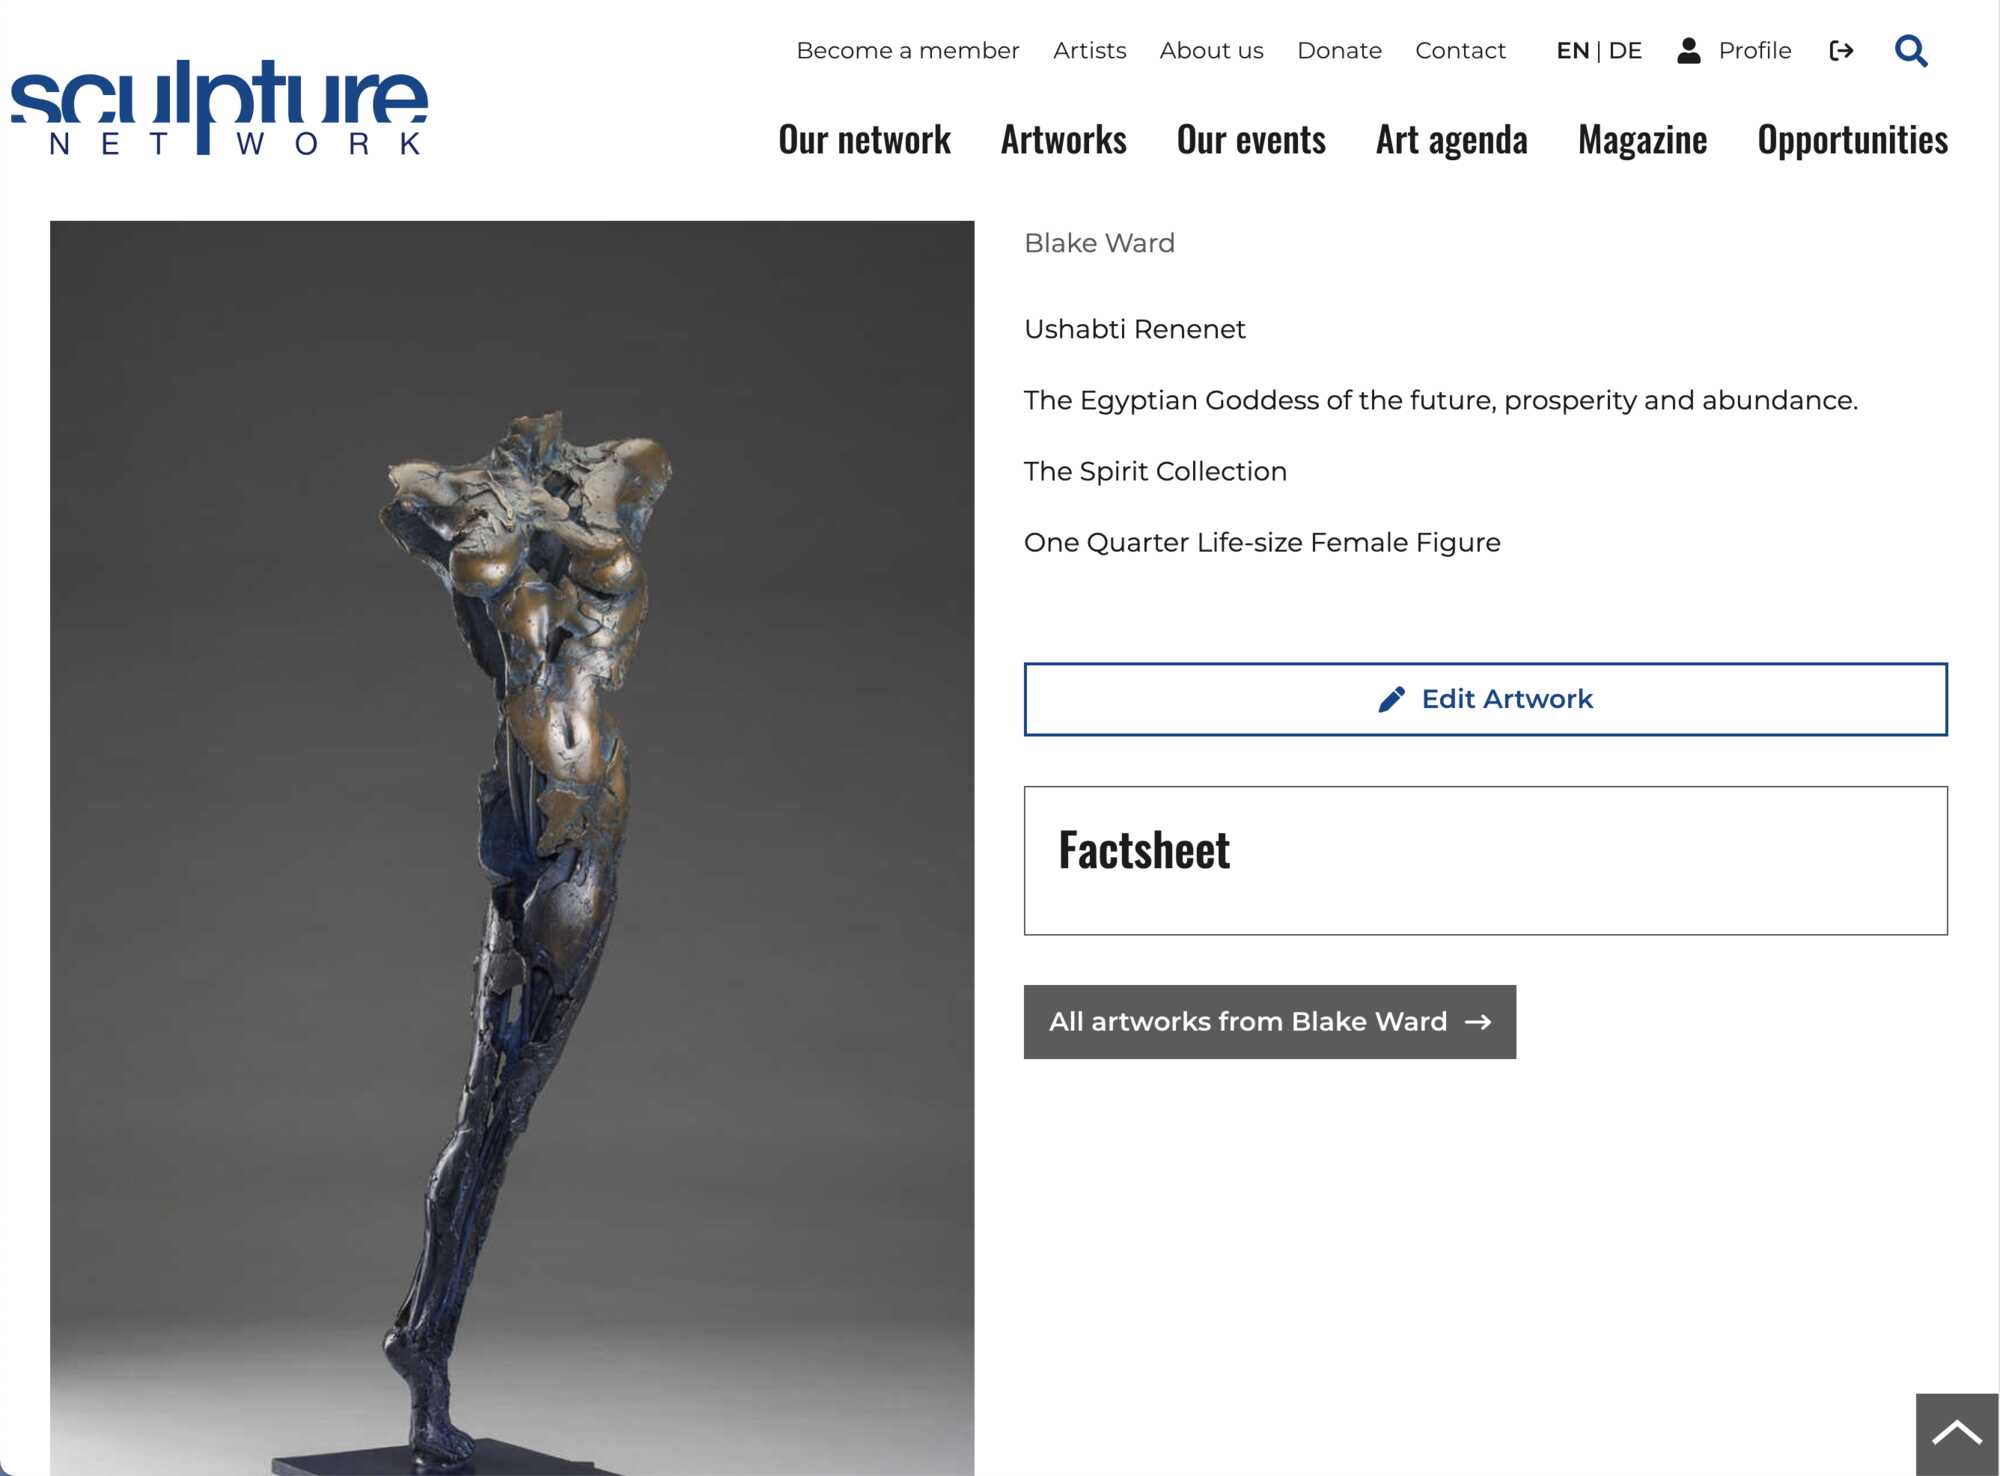
We can now see what the Preview photo will look like on our Profile Portfolio page. The Preview photo in this second format type will take up a large portion of the page that is specifically dedicated to each individual sculpture.
I think it looks good but the sculpture is a bit small inside the given frame. So lets edit it for a better fit in the frame.
To return to the "back end" of the Profile page, click on the Edit Artwork button in the long blue rectangle in the middle of the Profile Portfolio page as shown in the diagram above. This will take you to the Edit your Artwork page where you will have to scroll down to find the Images of the artwork window again.
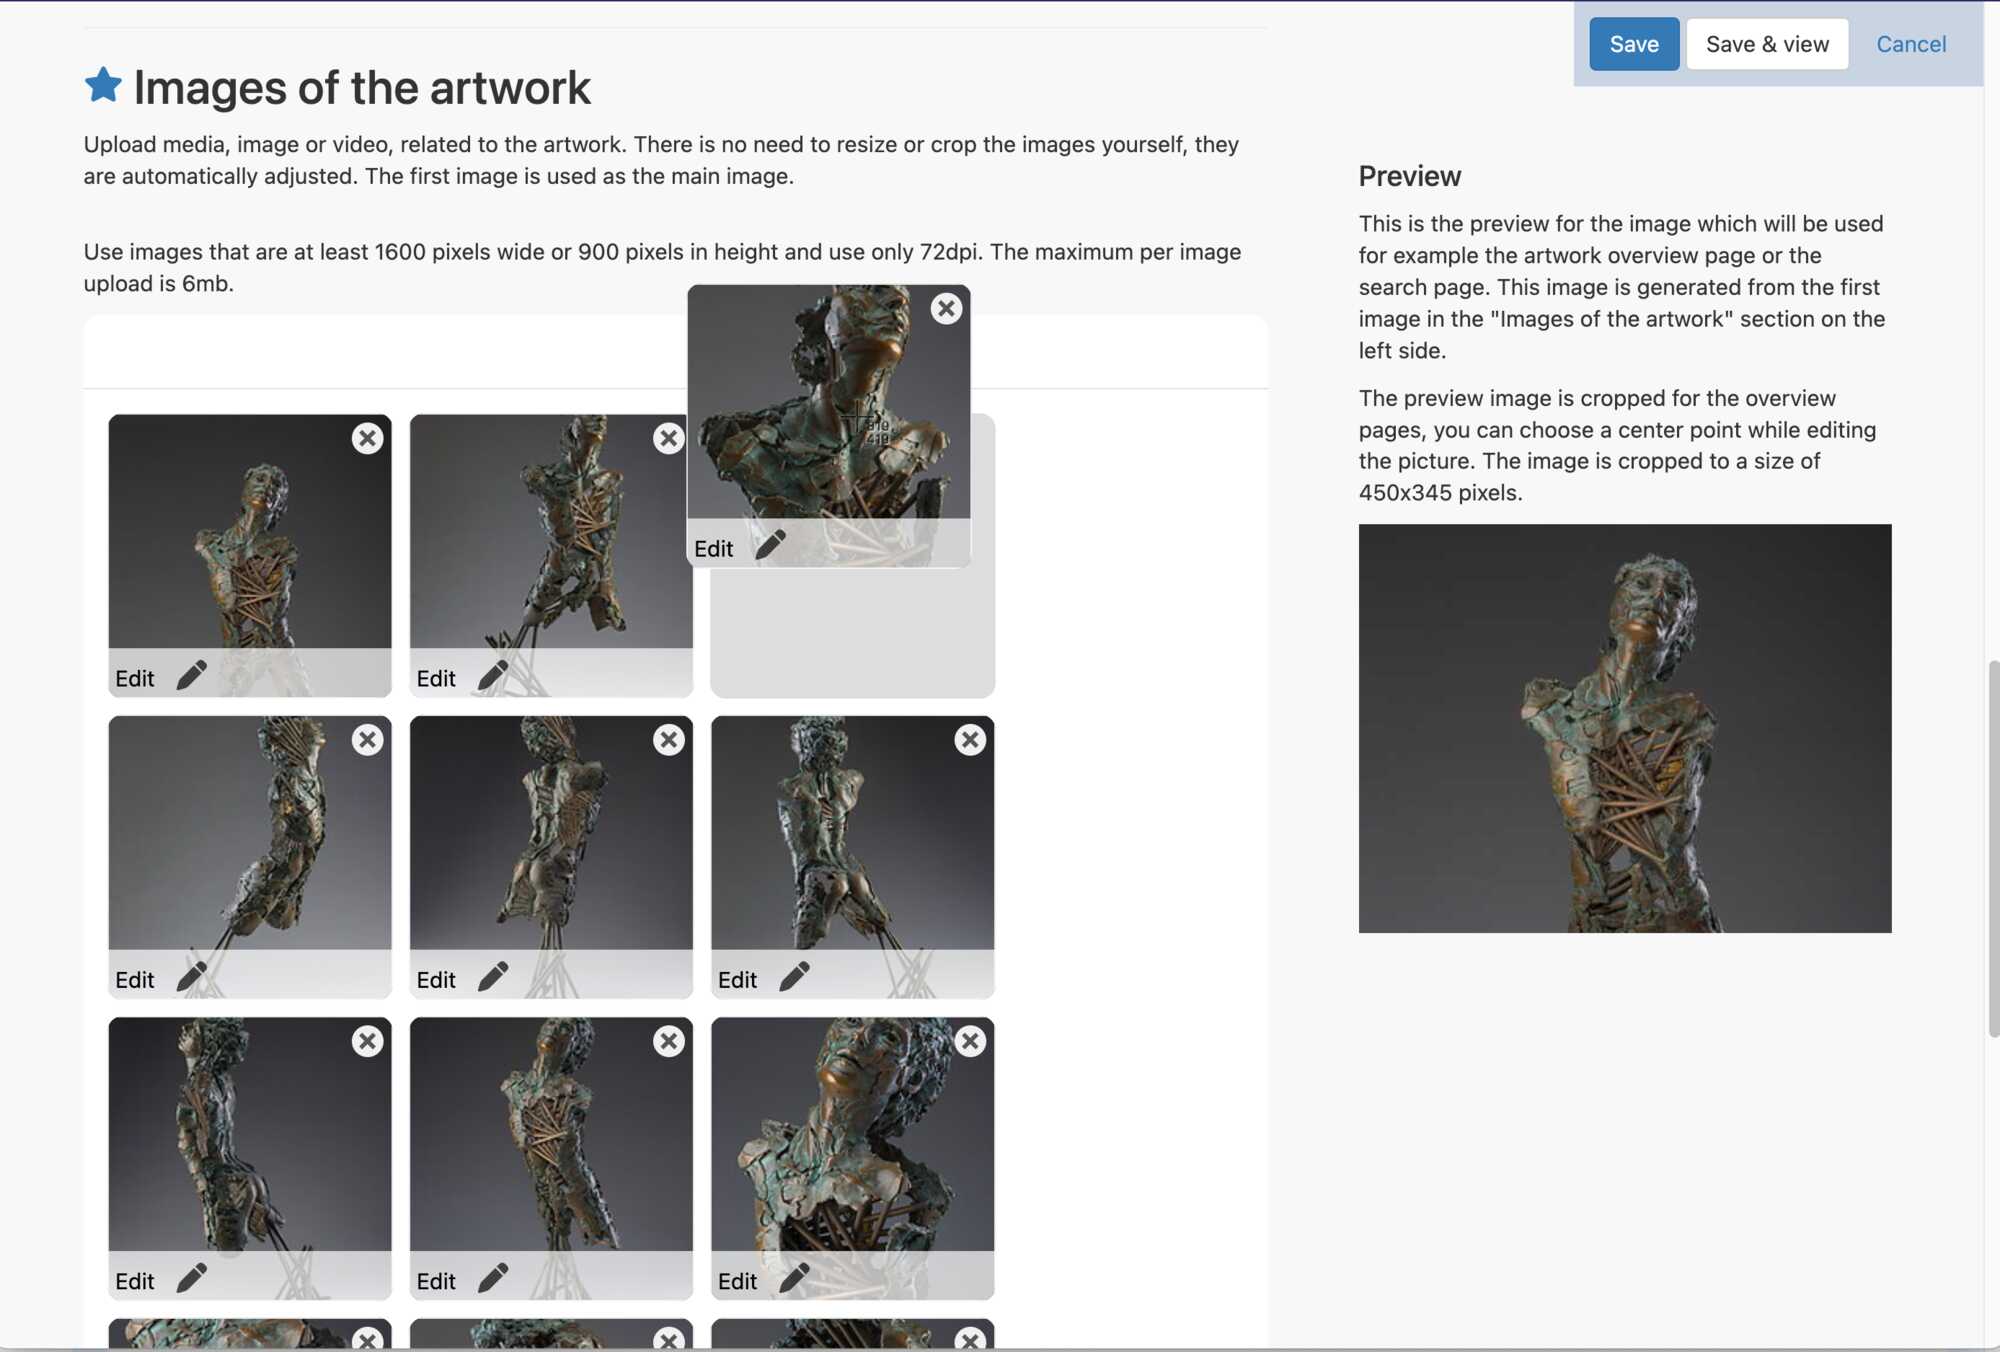
Edit images of the Artwork
Once you have clicked on the Edit Artwork button shown in the photo above, the Edit your Artwork page, will open in the "back end" of your Profile. Scroll down to the Images of the artwork window, shown in the diagram below.
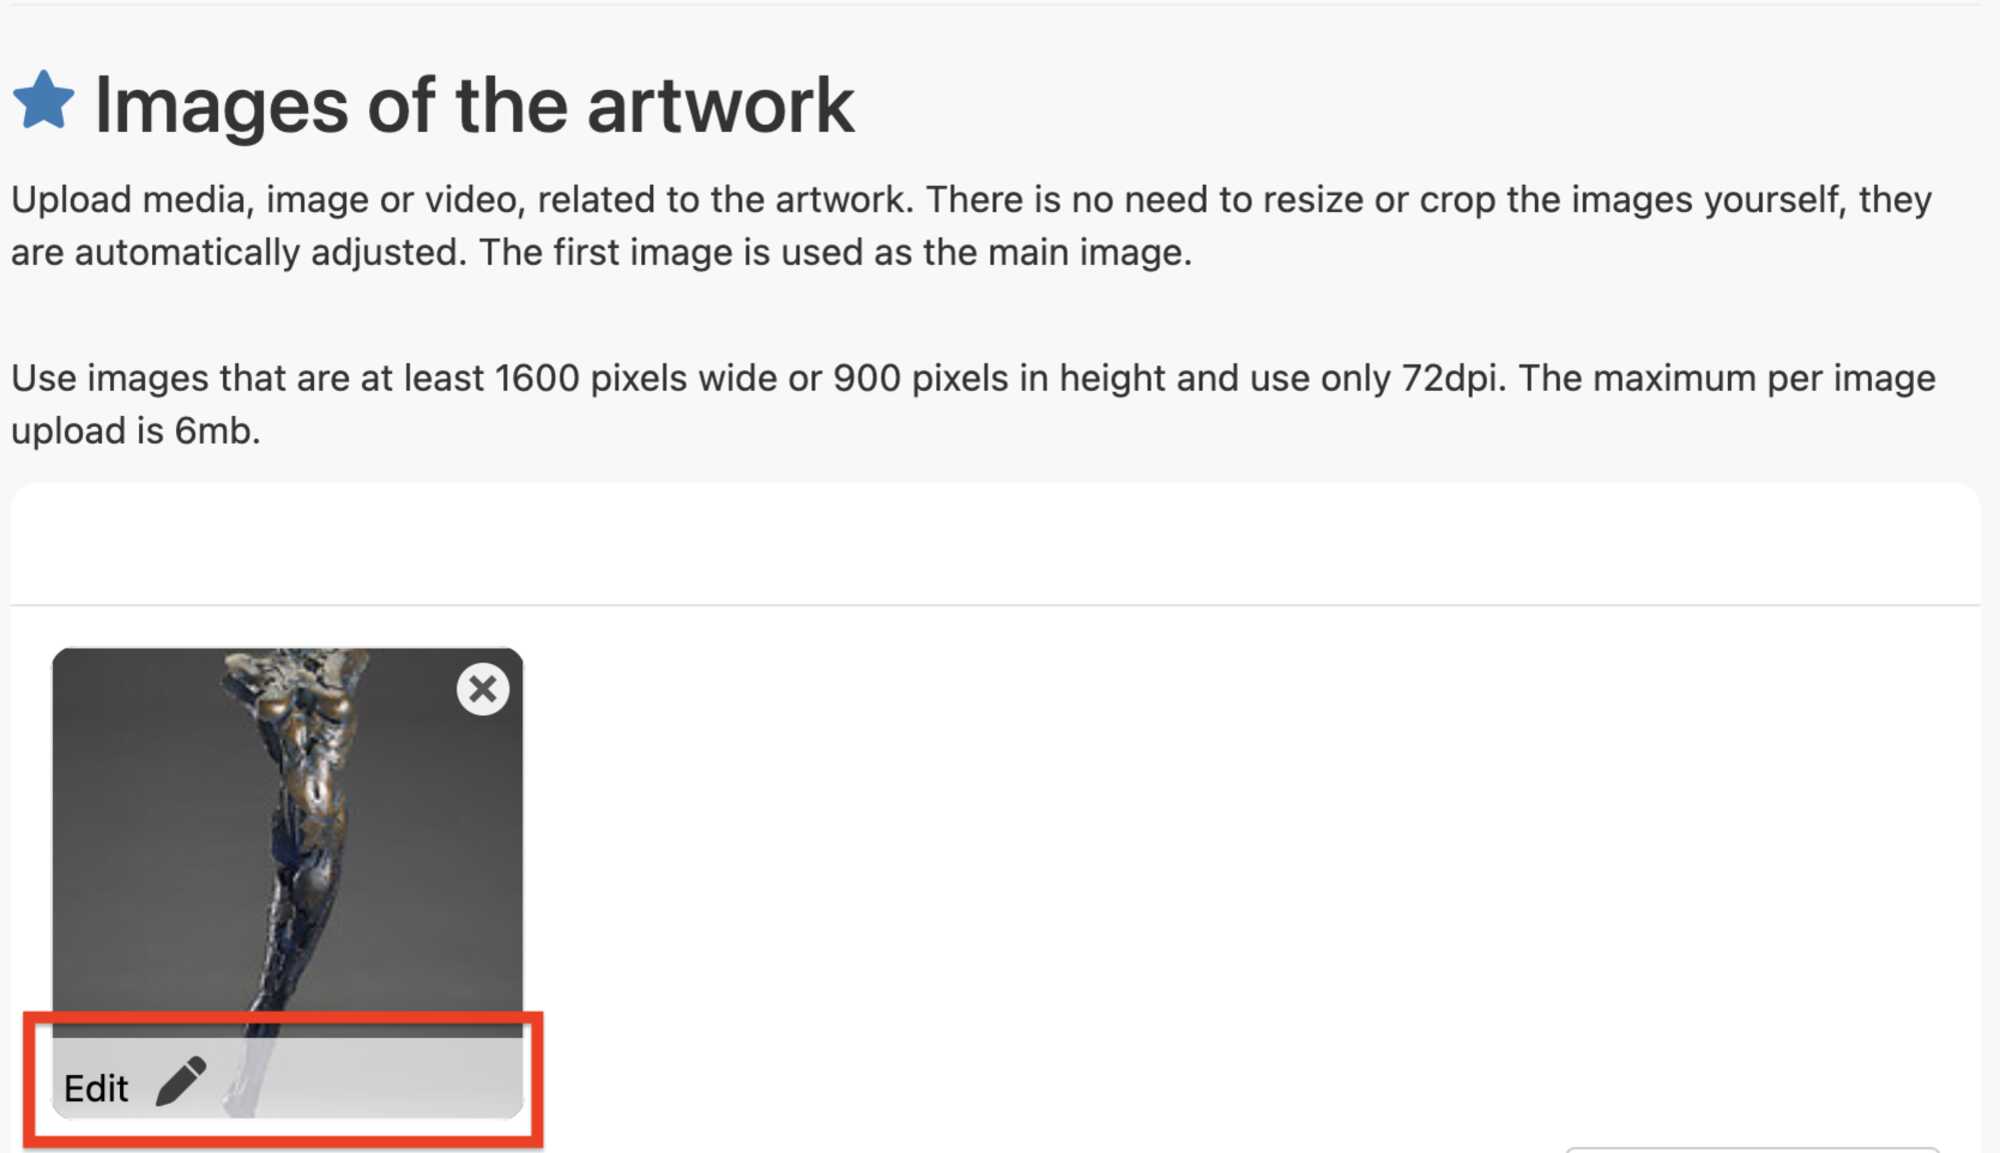
When we click on the Edit button beside the small pencil, shown in the red box above, we are taken to a Edit: sculpture title window for this specific sculpture, in this case it is the Edit: Renenet window as that is the title of my sculpture. This is shown in the diagram below.
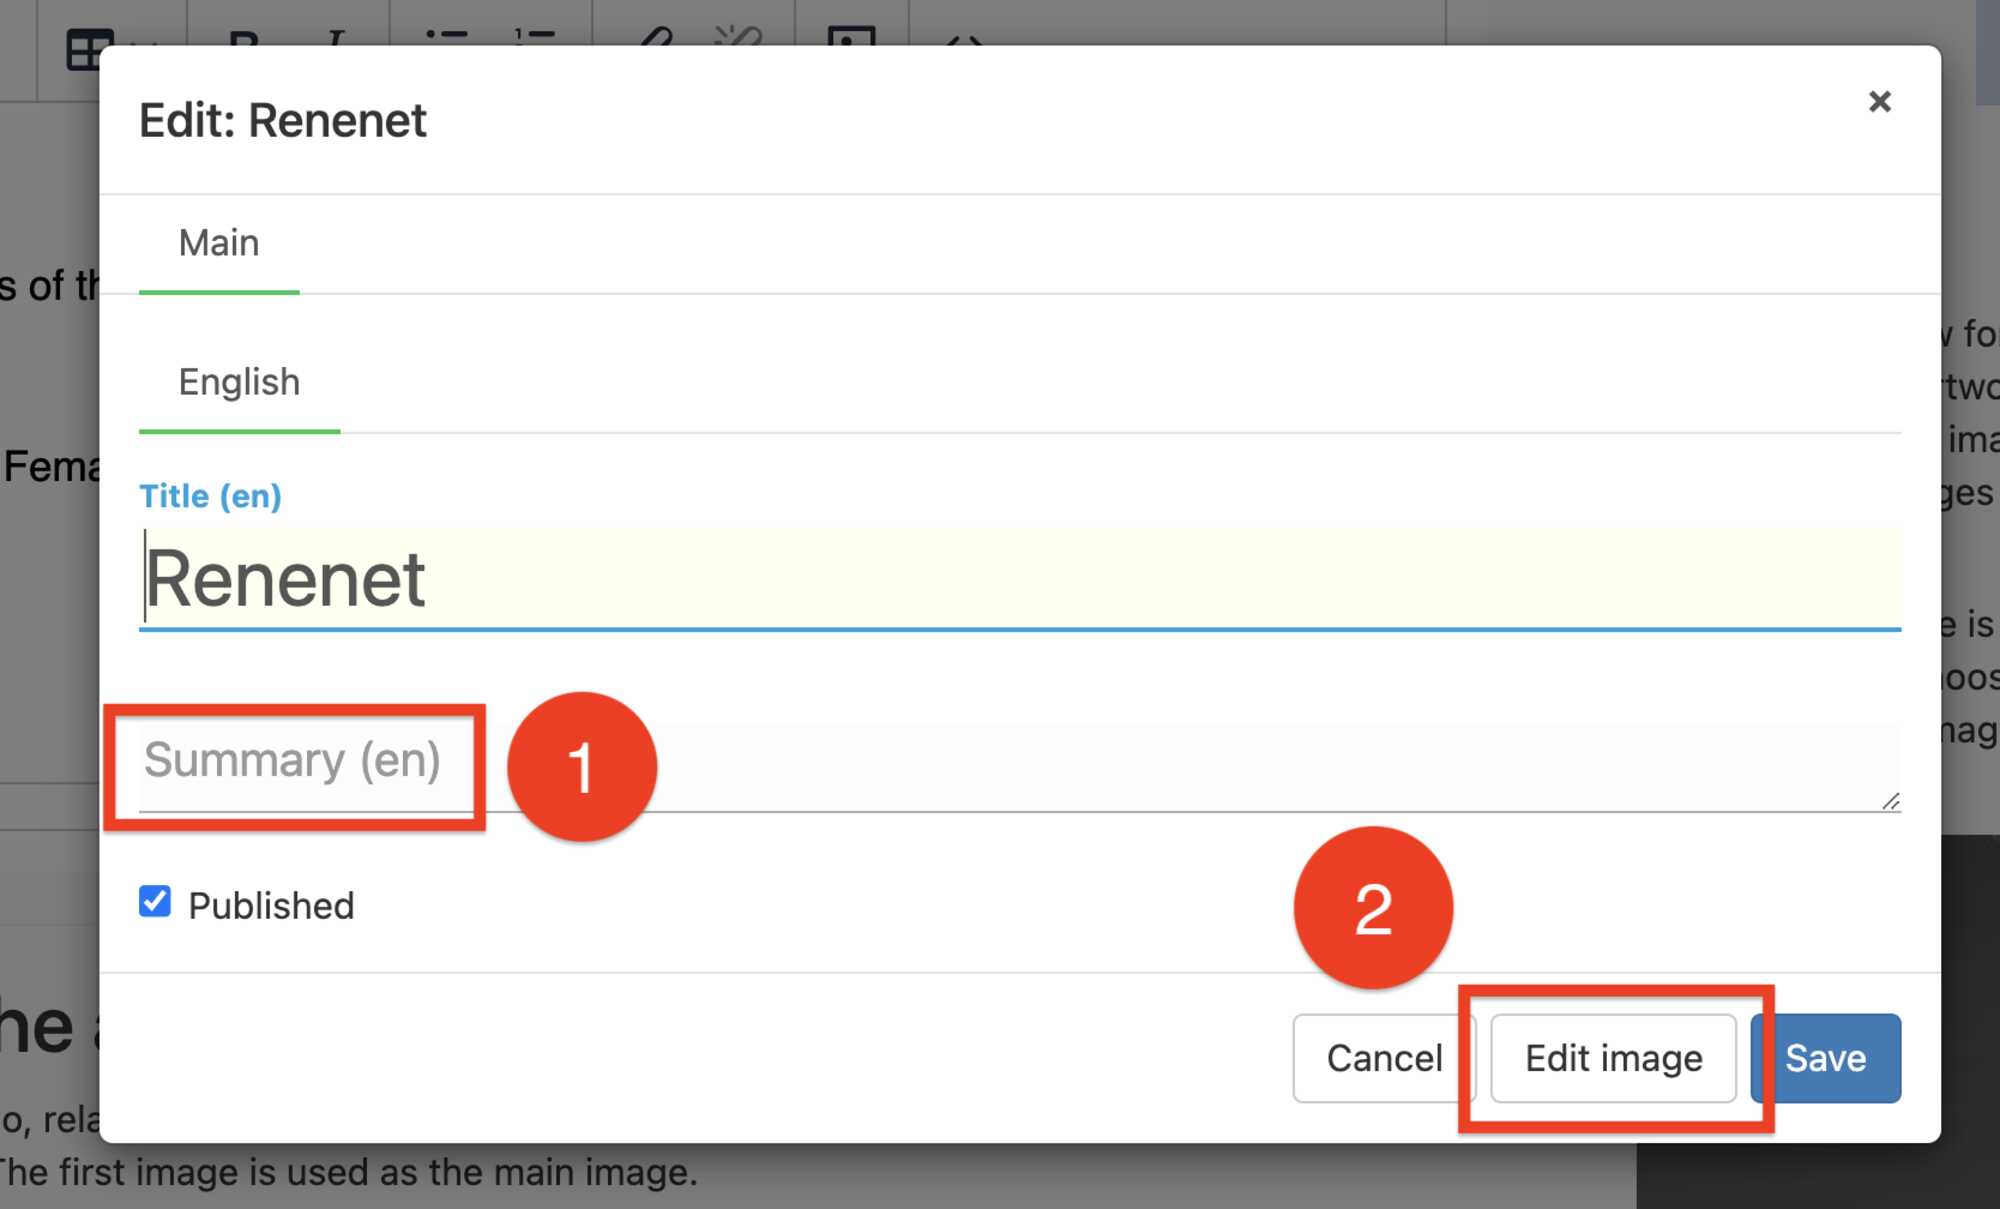
In the Edit: sculpture title window, (Edit: Renenet window), you can add a summary or notes on the photo in the Summary text box, identified by the number 1, above, if you wish to record information specific to this photo, but it will not be viewable to the public.
To edit the photograph, click on the Edit image button in the lower right hand corner of the Edit: sculpture title window, (Edit: Renenet window), indicated by the number 2 in the diagram above.
This will take you to to a Large Photo Edit page, shown below.
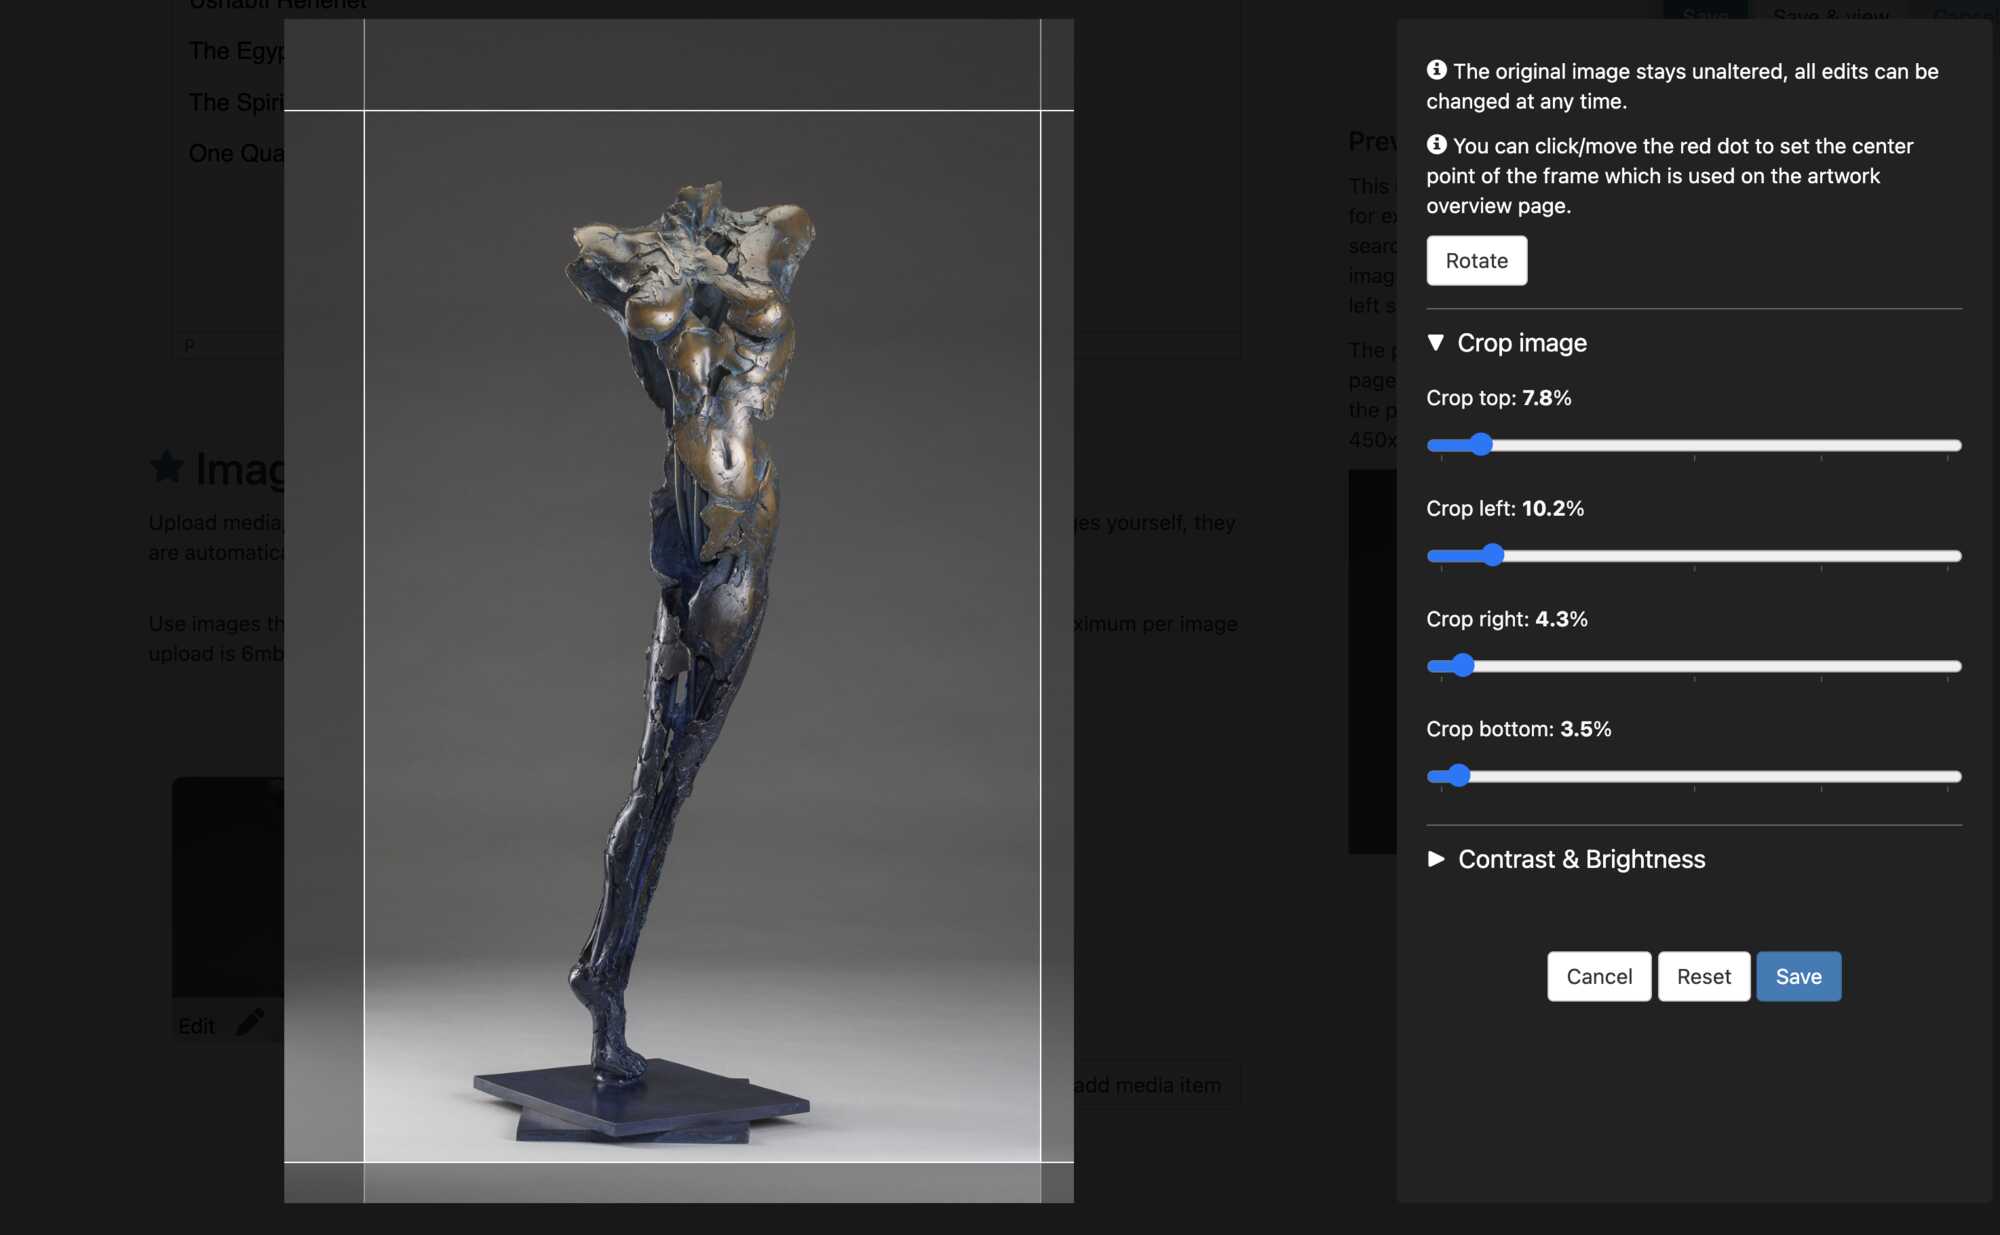
Here I have cropped all four sides of the photograph to make the sculpture appear larger in the frame.
Once you are satisfied with the edit, click on the blue Save button. in the bottom right hand corner of the on the Large Photo Edit page shown above, and you will return to the "back end" of your Portfolio, and land on the Edit your Artwork page shown below.
However, if you want to see how your edit looks on the website, you must go to the "front end" of your Portfolio page to see how the edits have altered the way the photo appears in the frame. So we would need to click on the Save & View button in the upper right-hand corner of the Edit your Artwork page, shown above.
This will take you to the "front end" of the Protfolio page for this specific sculpture, shown below.
The first diagram below shows the original photograph before the edit.
The second diagram below shows the photograph after the edit.

Althoug it is a subtile difference, I think that the photograph looks better when cropped. You can see the image of the sculpture takes up more of the space within the frame in the second photograph after the edit.
in order to return to the Edit your Artwork page in the "back end" of the Portfolio page once again, you have to clicked on the Edit Artwork button shown in the blue box in the middle of the diagram above,
You will land on the Edit your Artwork page shown below.
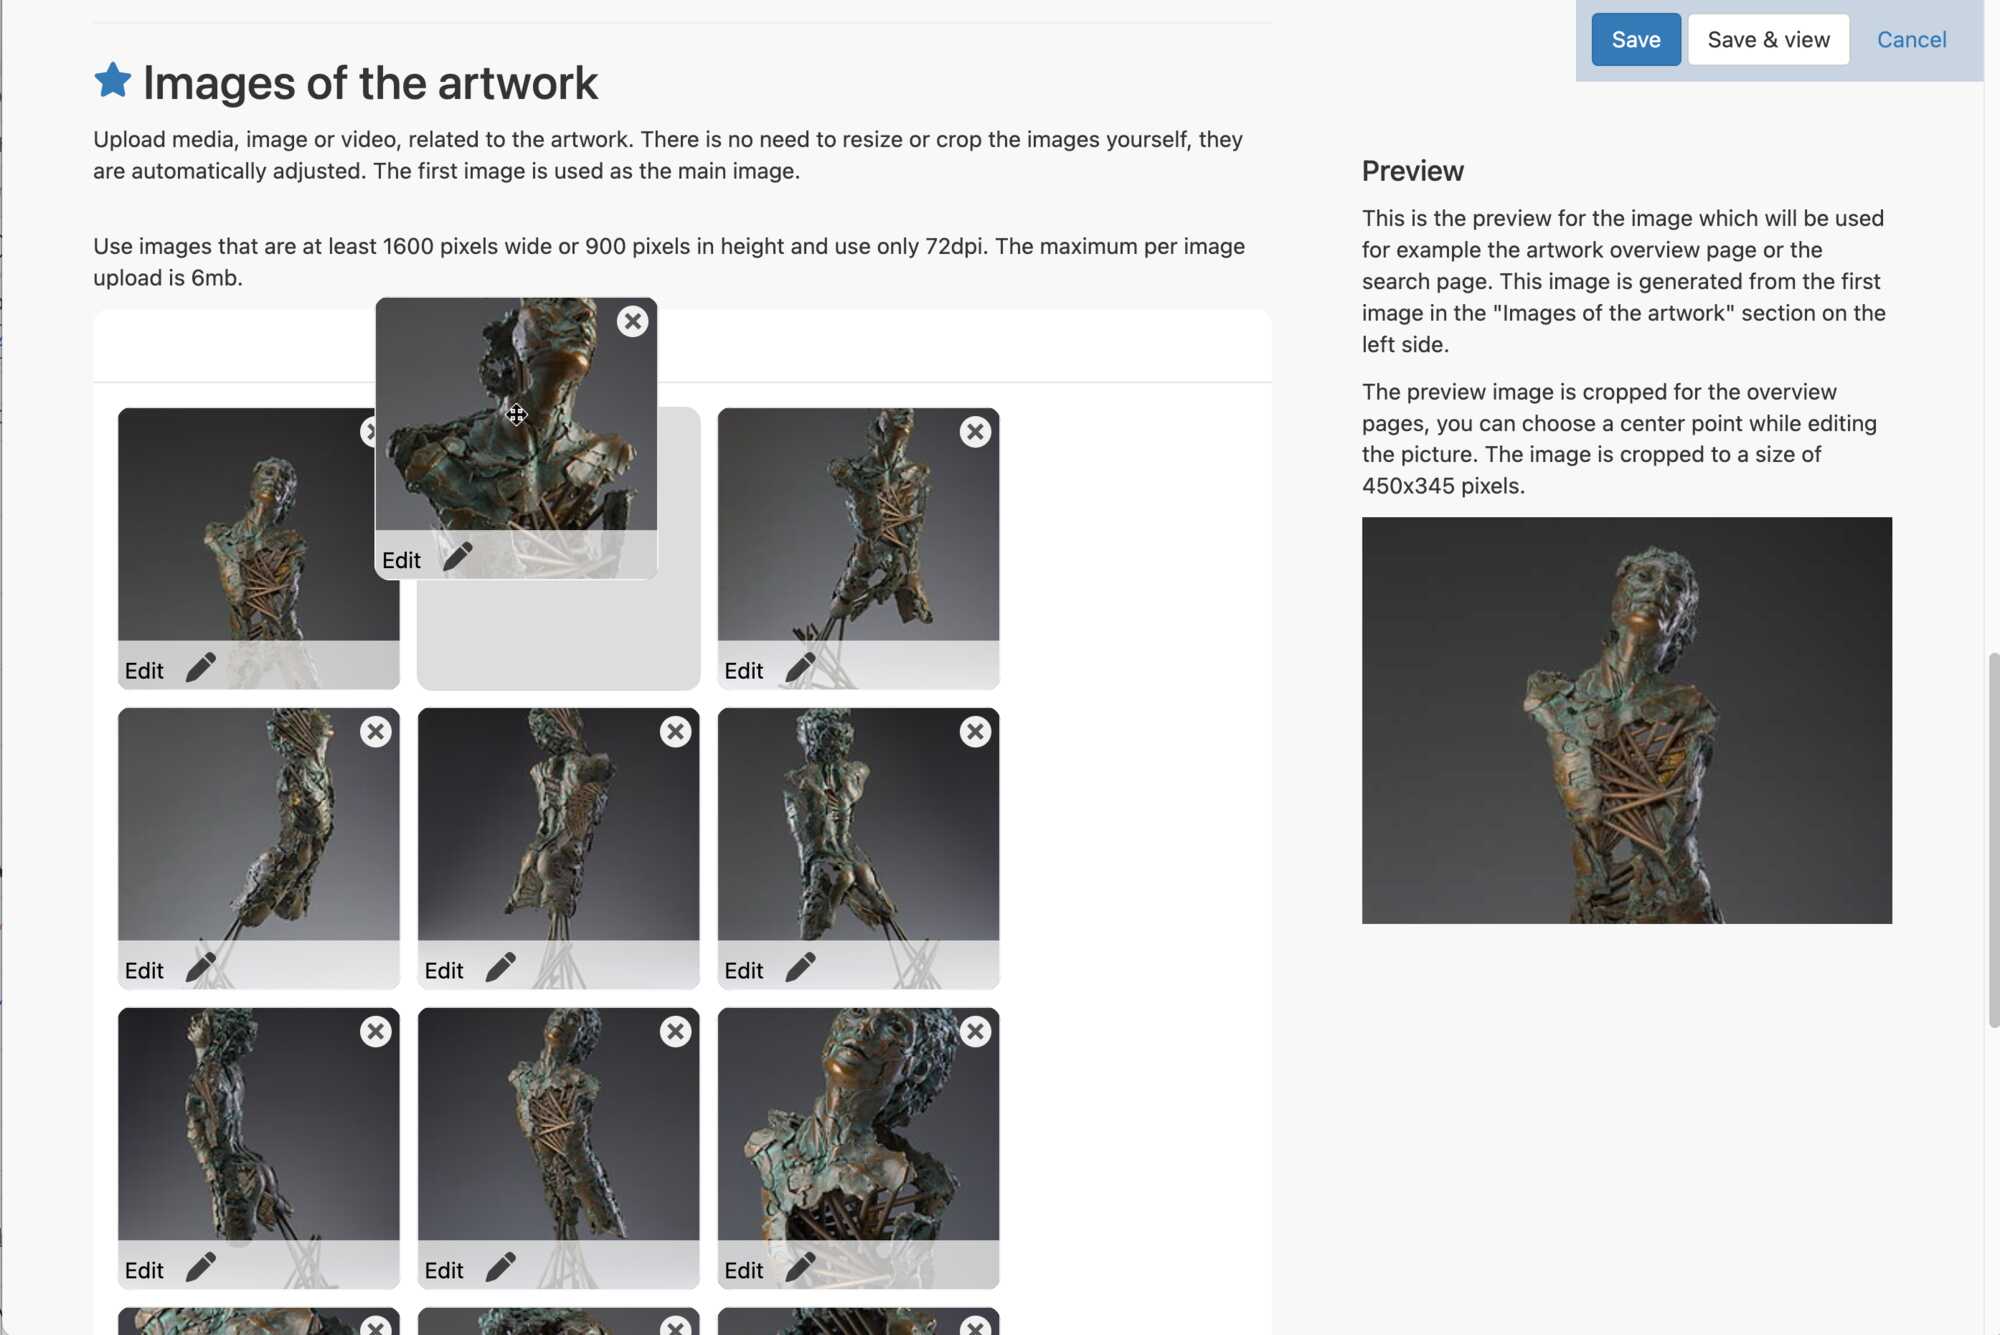
Now we Scroll down the Edit your Artwork page until you reach the Images of the artwork window. You can see how the edit that we made changed the way the photograph of your sculpture looks in the Preview window shown on the right side, in the diagram below.
As you can see in the Preview window on the right hand side of the page, the sculpture is still fits poorly in the frame.
We know now that, although the photo of the sculpture looks good in the Preview photo in the second format type that takes up a large portion of the page specifically dedicated to each individual sculpture, the sculpture still does not fit well in the frame of the first format type of the "Preview" photo.
We need to reset the centre of the photo in the smaller frame by changing the centre focal point of the photo. in order to frame the photograph in the smaller first format type picture frame, and this will not alter the second format type that takes up a large portion of the page.
Change the centre focal point
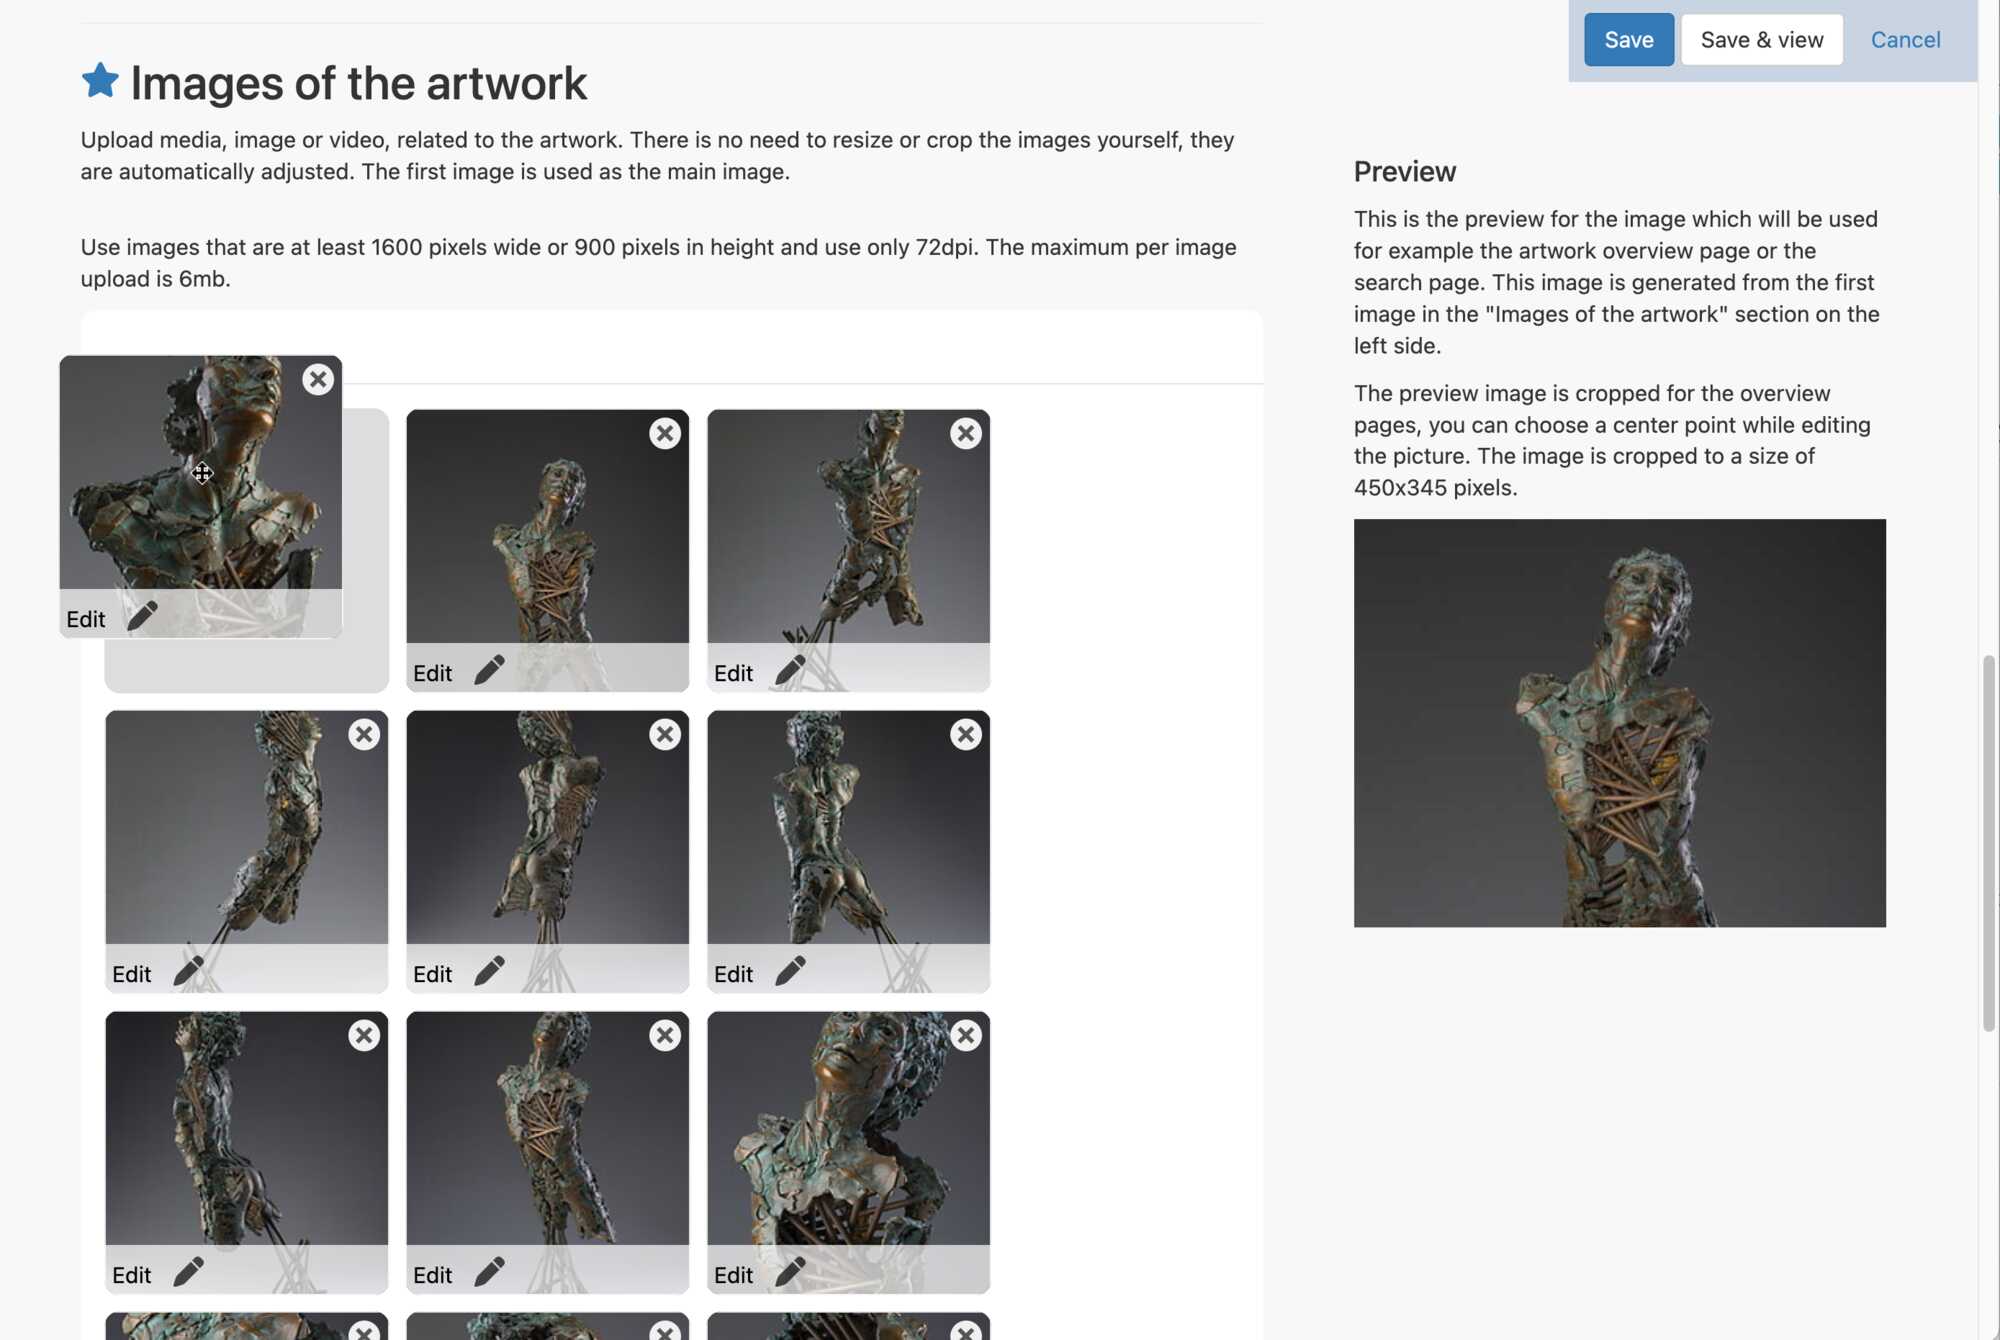
Now, we click on the Edit Artwork button, in the middle long blue rectangle in the middle of the Profile page as shown in the diagram above, to return to the "back end" as we still need to edit the photograph of your sculpture and center it within the Preview picture frame.
Again we repeat the same process;
Edit Artwork button, below, on the "front end" of your Profile page gives us the Edit your Artwork window. Shown below.

- This opens the Edit: "sculpture title" window (Edit: Renenet window) for this specific sculpture you are editing. Shown Below.

- Click on the Edit image button in the lower right hand corner of the Edit: sculpture title window,(Edit: Renenet window). Marked
- You land on the Large Photo Edit page, with all the cropping tools in it. Shown Below.
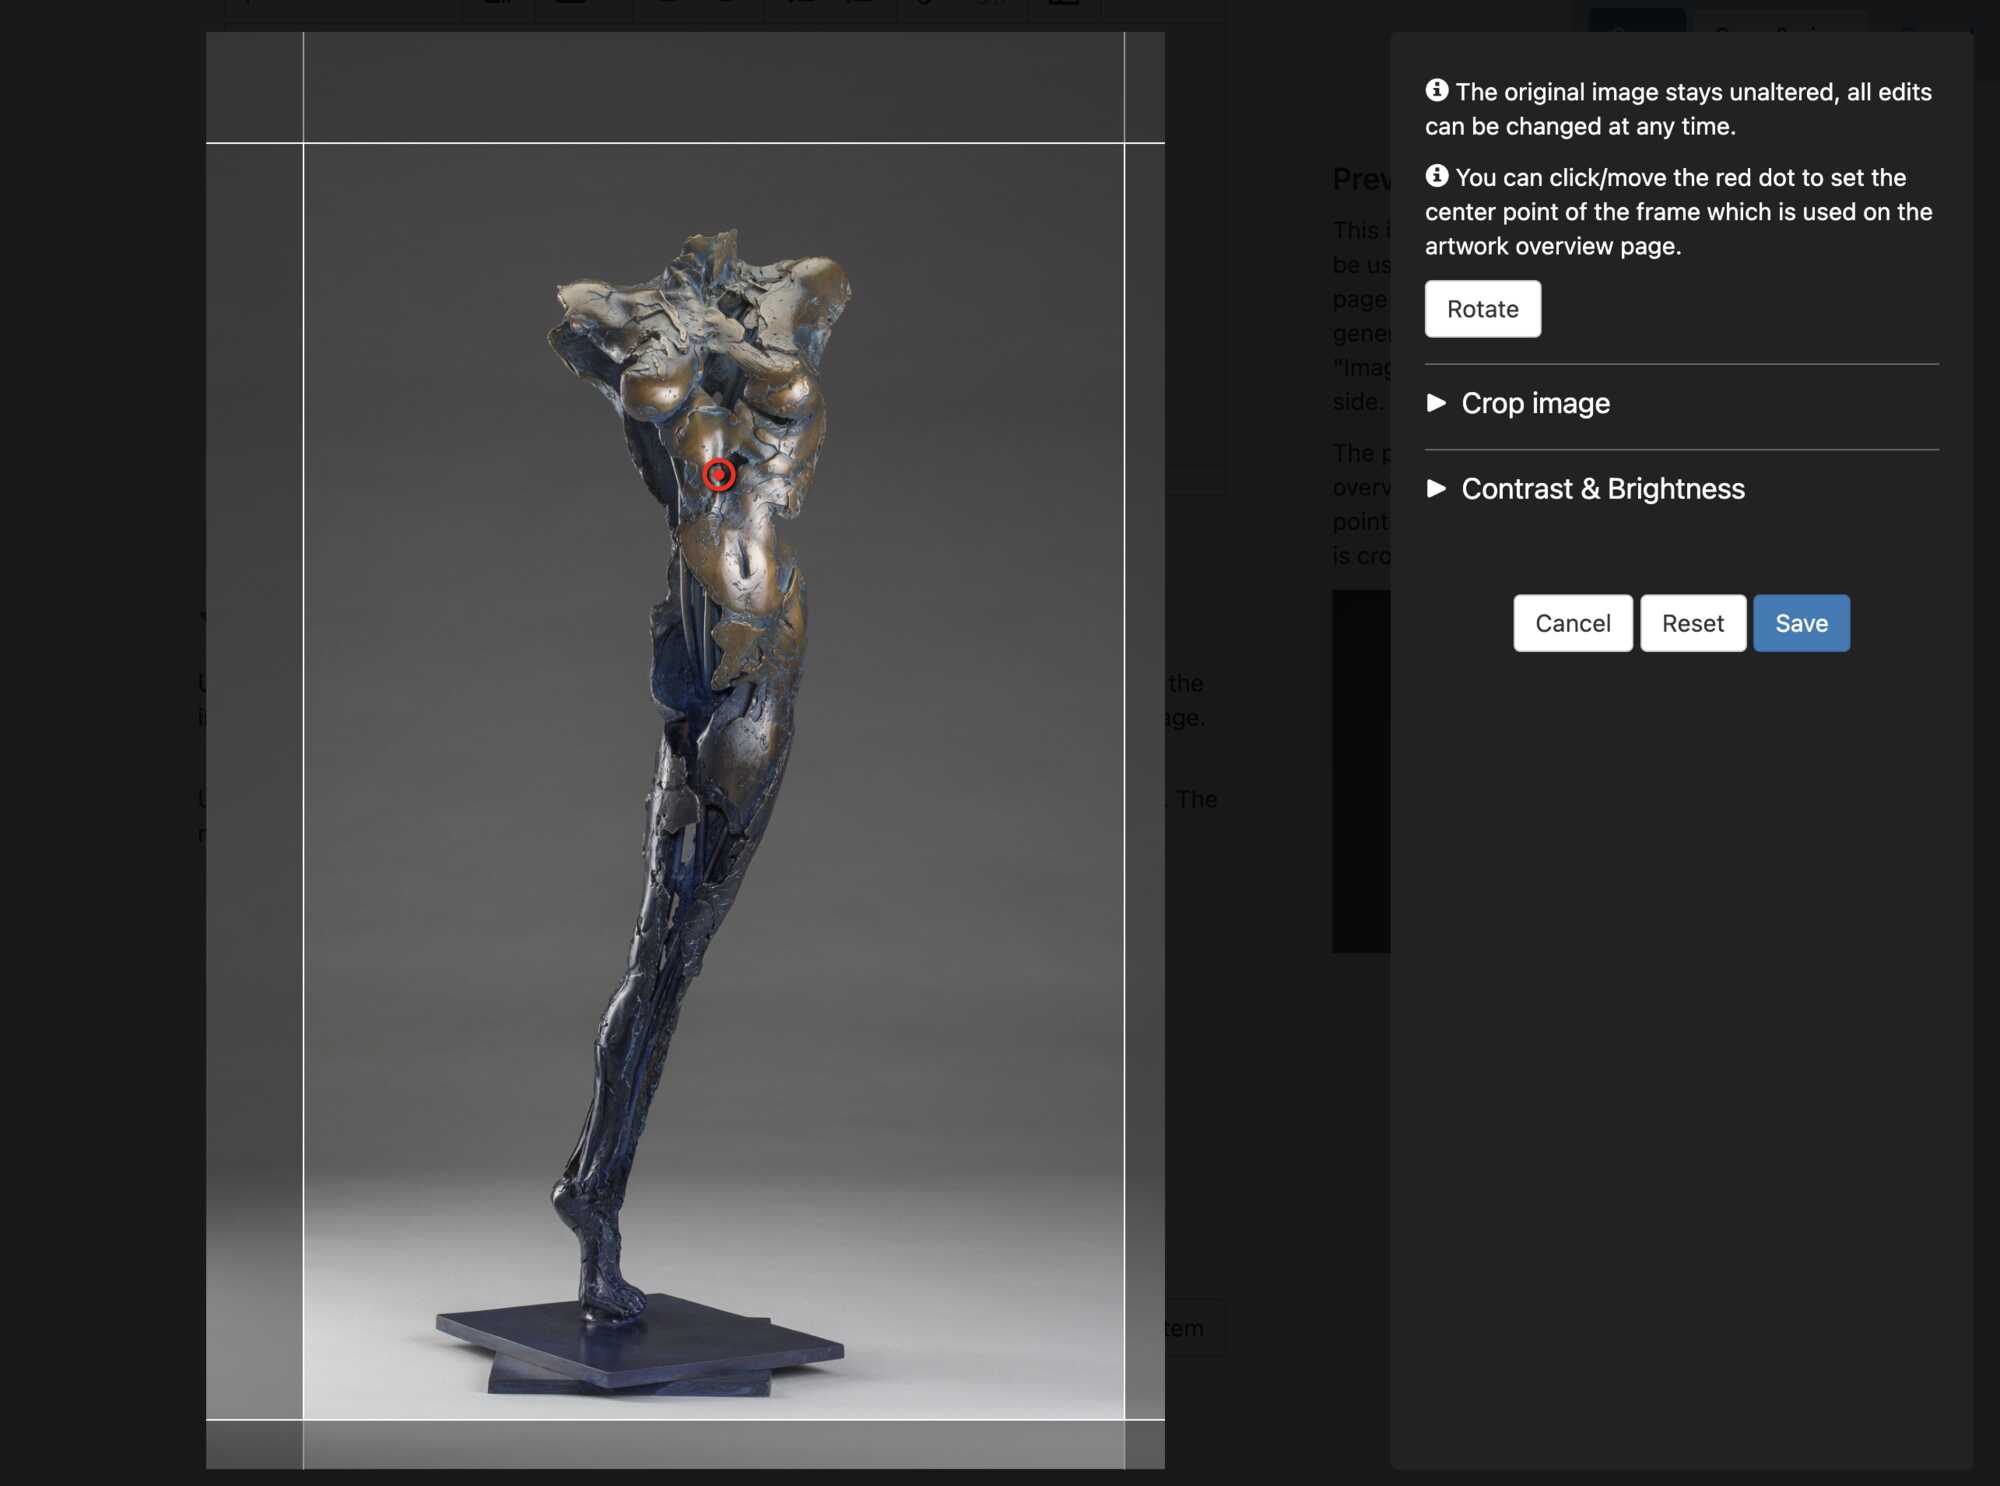
Here there is another tool that will allow us to change the certre focal point of the photograph. We will use this tool to make the photo fit into a smaller picture frame that is commonly used on website.
When you click on the photo the cursor will place a red dot at the location where you have clicked. This red dot will become the focal new point of the photograph. As shown in the diagram below.
You can move this red dot around with your cusor as required to find the correct focal point on the photograph in order to change the postion of the certre of the photo in relation to the frame. Click on it and it will disappear and click again on the photo and the red dot will reappear.
With this new centre focal will change the position of the photo in the frame, by placing the centre focal point higher on the photo, the sculpture is no longer cut off at the top of the photo. The photo has been repositioned in the frame, as you can see below.
As opposed to the opriginal placement of the sculpture in the frame, shown below.
You will find another explaination of this process in the Help Document: "Fill in you Profile" in the section "Add a Profile Picture"
Change Picture Order

Once you have uploaded a number of photographs into your Portfolio you can change the order of the photos as they appear in the Images of the artworks window by dragging and dropping the photo in the new position that you perfer.
In the first diagram appearing in the column to the right, you have the photos as you uploaded them.
In the second diagram below, you can see that the 3rd photo or the "target photo", is in the process of being dragged over towards the 2nd photo in the same row of photographs.
In the thrid diagram found on the right, you can see that the "target photo" has been dragged over further to the left and the 2nd photo that was originally in the second spot, now has taken the 3rd place in the row.
If we continue dragging the traget photo further to the left we can place it in the 1st spot and the photo originally in the first spot in the row will move over to the right and take the 2nd spot, leaving the first spot in the row empty where we can drop the target photo.
Finally, we can drop the traget photo in the first spot, which is the "Preview spot" and it will become the "Preview Picture" in your Portfolio page for this specific sculpture. You will notice that this photo is now found in the Preview window.
This works for rows and columns, just drag and drop the photographs as you want them.
Creating Collections of Artworks
If you have a number of different groups of artwork or perhaps you want to separare your work by peroids, or stages such as "Early Work" or a Blue period, or Steel Abstract Chapter, you can organise the sculptre into "Collections" within you Profile Portfolio.
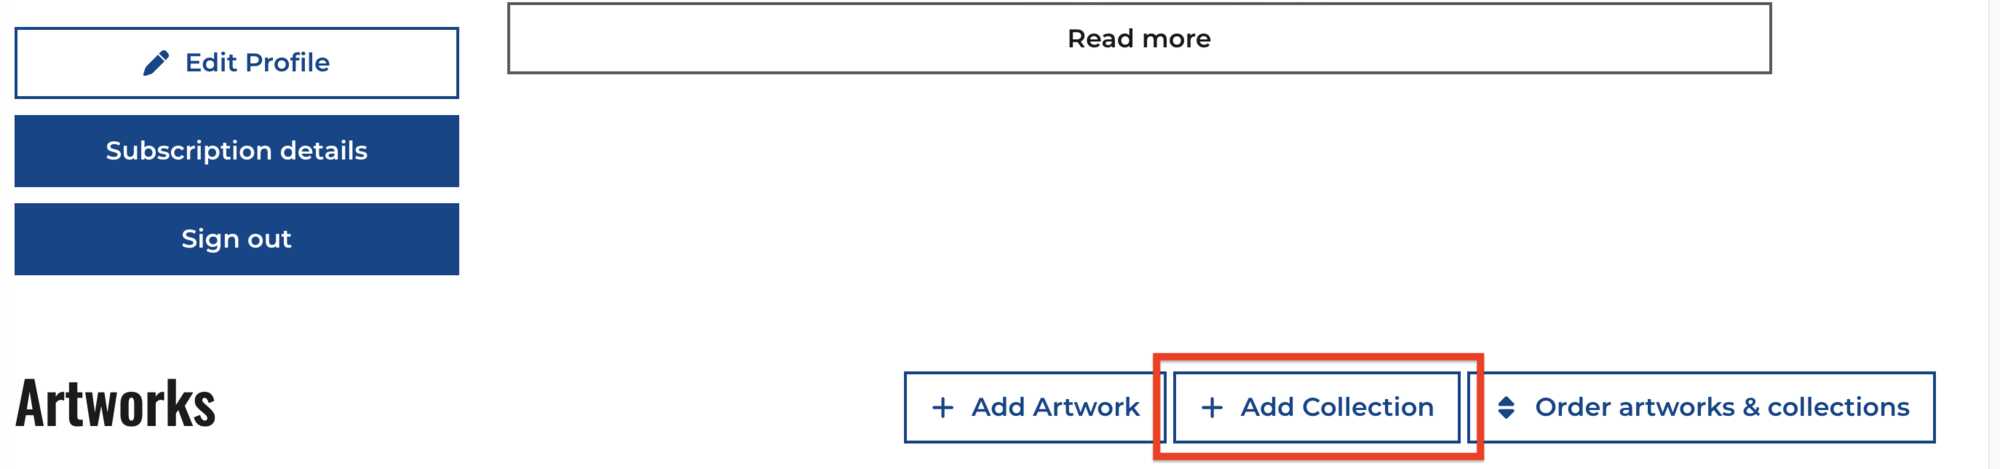
Start by going to your Profile page and scroll down until you arrive at the + Art Collections button, shown in the diagram below.
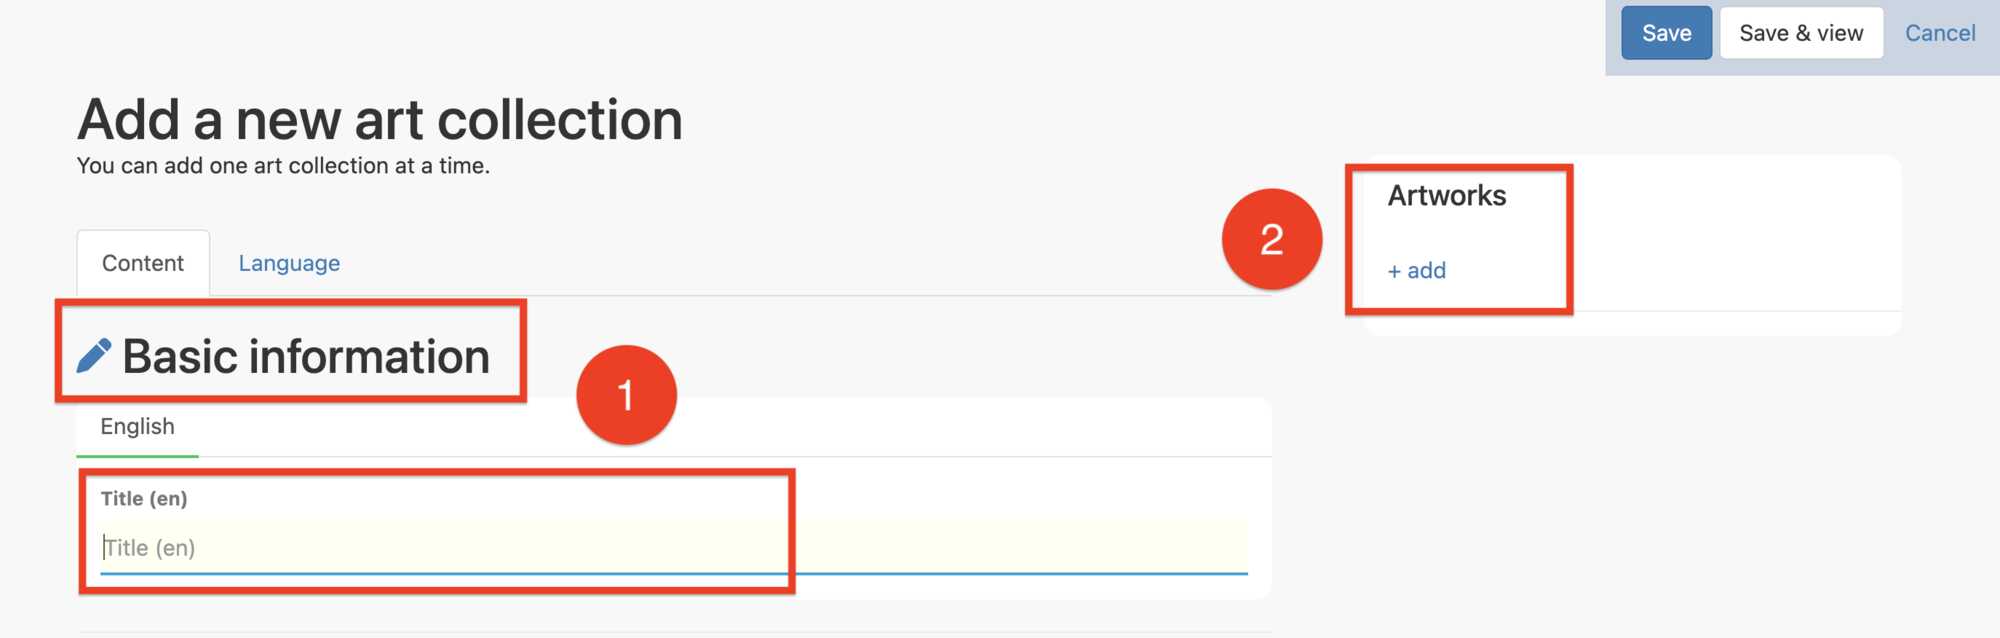
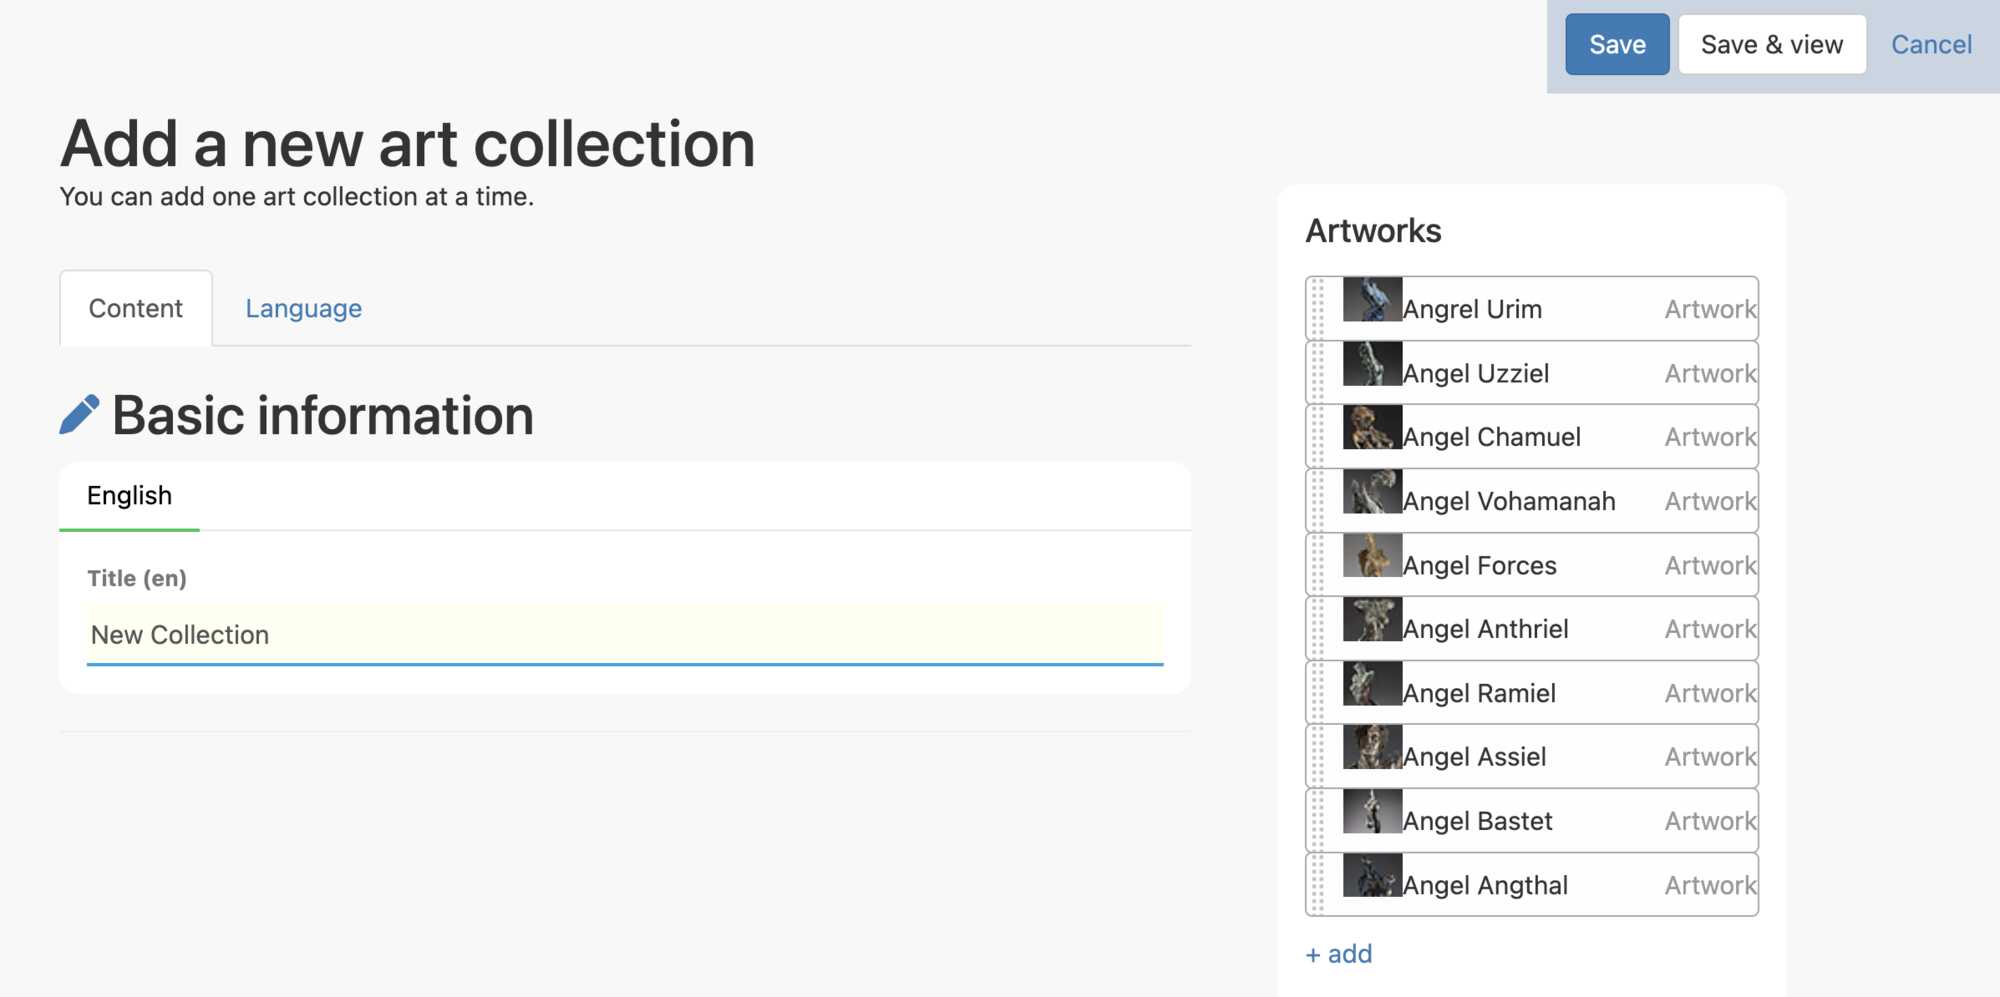
When you click on the + Art Collections button you will be taken to the + Add a new art collection window, where you can enter the Title of your Collection, in the area under Basic information, marked by the number 1, in the diagram below.
Then go to Artworks, marked number 2, in the diagram below, and click on + add button in order to open a new window that will allow you to choose a photograph of a sculpture that you can include in the new Collection that you want to create.
You are, in fact, are creating a "connection" to a photograph that you have already uploaded into memory on the website of one of your sculptures, that connection will place the sculpture in this new group or "Collection" that you are creating.
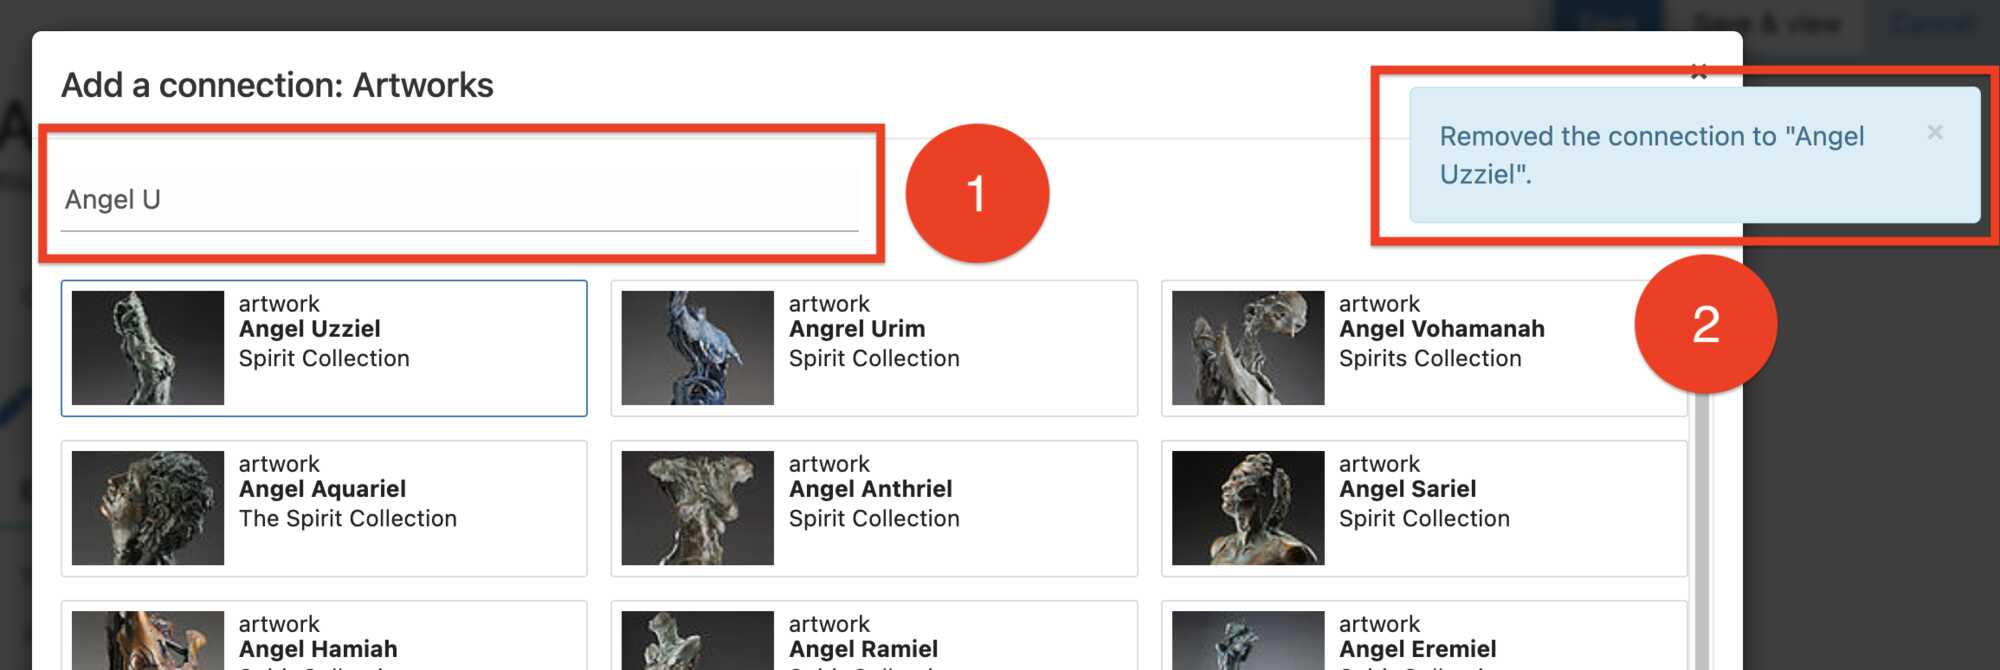
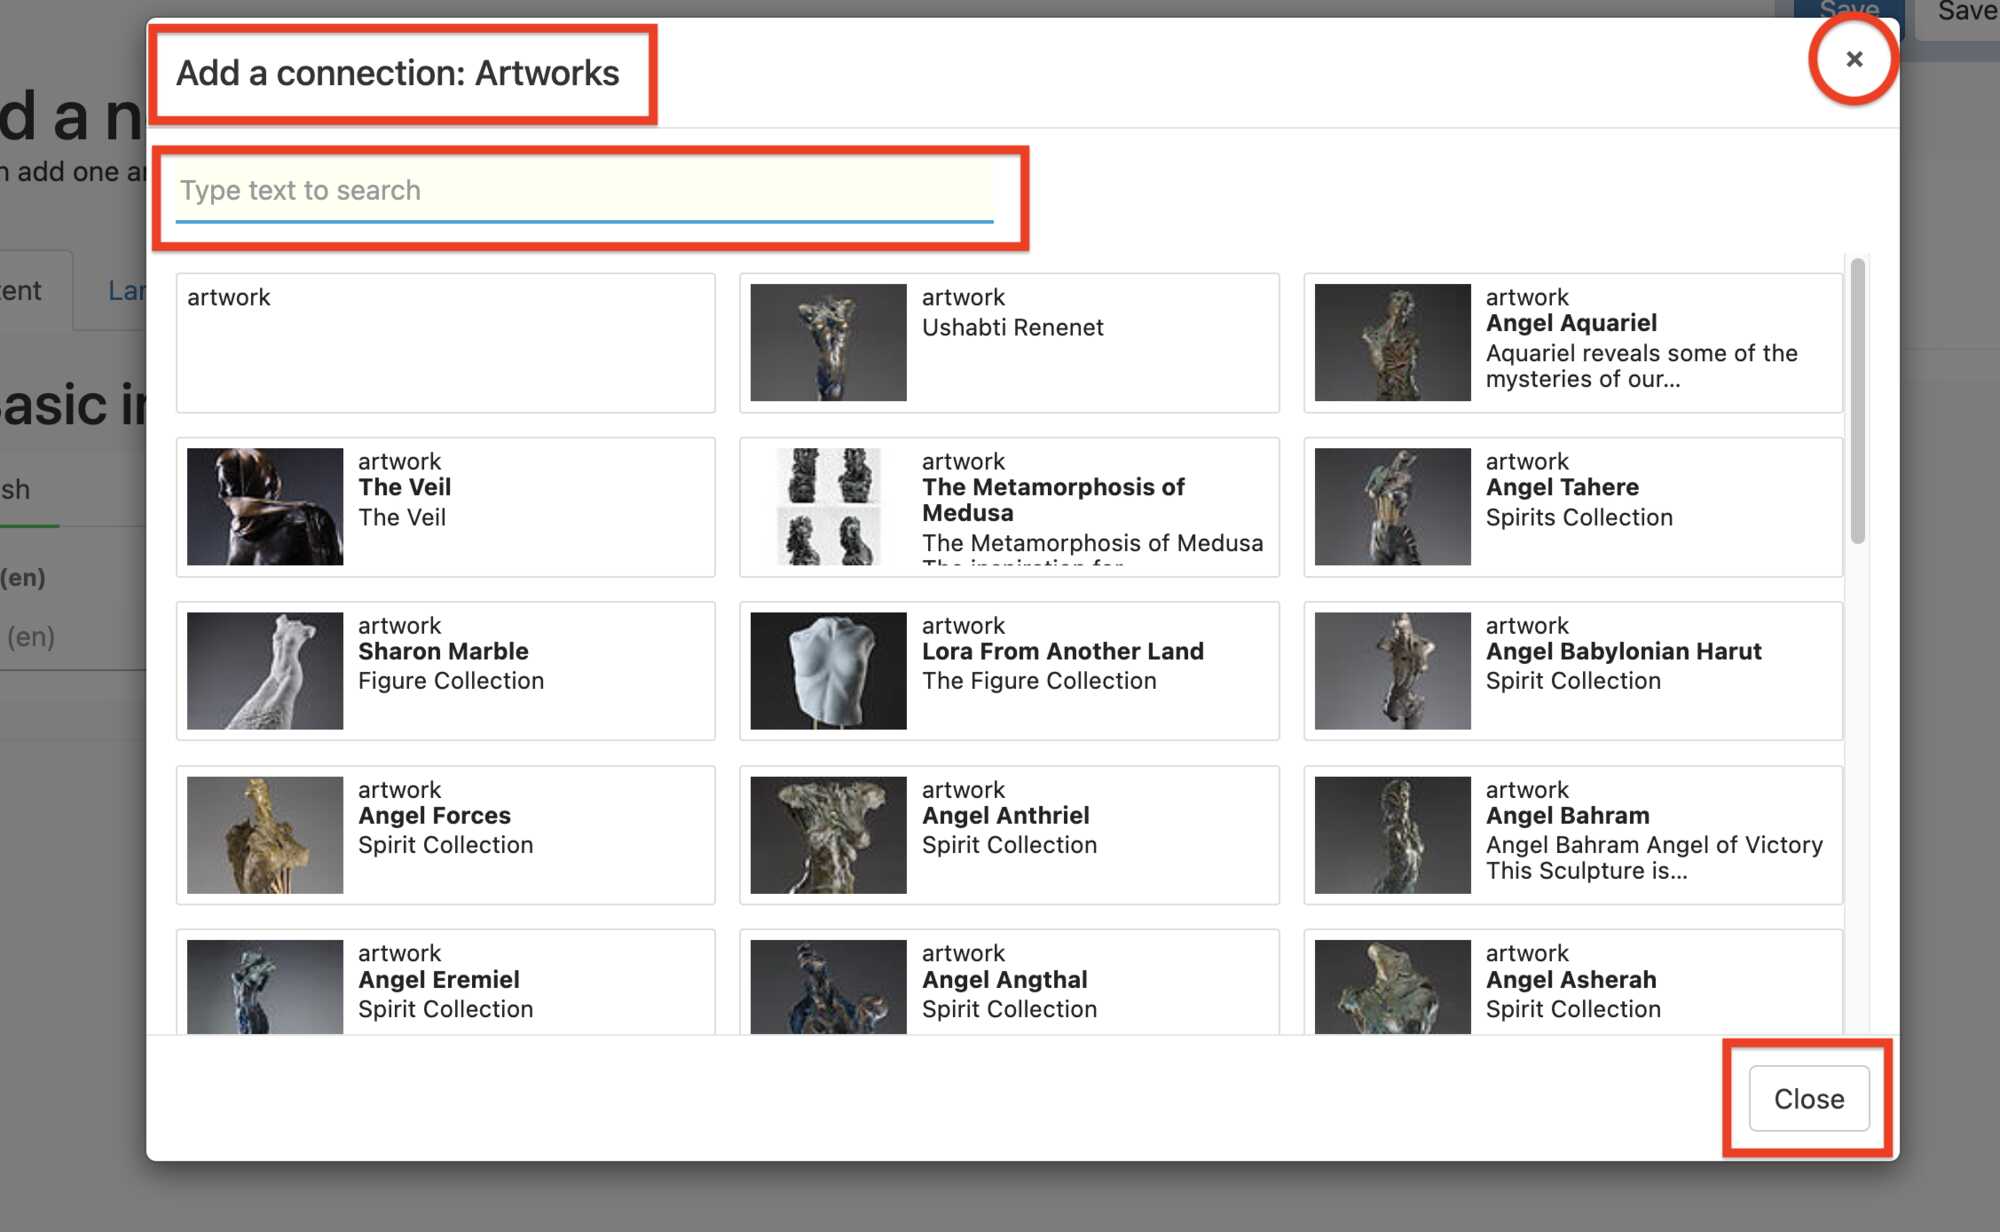
Clicking on the + add buttonwill open a new Add a connection: Artworks window, shown below, you will find a search text window titled; "Type text to search" in the area marked by the red box and the number 1. By entering the names of the sculptures that you want to include in the Collection that you are creating, a thumbnail photo and name of the sculpture will be found and included in the Add a connection: Artworks window below the search box. Here I have typed in the name "Angel"
and then I mis-typed the letter "U" but it doesn't matter, all the sculptures that I have uploaded into the website already, that have the title "Angel" in them have been found and are shown in the window below the text box.
Or you can also just scroll down through all of the photos that you have added so far to your portfolio and choose the one that you are looking for.
When you click on one or any number of thumbnail photos to include them in your new Collection, a small confrmation window appears, marked in the red box in the diagram below by the number 2. The blue windiw indicates the name of the sculpture that you have included, or removed and reads "Added (or Removed) the connection to "the Title of your sculpture", and then the small confrmation window disappears. You will also notice that the colour of the thumbnail photo fades to grey to indicate that the photo has been selected and it will be included in or removed from the new Collection that you are creating.
Once you have chosen all the photos that you want in your Collection, or you just want to see how it looks so far then you can close the window by clicking on the "X", in the red circle in the upper right hand corner, or you can click on the Close button in the red box found in the lower right hand corner of the Add a connection: Artworks window.
Once you have closed the Add a connection: Artworks window you will be taken back to to the Add a new art collection window, where you originally started. Here, you will be able to see all of the photos that you have included in your new Collection, as shown below.
Notice that all of the photos that you added have been stacked up in the order that you choose them, however, you can easily change the order of the photos by simply "grabbing" or clicking and holding, the left edge of the small lable window with the thumbenail photo of the sculpture and the name of the sculpture on it, and dragging it up or down in the column in order to change the order of the photos on the page in your Profile.
Once you have created a Collection or two, then it is easy to add more artworks to a specific Collection by going to the Edit Collection button as shown below, marked by the number 2. You can sort through the column of artworks as shown in the Add a new art collection window in the diagram above, and you can also add a new artwork to the collection you are editing by clicking on the little blue + add button found at the bottom of the cloumn of artworks, you can see this at the very bottom of the diagram shown above.
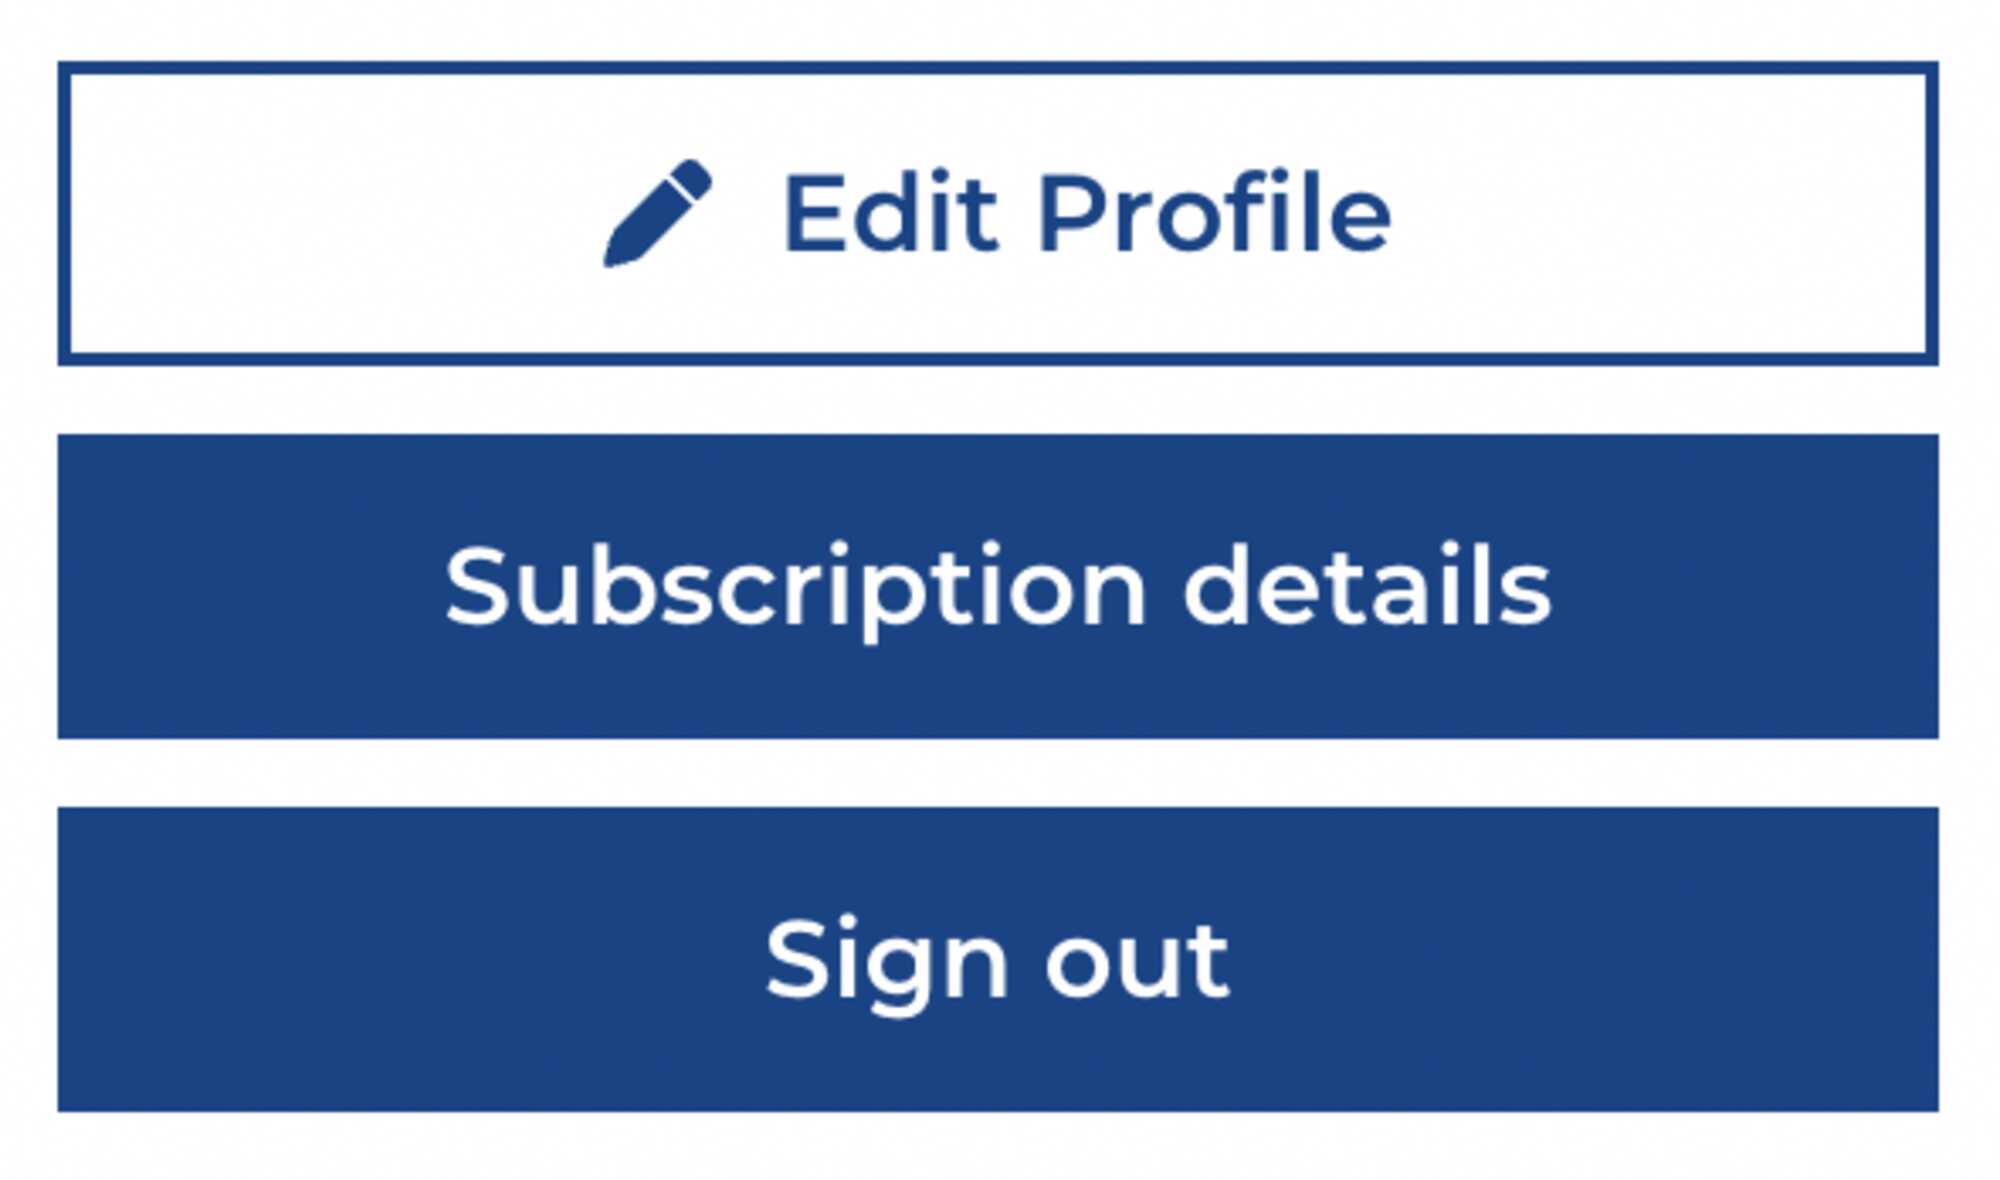
This will add artworks to the specific Collection that you are editing, however, if you wish to add a different, "completely new", artwork to your Profile, you will have to go back to your Profile page and use + Add Artwork button, in the row of buttons found below and to the right of the Sign out button on your Profile page.
In this case, after you have uploaded the "completely new" sculpture you will need to search for the photos that you have uploaded of this "completely new" sculpture, by using the name of the sculpture in the Find Media text box that is a part of the Add a connection window. The Add a connection window is the one that you always use to add media. So remember to give a unique title to each photo so that you can find it again, especially if you have a number of Collections.
When you use the the Edit Collection button as shown below, marked by the number 2, you can only change the order of the photos that appear in the column on the right, that show artwork you have already uploaded.
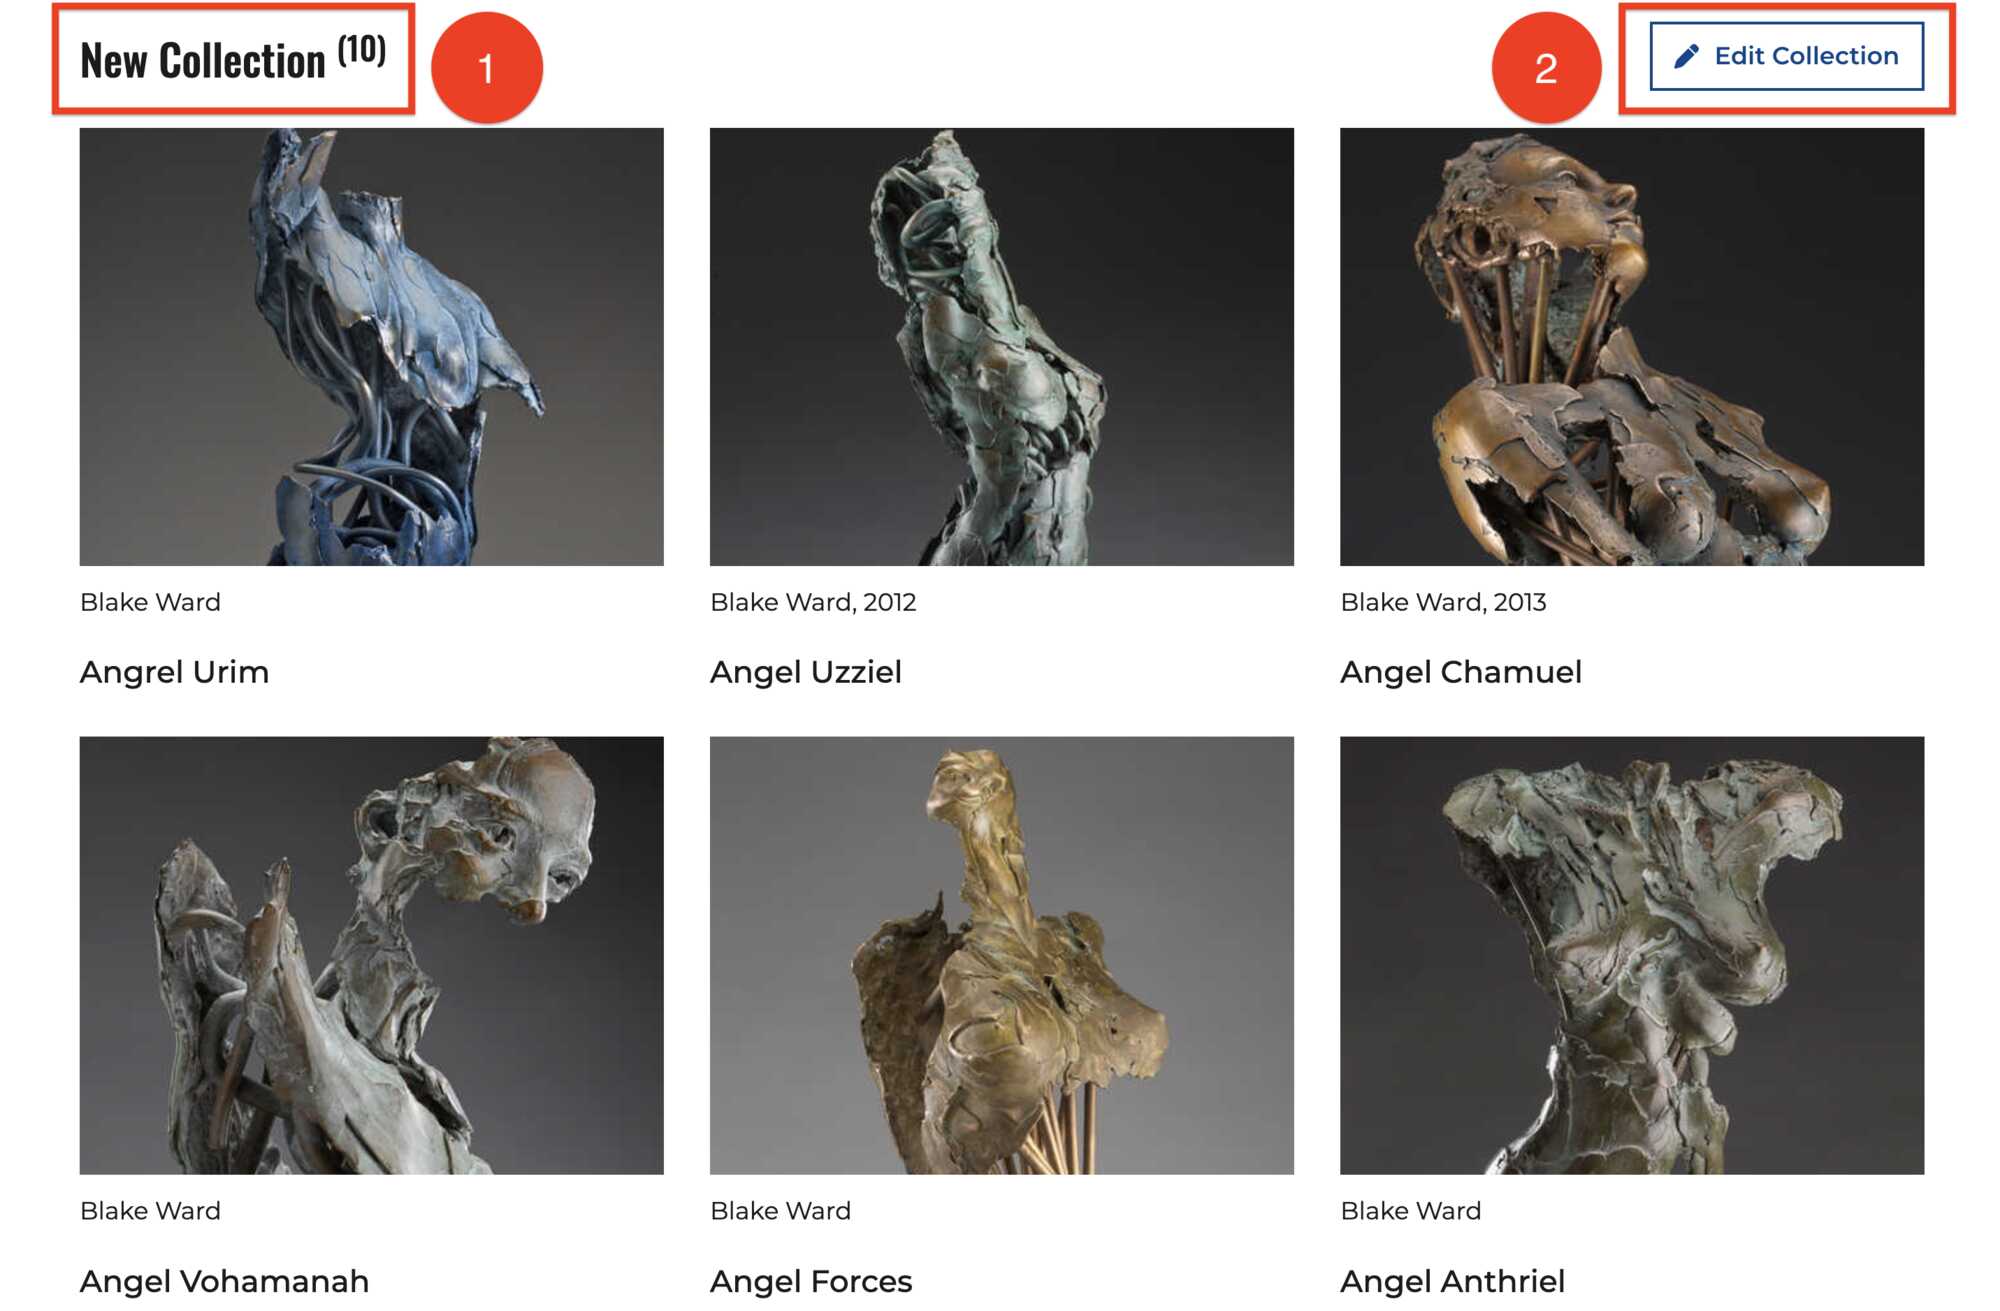
Now if you go up to the Save & View button in the upper right hand corner of the Add a new art collection window, above, you will be taken back to the front end of your Profile page and you can see your New Collection, as shown in the photo below.
As you add Collections, the newest Collection that you made will be at the bottom of your Profile page, so you will have to scroll down to the bottom of your Profile page to find it.
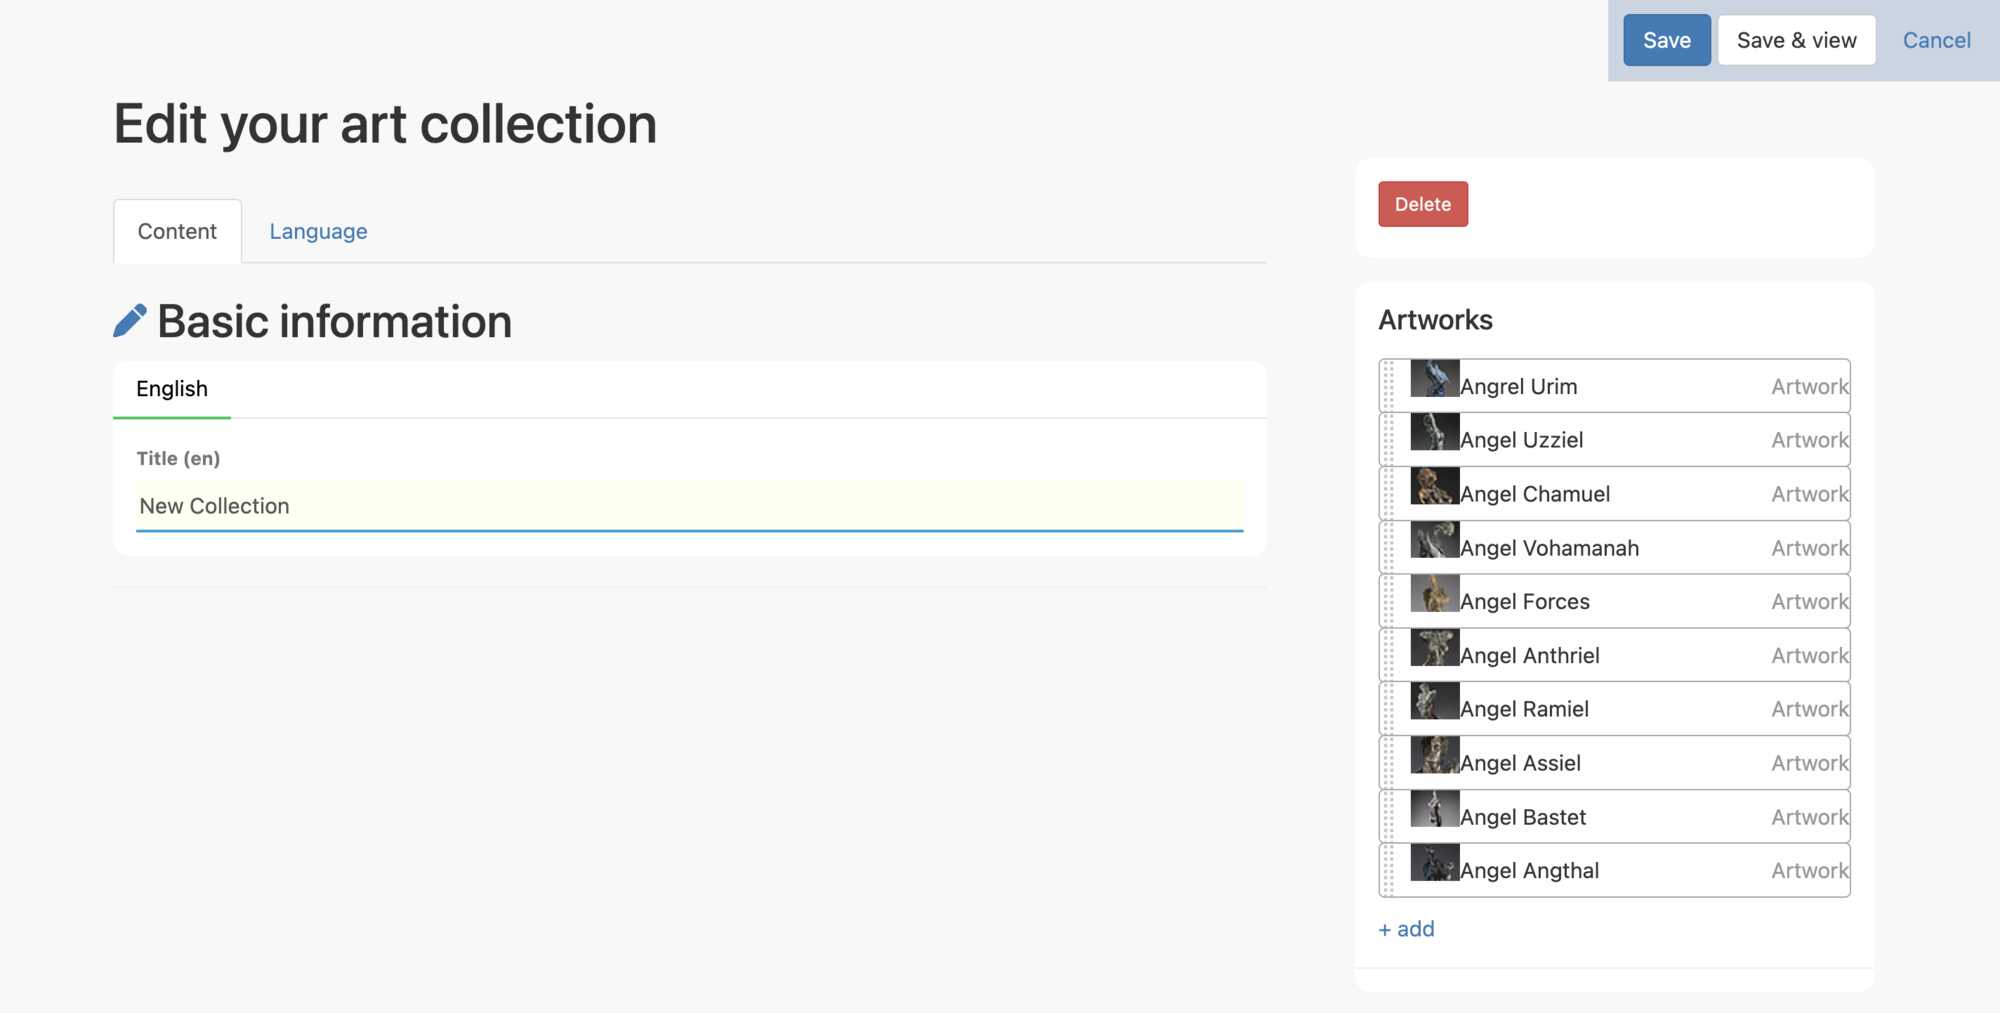
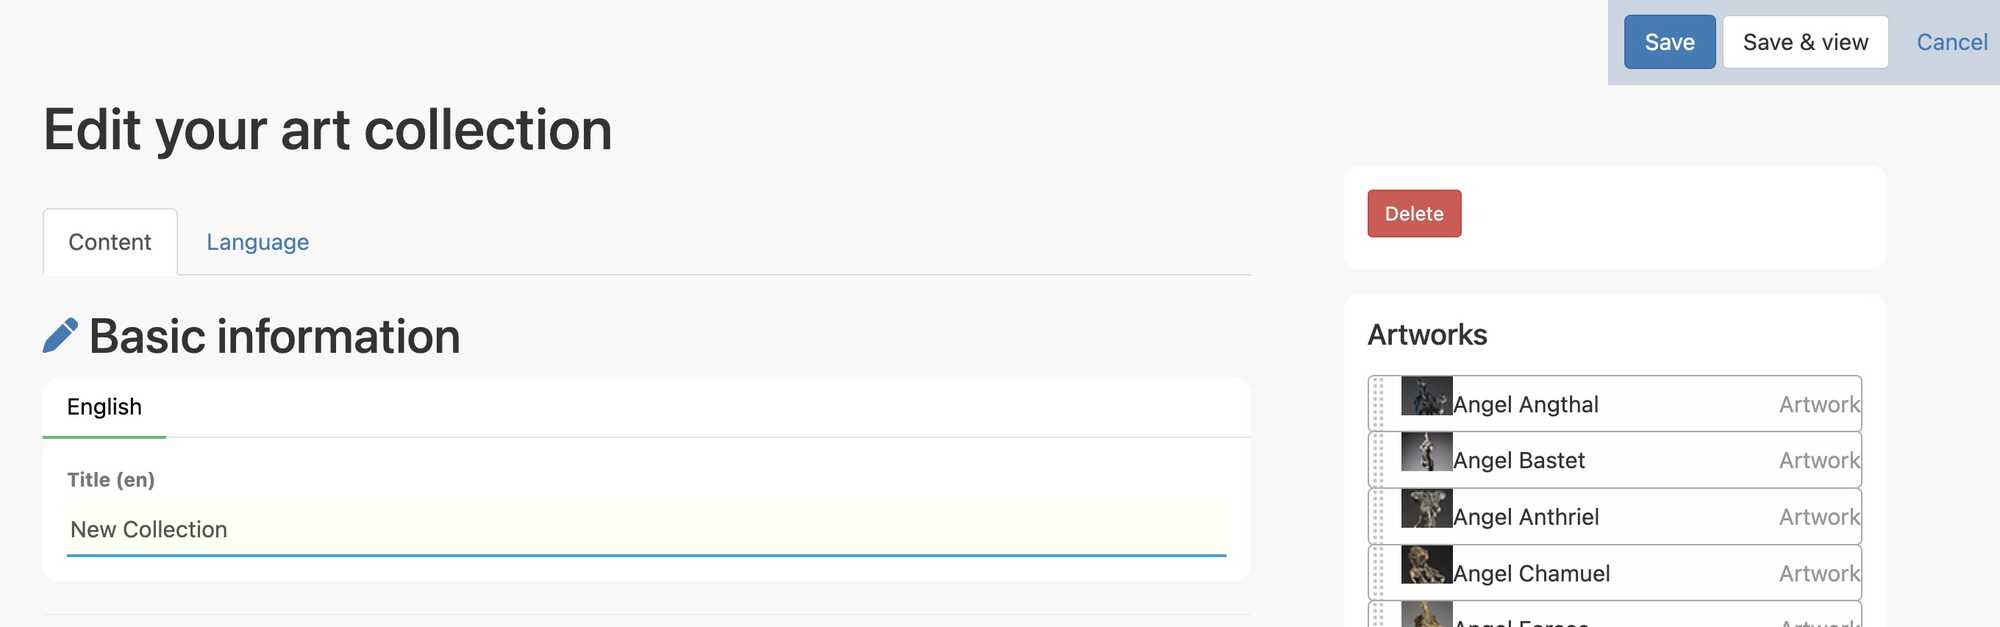
Once you click on the Edit Collection button, a new window will open, called Edit your art collection. Here you can change the name of your new collection and change the order of the photos of your work as shown in the diagram below.
In order to change the order I will drag and drop the thumbnail box for each sculpture. Personally, I will place the works in chronological order from the last created to the first created, for two reasons.
First, I have created each Collection starting with my early work, then the next series of work that I built in decending order with the newest Collection first, or at the top. This is to show the eveloution of my work over the years, and I do the same with the work inside each Collection as well.
The second reason is that the first picture in the Collection will be the newest and therefore, the most likely to be still in my inventory for sale.
The last thing that you will need to do, once you have your Collections completed, is arrange the order of each Collection. You will find the list of all the Collections that you have created in the back end of your main Profile page at the very bottom, so go to your Profile page front end, and click on the Order artworks & collections button shown in the red box below.
I will point out to you in the diagram below that I have used rather long titles for each of my Collections in order to include the actual years in which I created the sculpture included in each Collection, and arranged them chronologically.
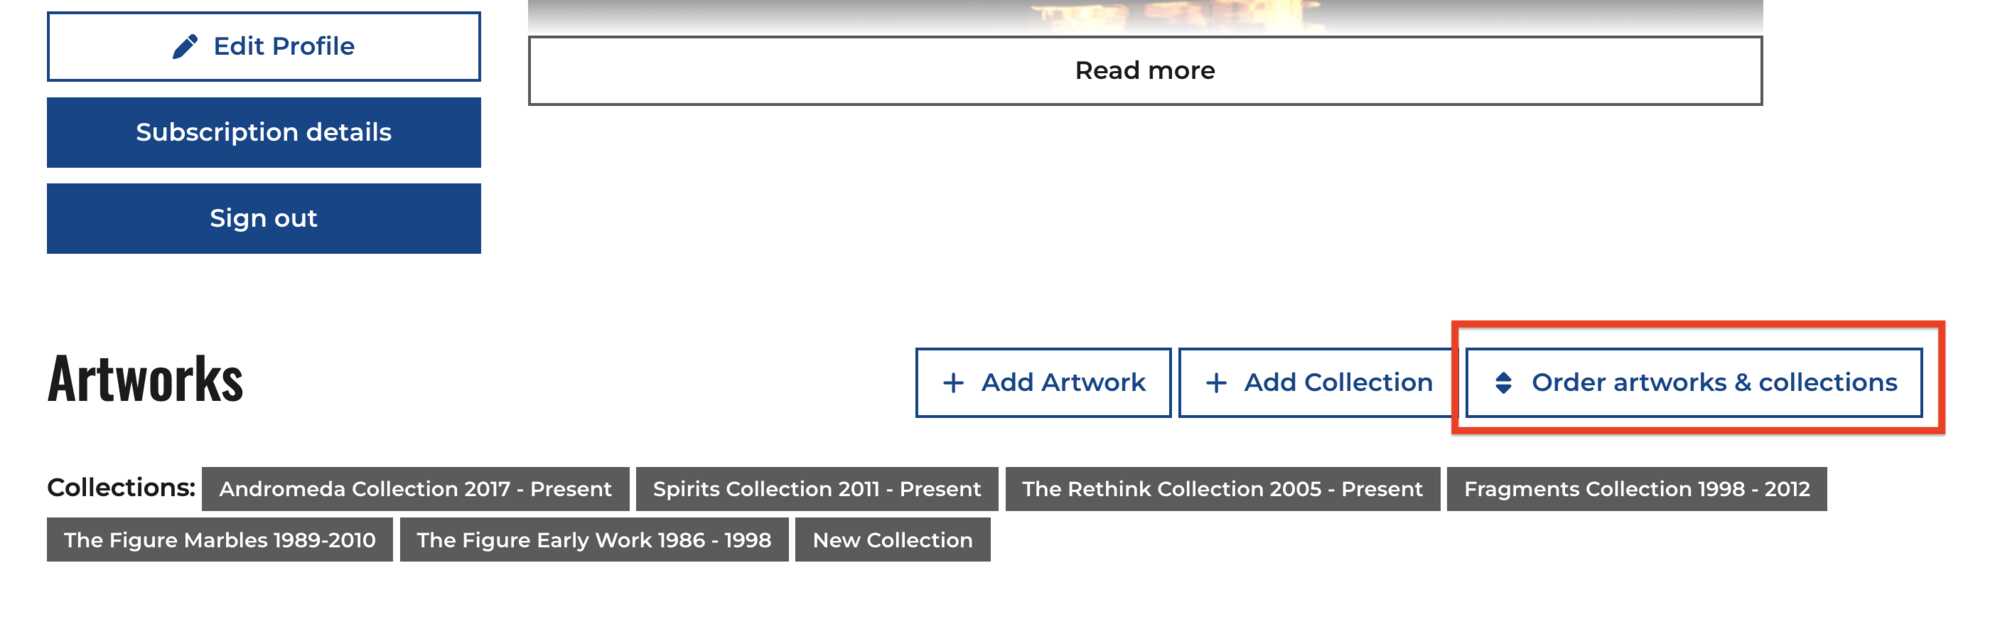
Clicking on the Order artworks & collections button shown in the red box above will take you to the back end of your main Profile page, shown below.
You will want to scroll down to the very bottom, until you reach the window entitled Art collections show below. You can see here that the "New Collection" that I added in order to make this "How to creat collections of artwork" shows at the bottom of the column of Collections in the diagram below.
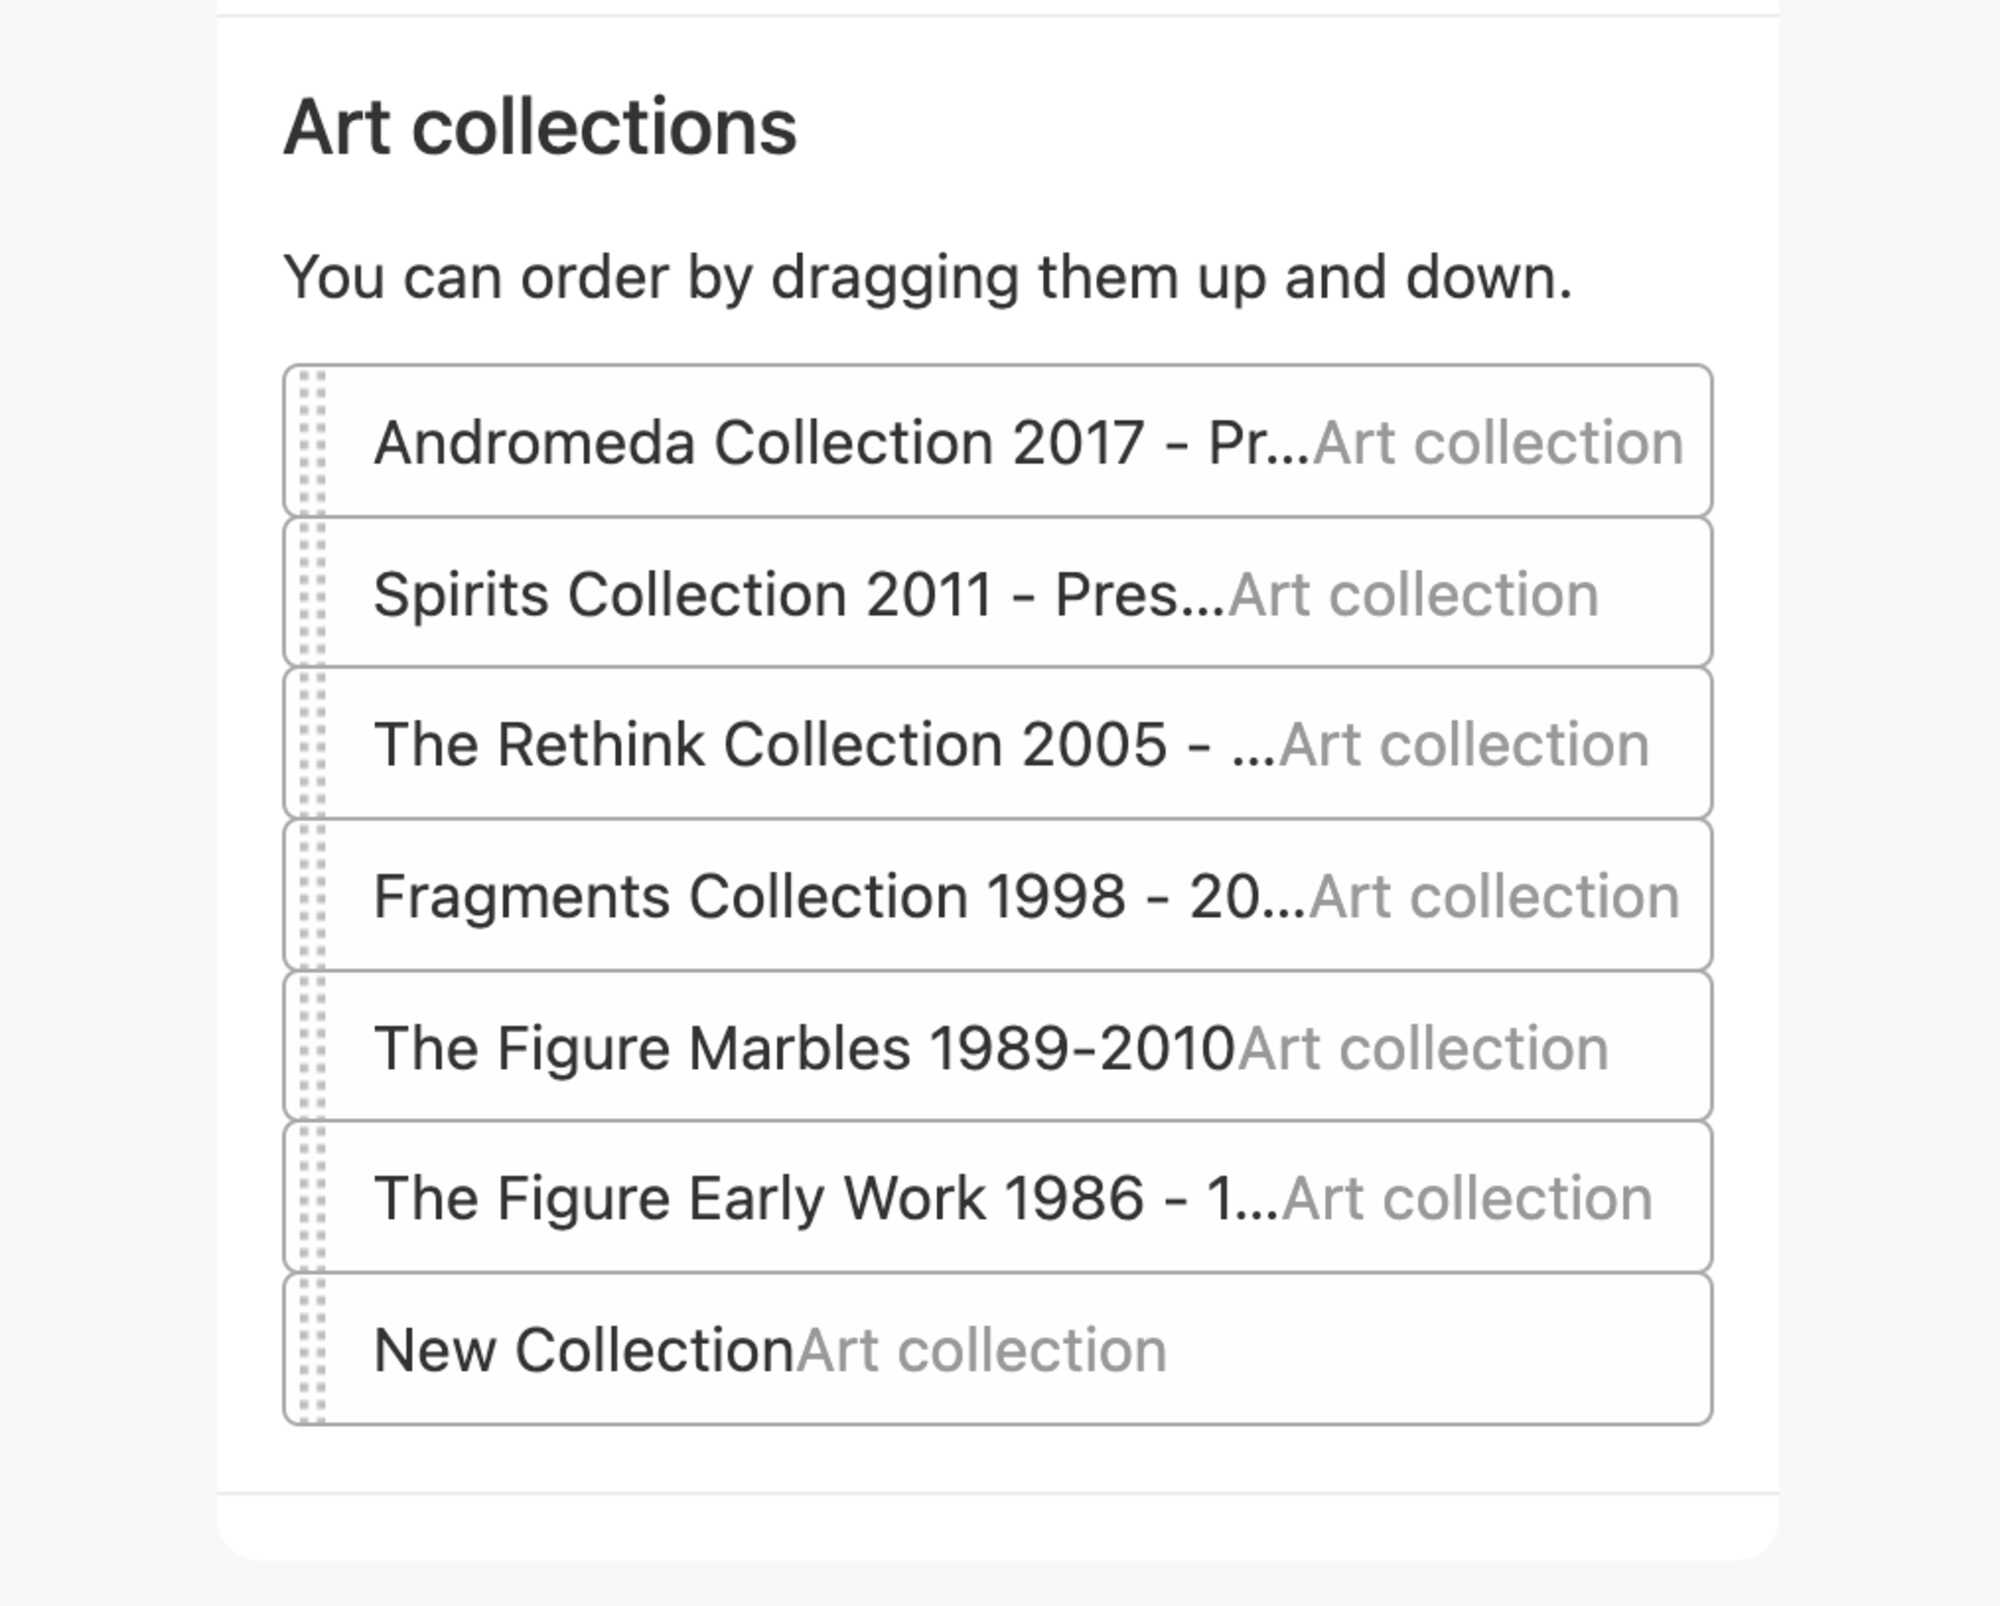
Now that I am done with this Collection, I will delete it by clicking on the red Delete button found above the Artworks colum in the diagram below.
One last word about Collections, once you have begun using the Collections function then you will find a group of photos, which includes all of your uploaded photos, are repeated again at the bottom of your Profile page. This means that they are shown once in the different Collections that you have created, and then they are shown again at the bottom of your Profile page, in a Section that is called All artworks, further, they are presented in the order that you uploaded them.
It is likely that you may want to remove this group of All artworks from view.
Once you click on the Edit Profile button you will be taken to the "back end" of your Profile page, which looks like the page shown below.
Now scroll down until you find the All artworks title, marked as number 1 in the Basic profile information window shown below.
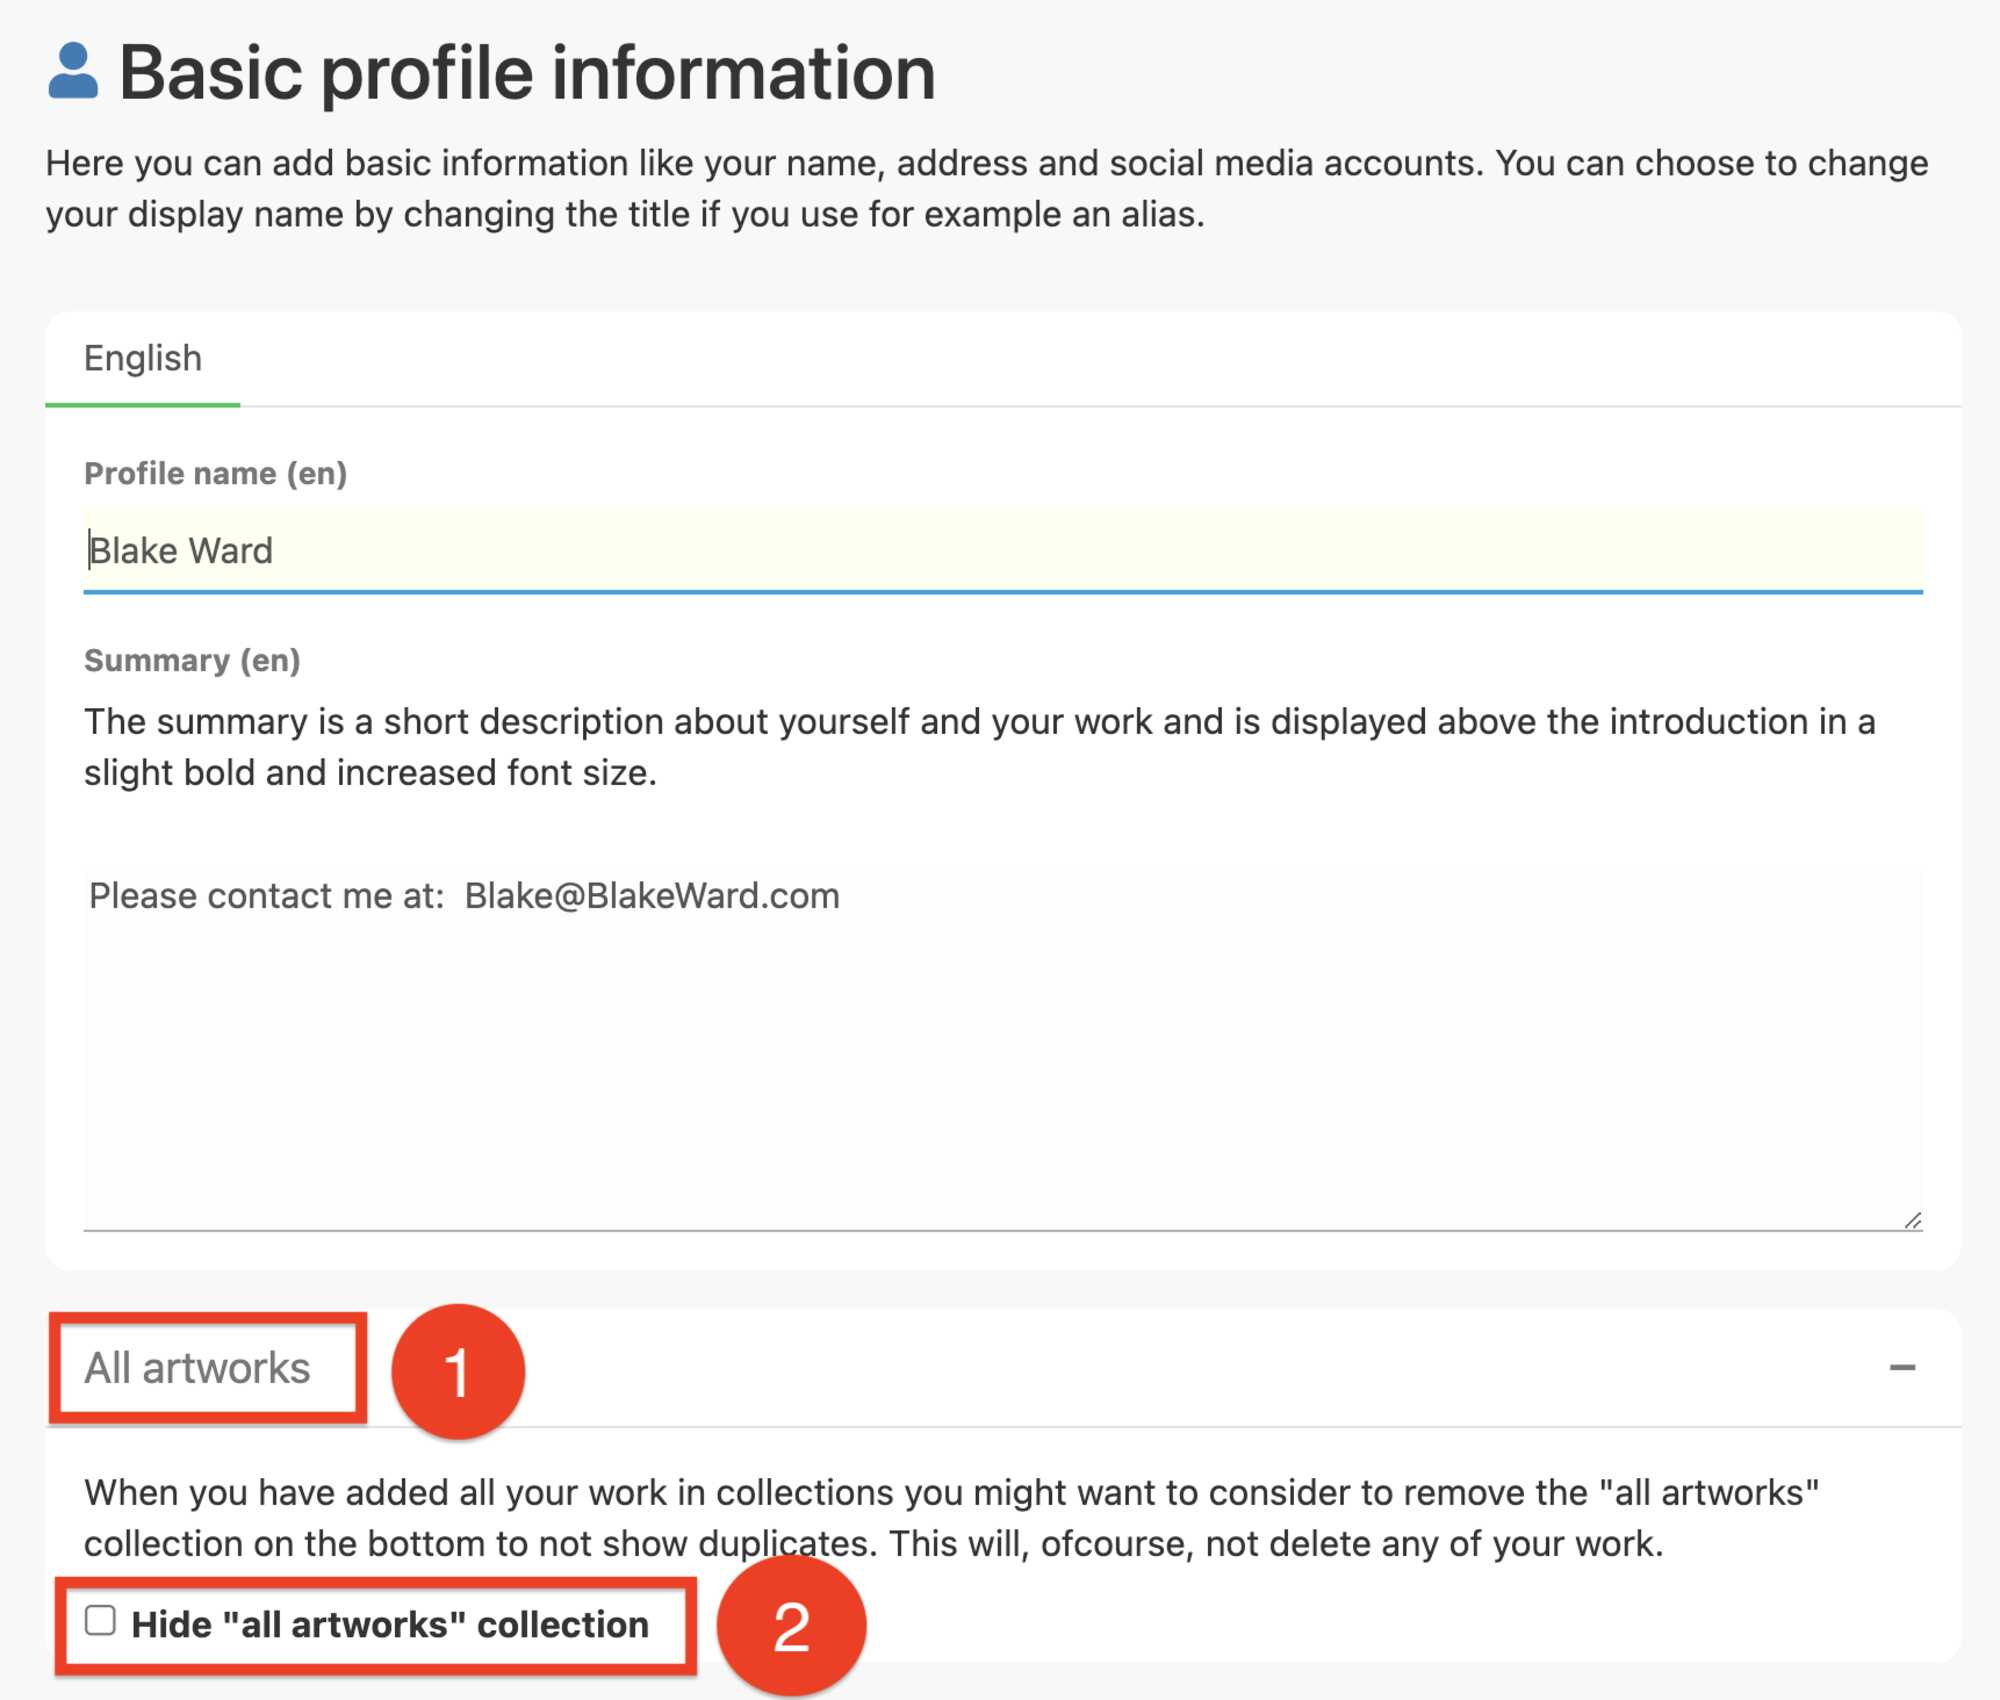
In order to hide the All artworks section click on the small box indicated in the diagram above and marked as number 2.
If you are using the Collections function you may have already checked this button and to find a "lost" photo you may have to uncheck this small box beside the title "Hide "all artworks" collection", and check it again once you have found your photo.
Find a Lost Photo
Let's say that your editing process was interupted and when you return to your page you can not find the photo that you were about to edit.
All you need to do is go to your the "front end" of your Profile page show below.
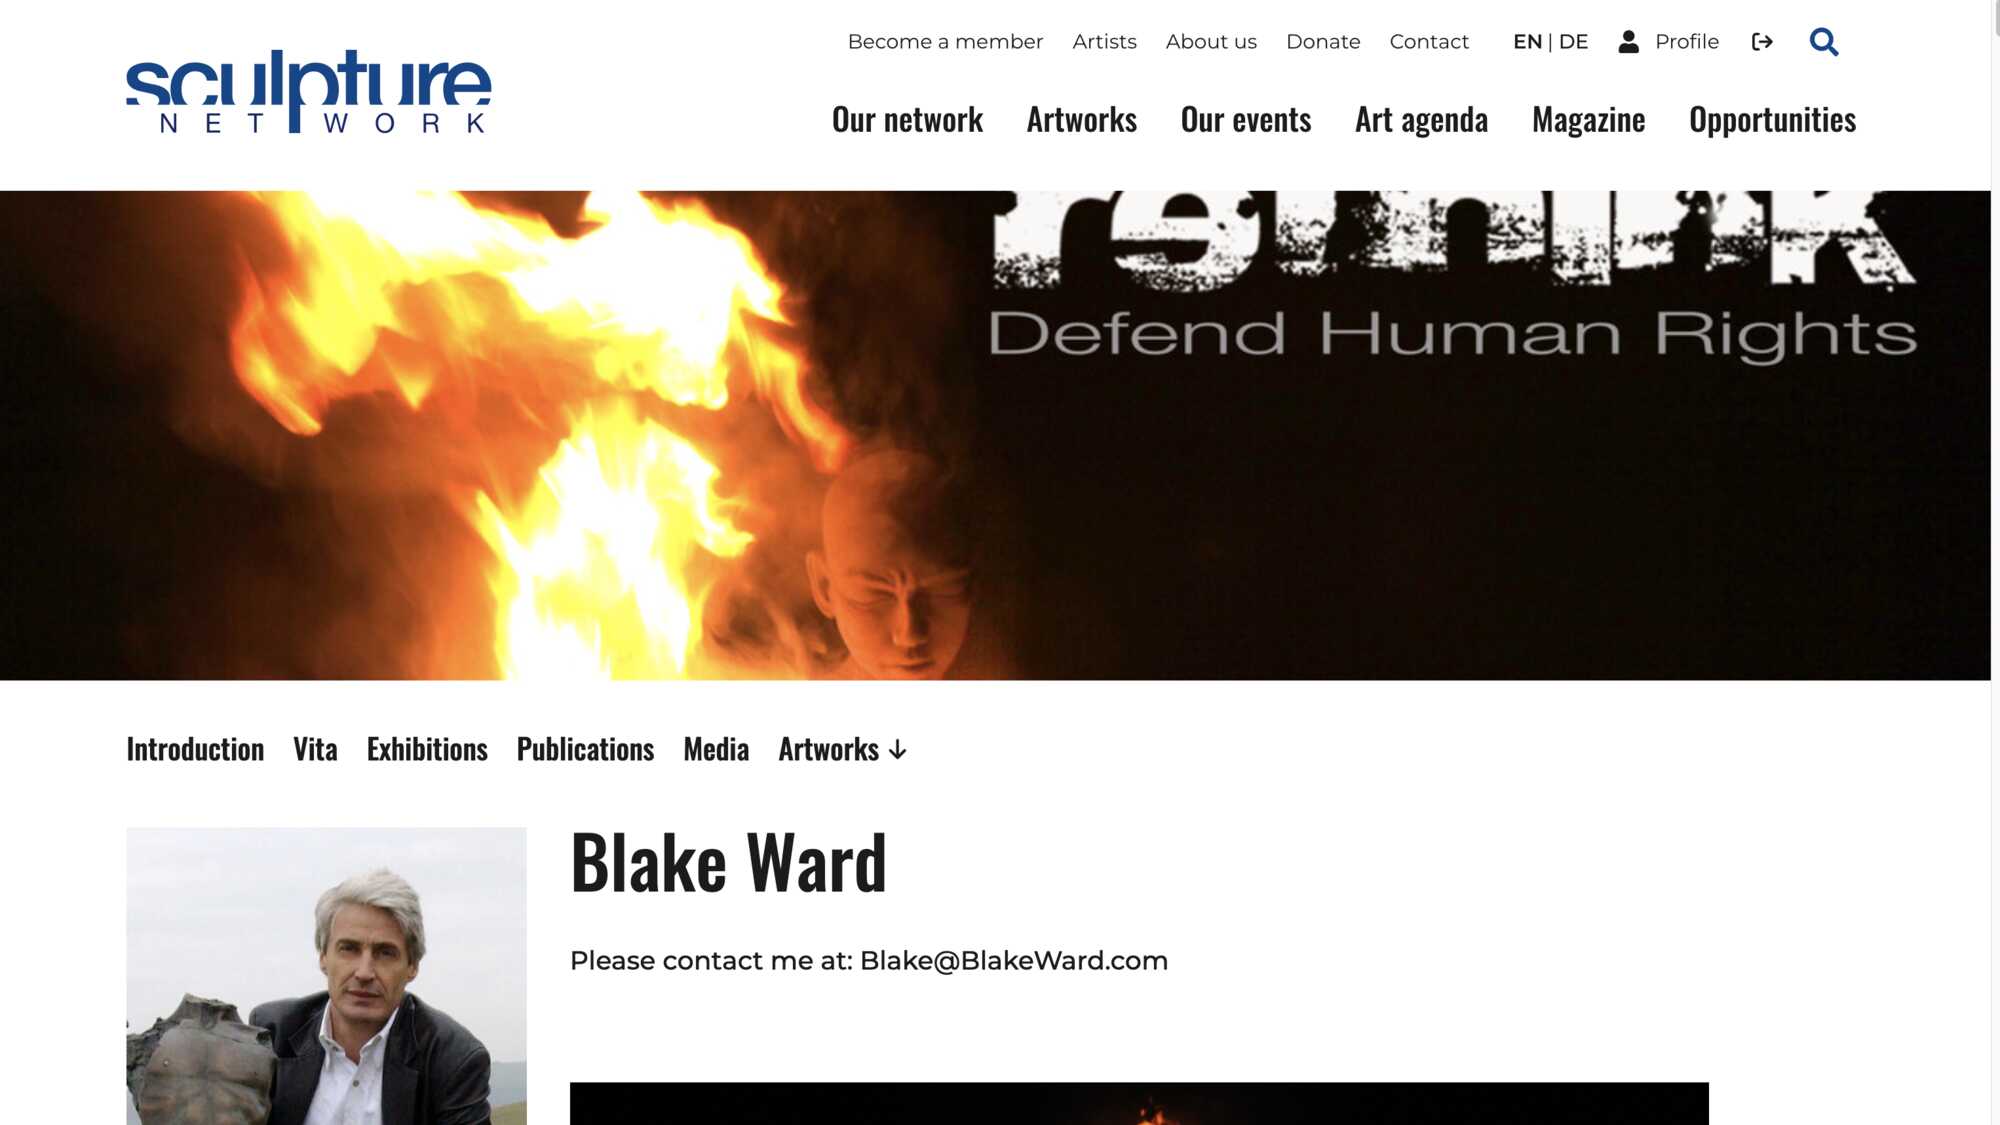
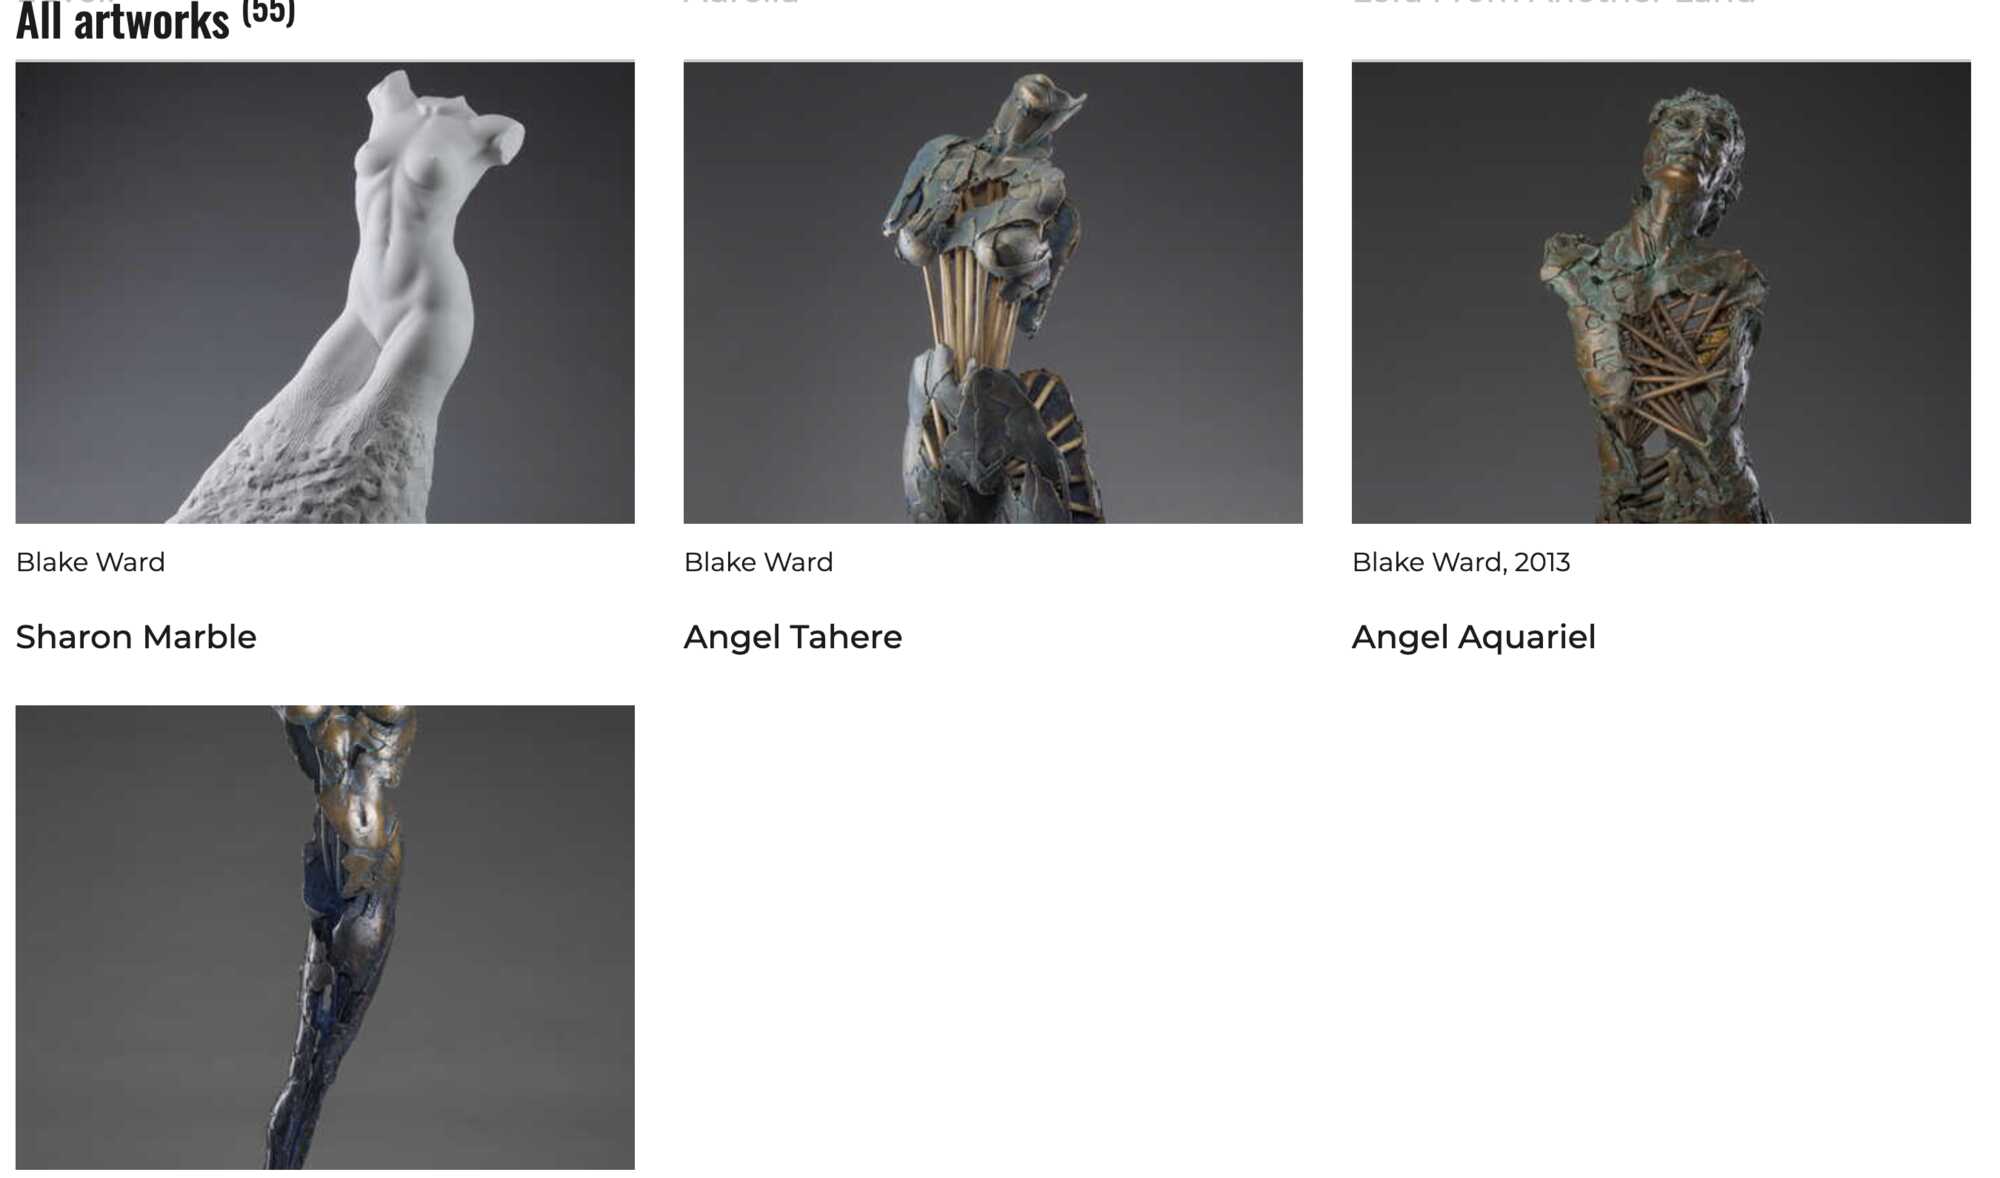
Once you are on the "front end" of of your Profile page scroll down to the bottom of the page and you will find all of the photos that you have posted on your page in the section called All artworks. The last photo on the page will be the last photo that you uploaded, as shown in the diagram below.
If you have begun using the Collections Function on your Profile page then you may have hidden this group of photos so that they are not shown in the different Collections and then repeated again at the bottom of the page in the order that you uploaded them.
Once you click on the Edit Profile button you will be taken to the "back end" of your Profile page, which looks like the page shown below.
Now scroll down untili you find the All artworks title, marked as number 1 in the Basic profile information window shown below.
In order to hide "all artworks" click on the small box indicated in the diagram above and marked as number 2. If you are using the Collections Function you may have already checked this button and to find your "lost" photo you may have to uncheck this small box beside the title "Hide "all artworks" collection".
Thank you for joining me on this voyage through the website!
Please feel free to drop me a note and let me know where this document needs more work, if you find areas where the explaination is not clear, or where there are typos, mis-spellings, errors in grammar or other corrections or if you have comments as to how I can improve these instructions.
Thanks, please email me at Blake@sculpture-network.org
I appreciate your help.
Warm regards
Blake