Once you are a member of Sculpture Network you can create your Profile Page. First Log In on the Sculpture Network Home Page and go to the Profile Button at the top of the page, this is shown in the red box in the image below.
This is not where Pictures of your sculpture are uploaded into your Profile Portfolio, that will go elsewhere… We describe how to do that in the Sculpture Network Help Page: Add Artwork to your Profile Portfolio.
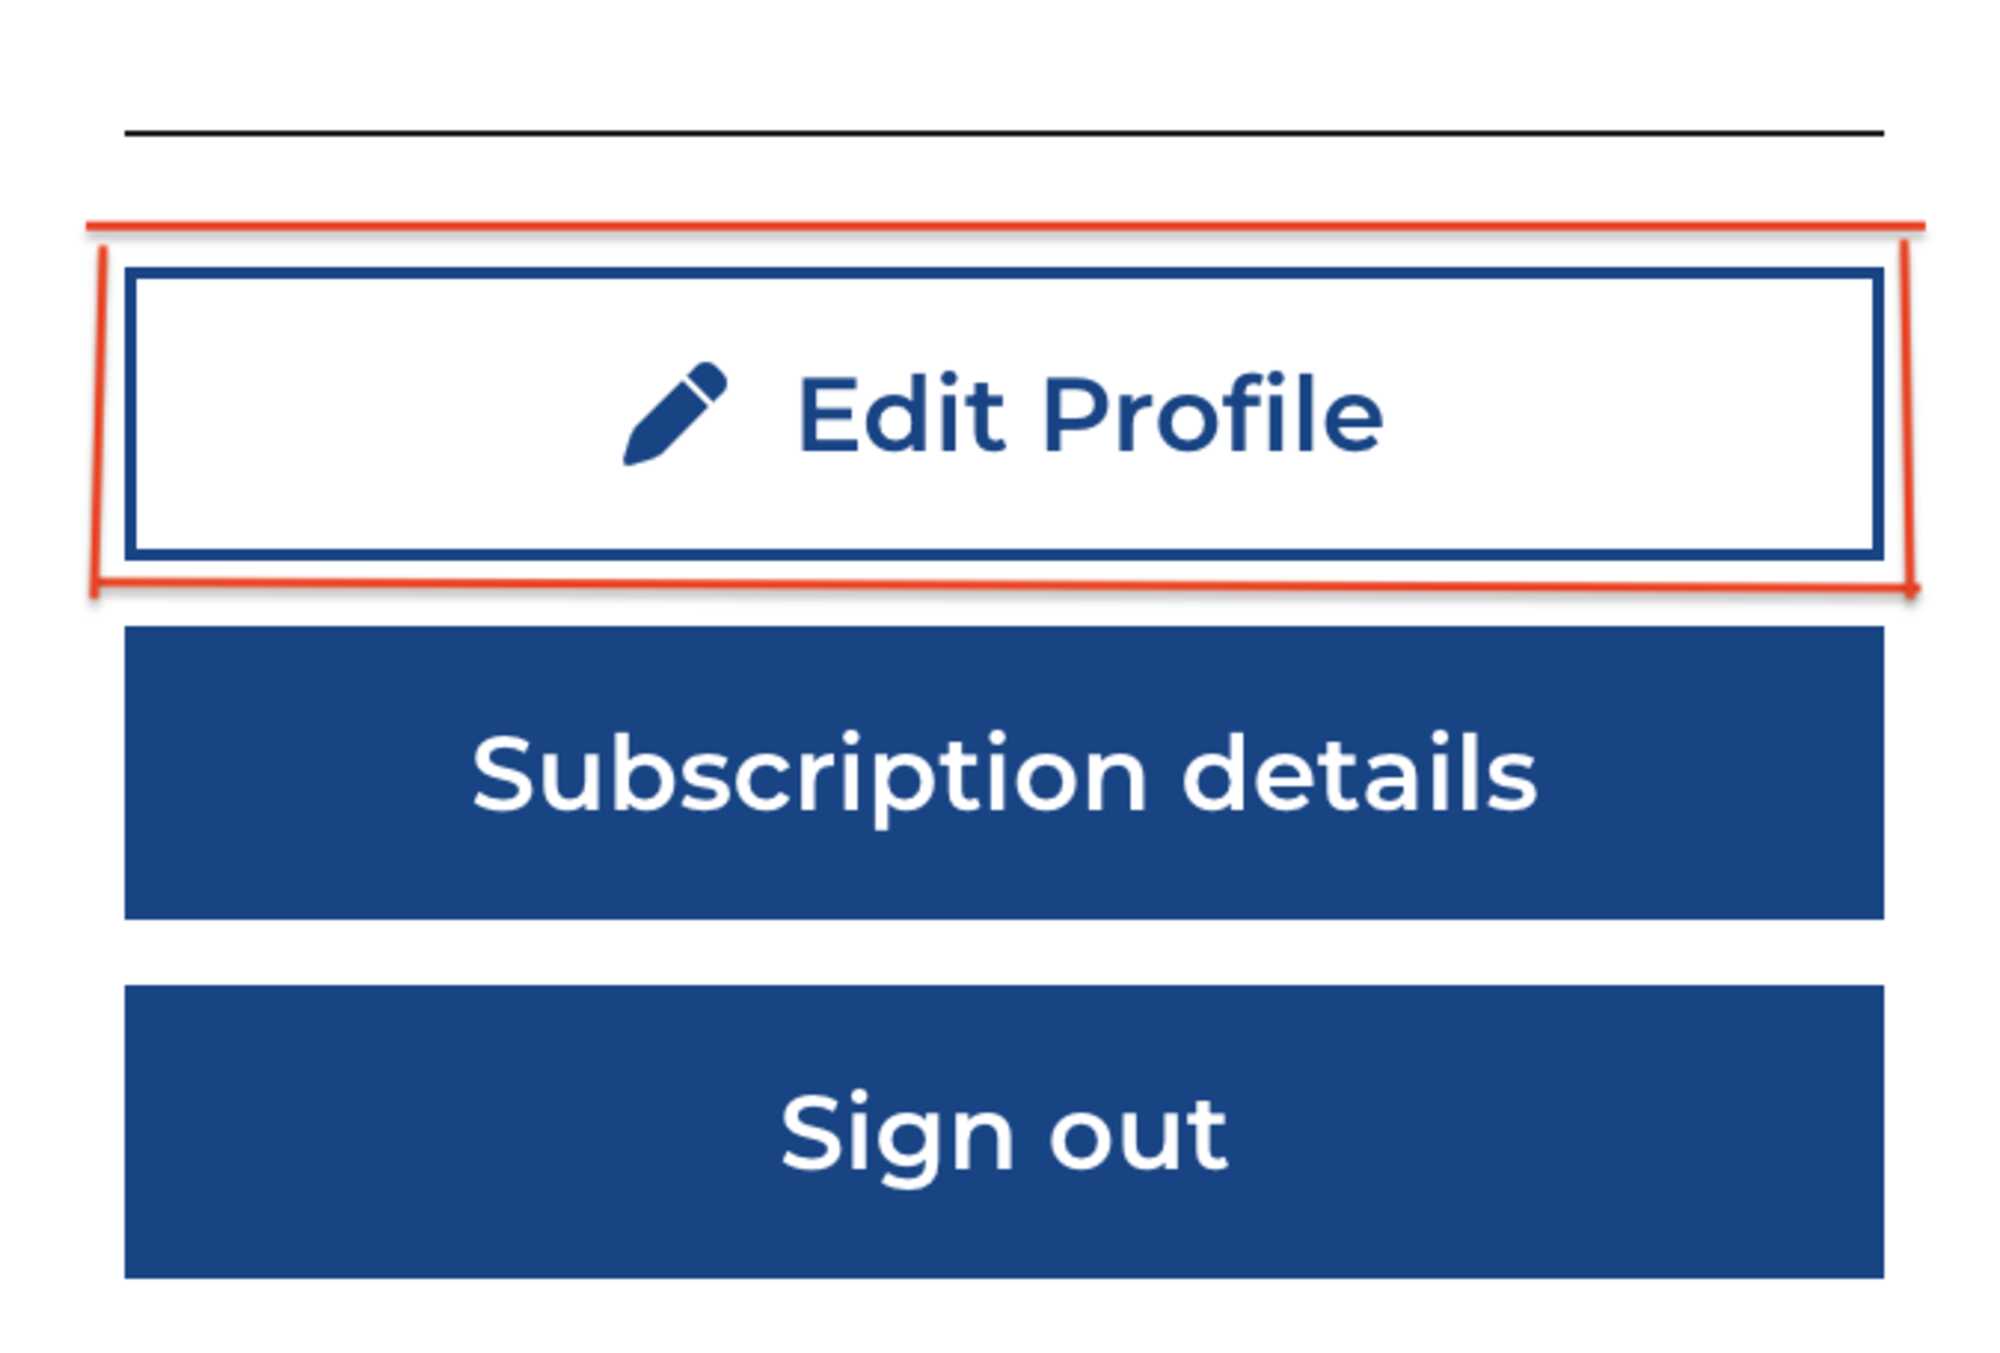
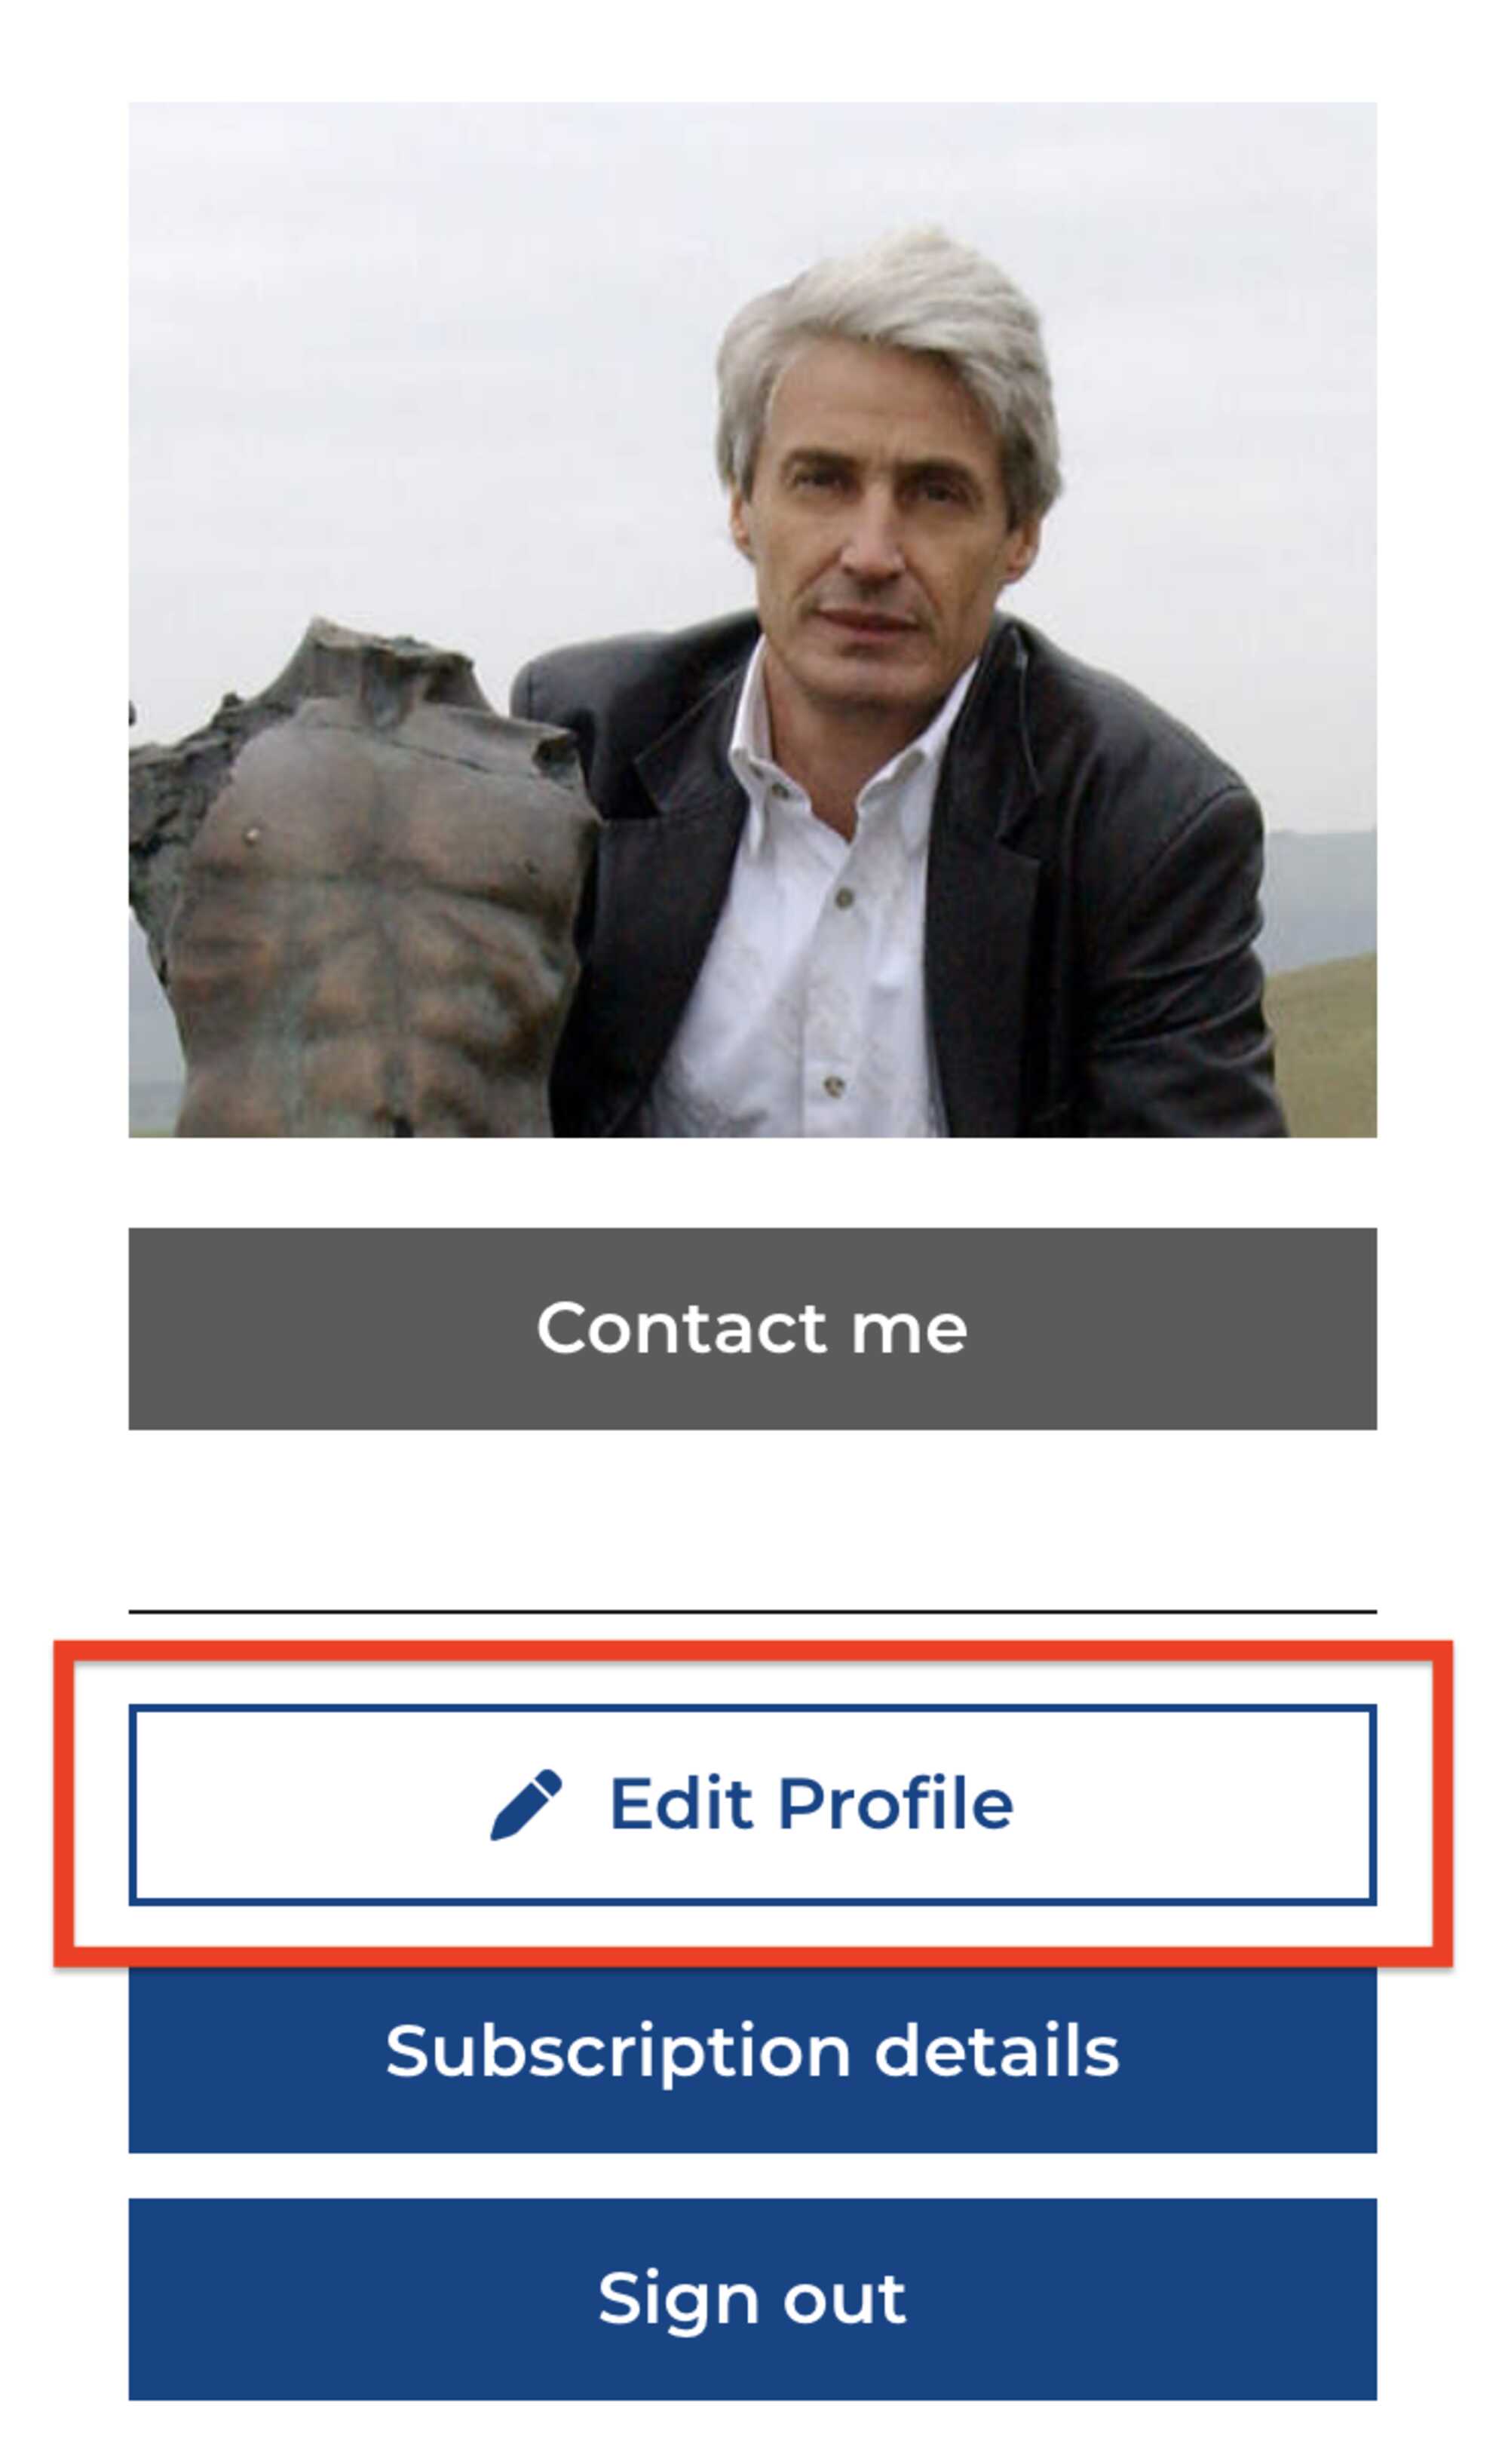
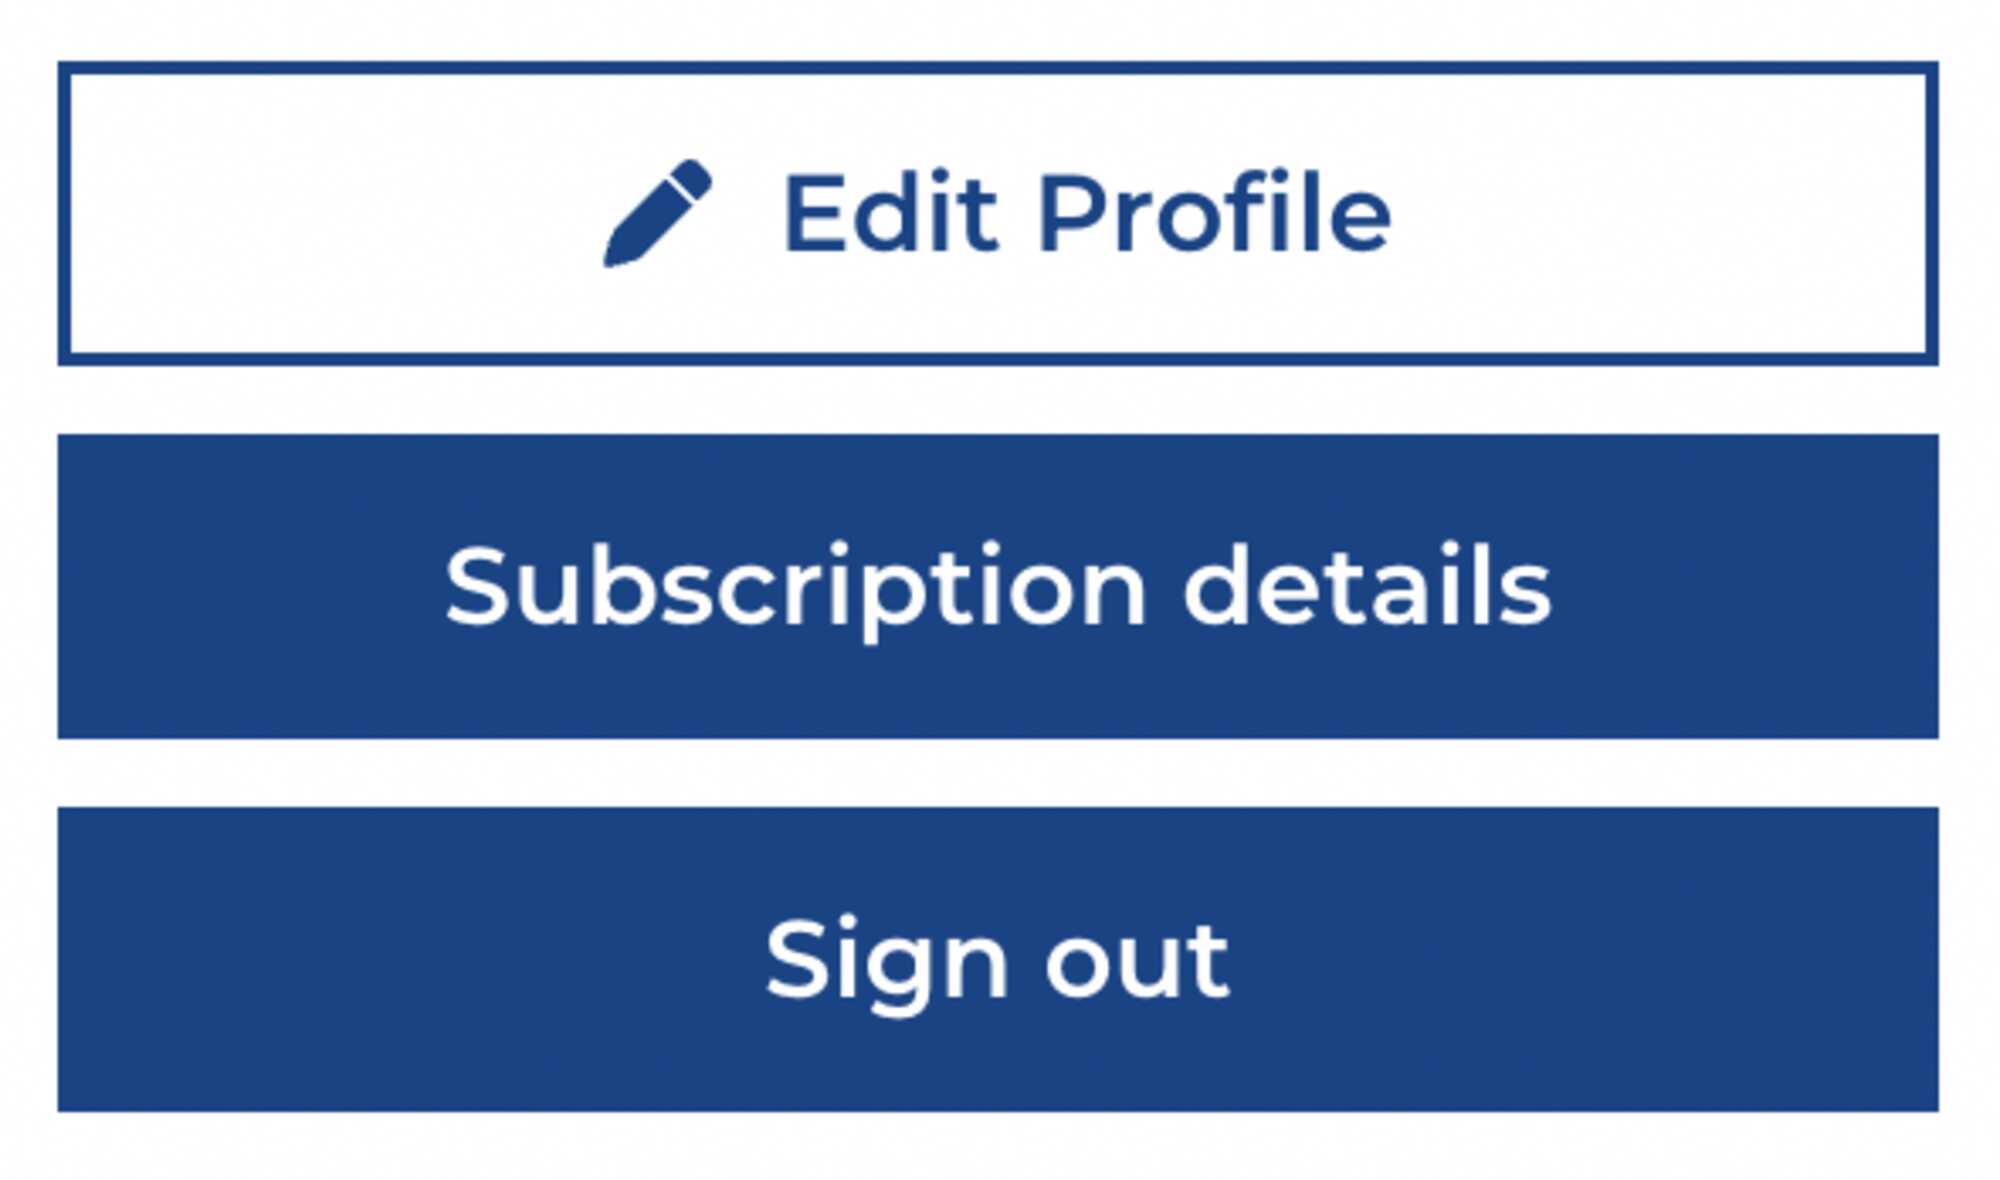
Once you are logged in, to get access to the "back end" of your Profile page, click on the Profile button, Shown above and then scroll down to the Edit Profile button shown in the red box below.
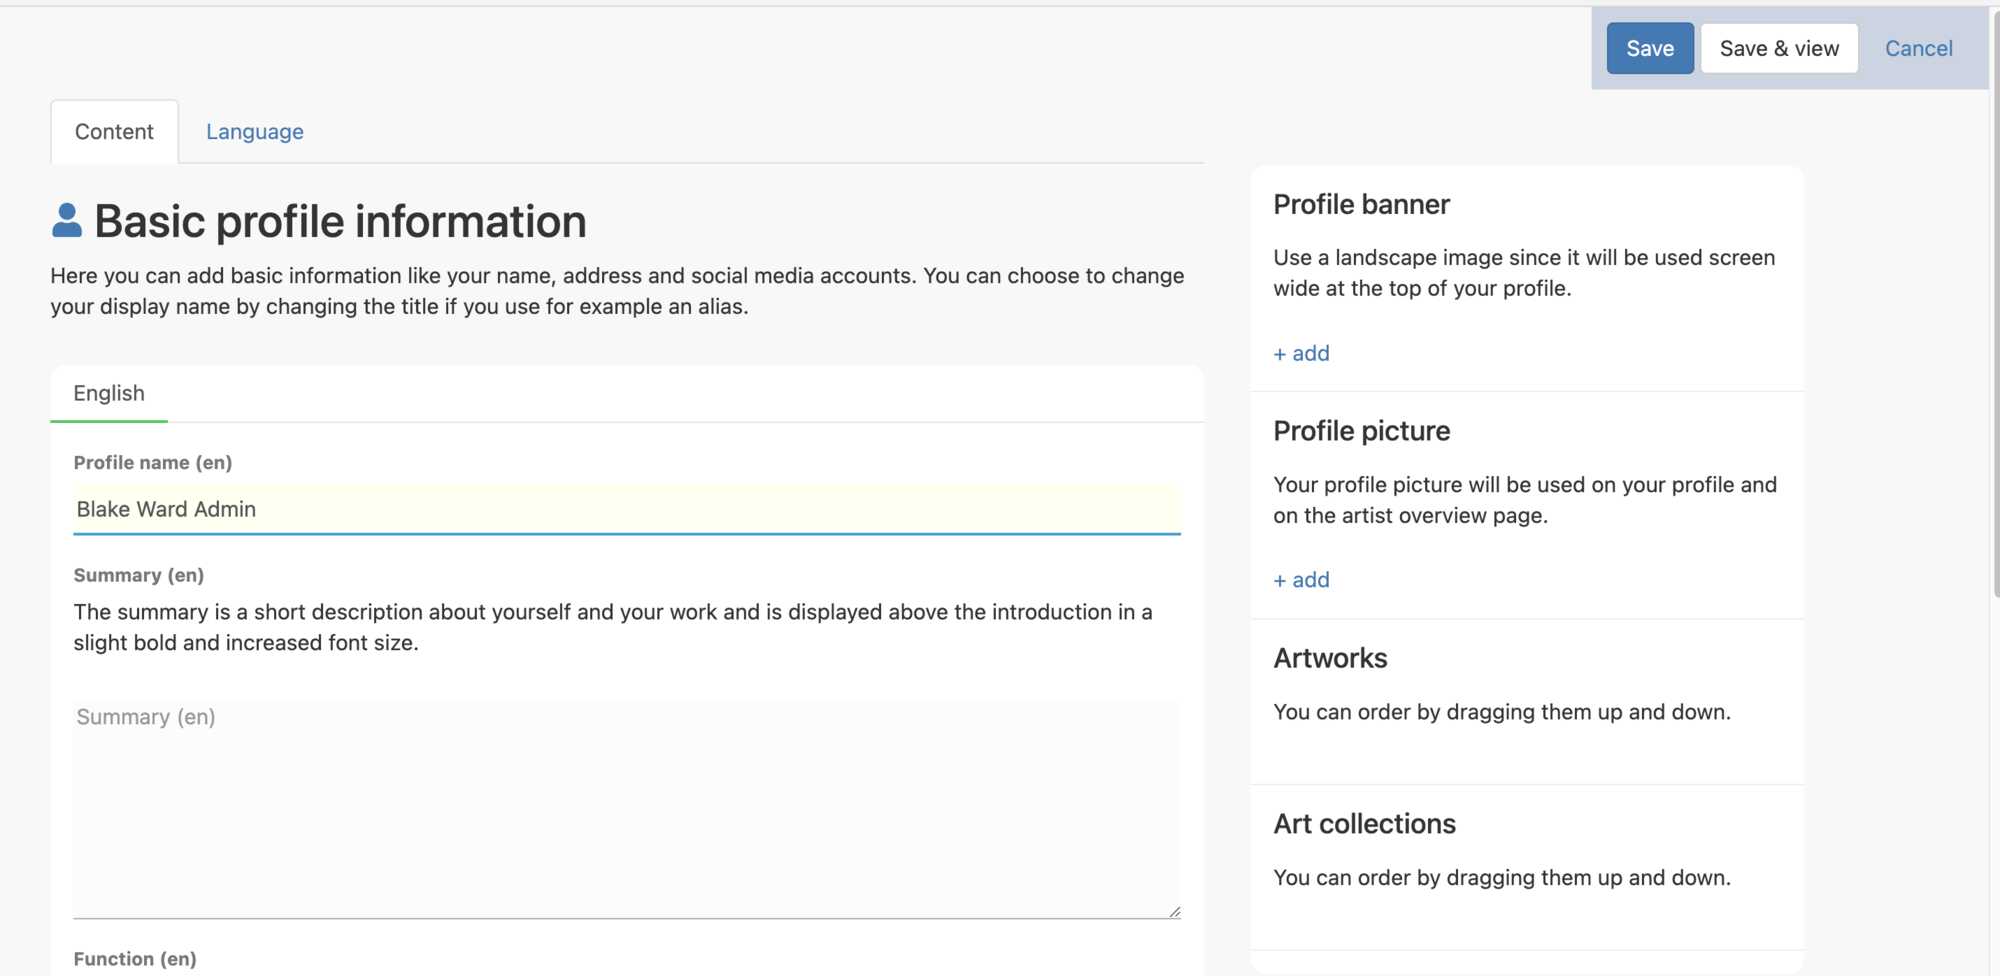
When you click on the Edit Profile button the “back end” of your Profile Page will open. This is where you will enter the information and pictures about you, the Artist.
The "back end" of Your Profile Page will look like the window shown below entitled; Basic profile information.
Choose your language
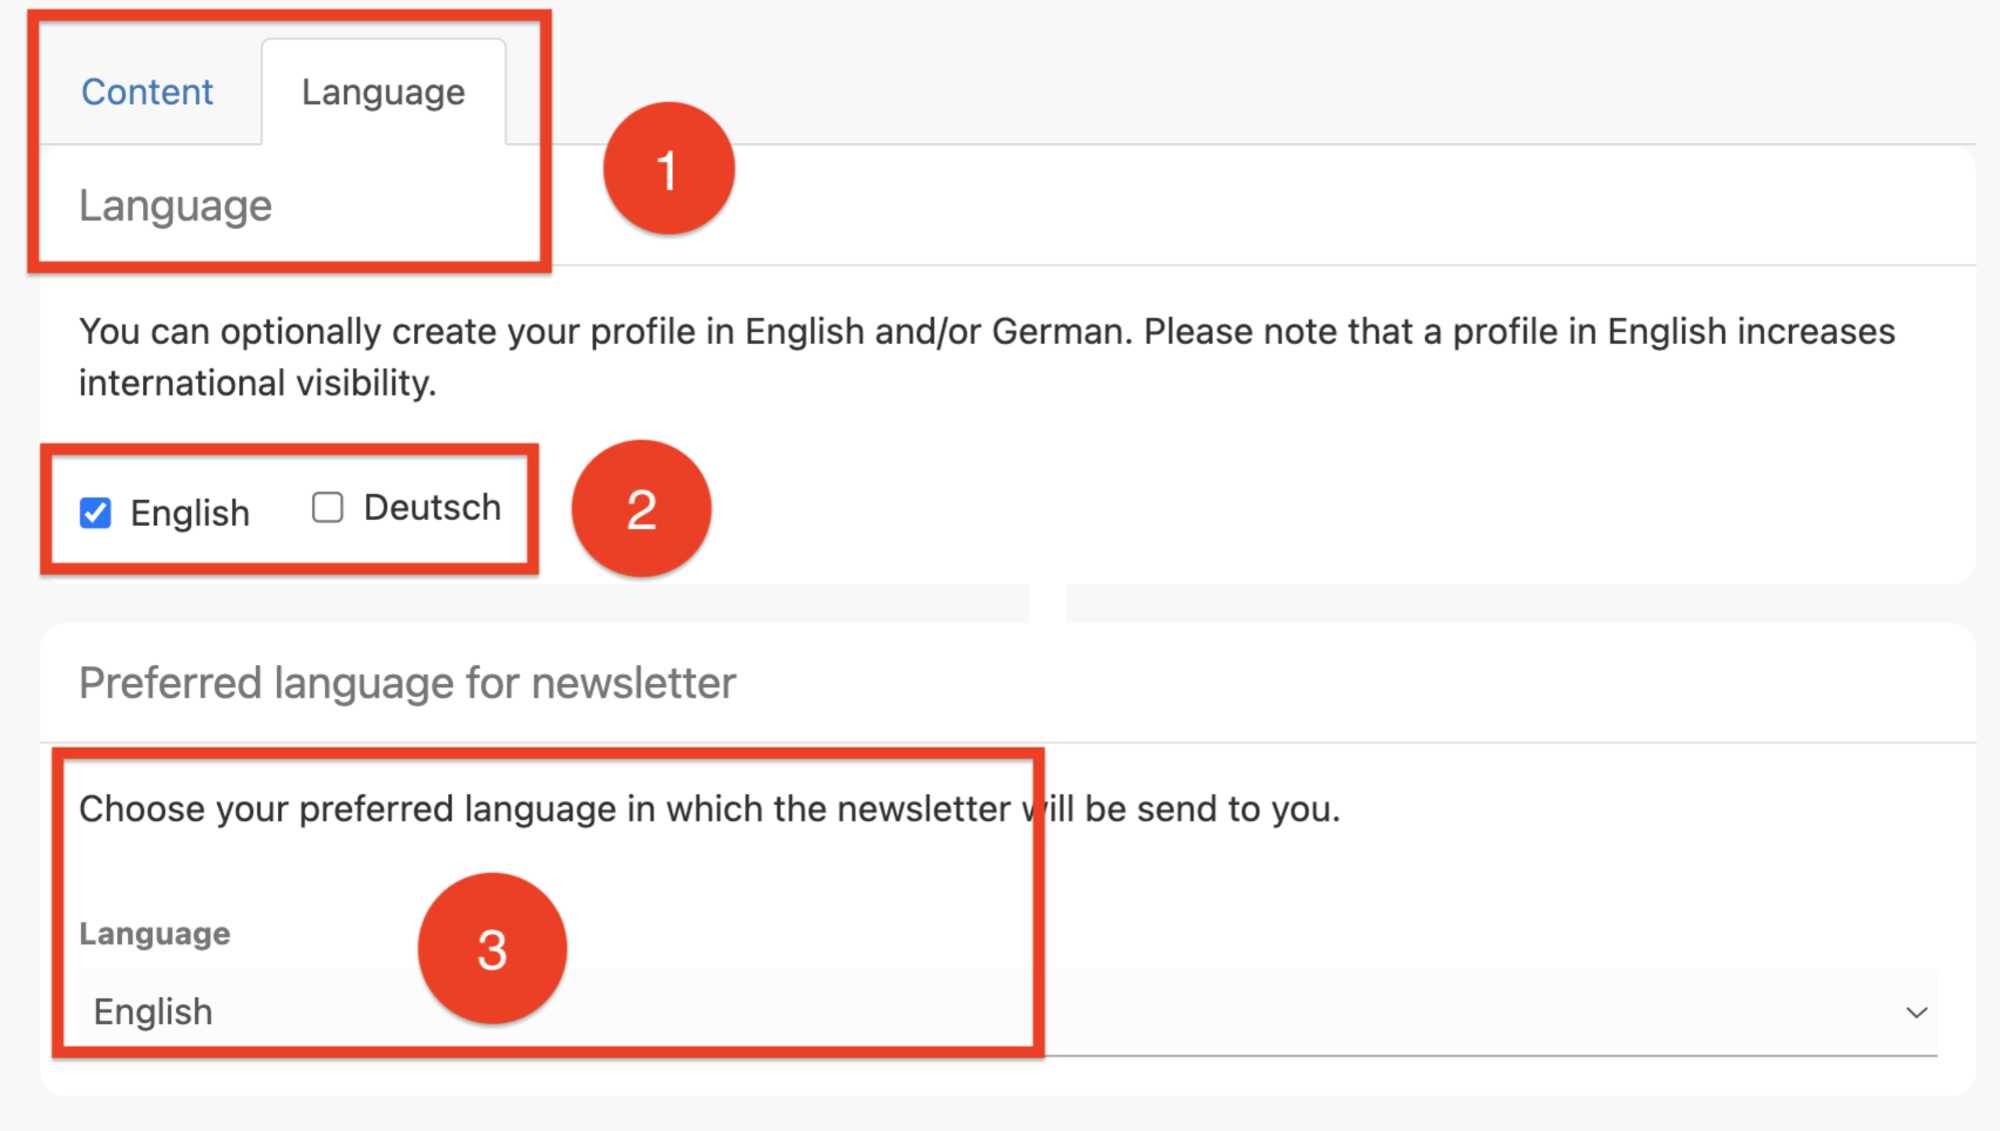
First let's set the language for our entire Profile. At the very top of the page, above the title Basic profile information, you see two tabs, the tab on the left is entitled Content and the tab of the right is Language, as shown in the diagram above.
By clicking on the Language tab you are given a new window shown below in the red box beside the Number 1. You can choose ethier English or German (Deutsch) as shown below, in the red box number 2.
After that you can choose your preferred language for the Newsletter and the Notices or Announcements that Sculpture Network will send out to our members, marked by the number 3. Clicking on the Word under the title Language in this text box will give you a drop down menu that offers you the choice of English or Deutsch.
To go back to the Basic profile information page click on the Contect tab shown in the red box marked as number 1 in the diagram below.
Basic profile information
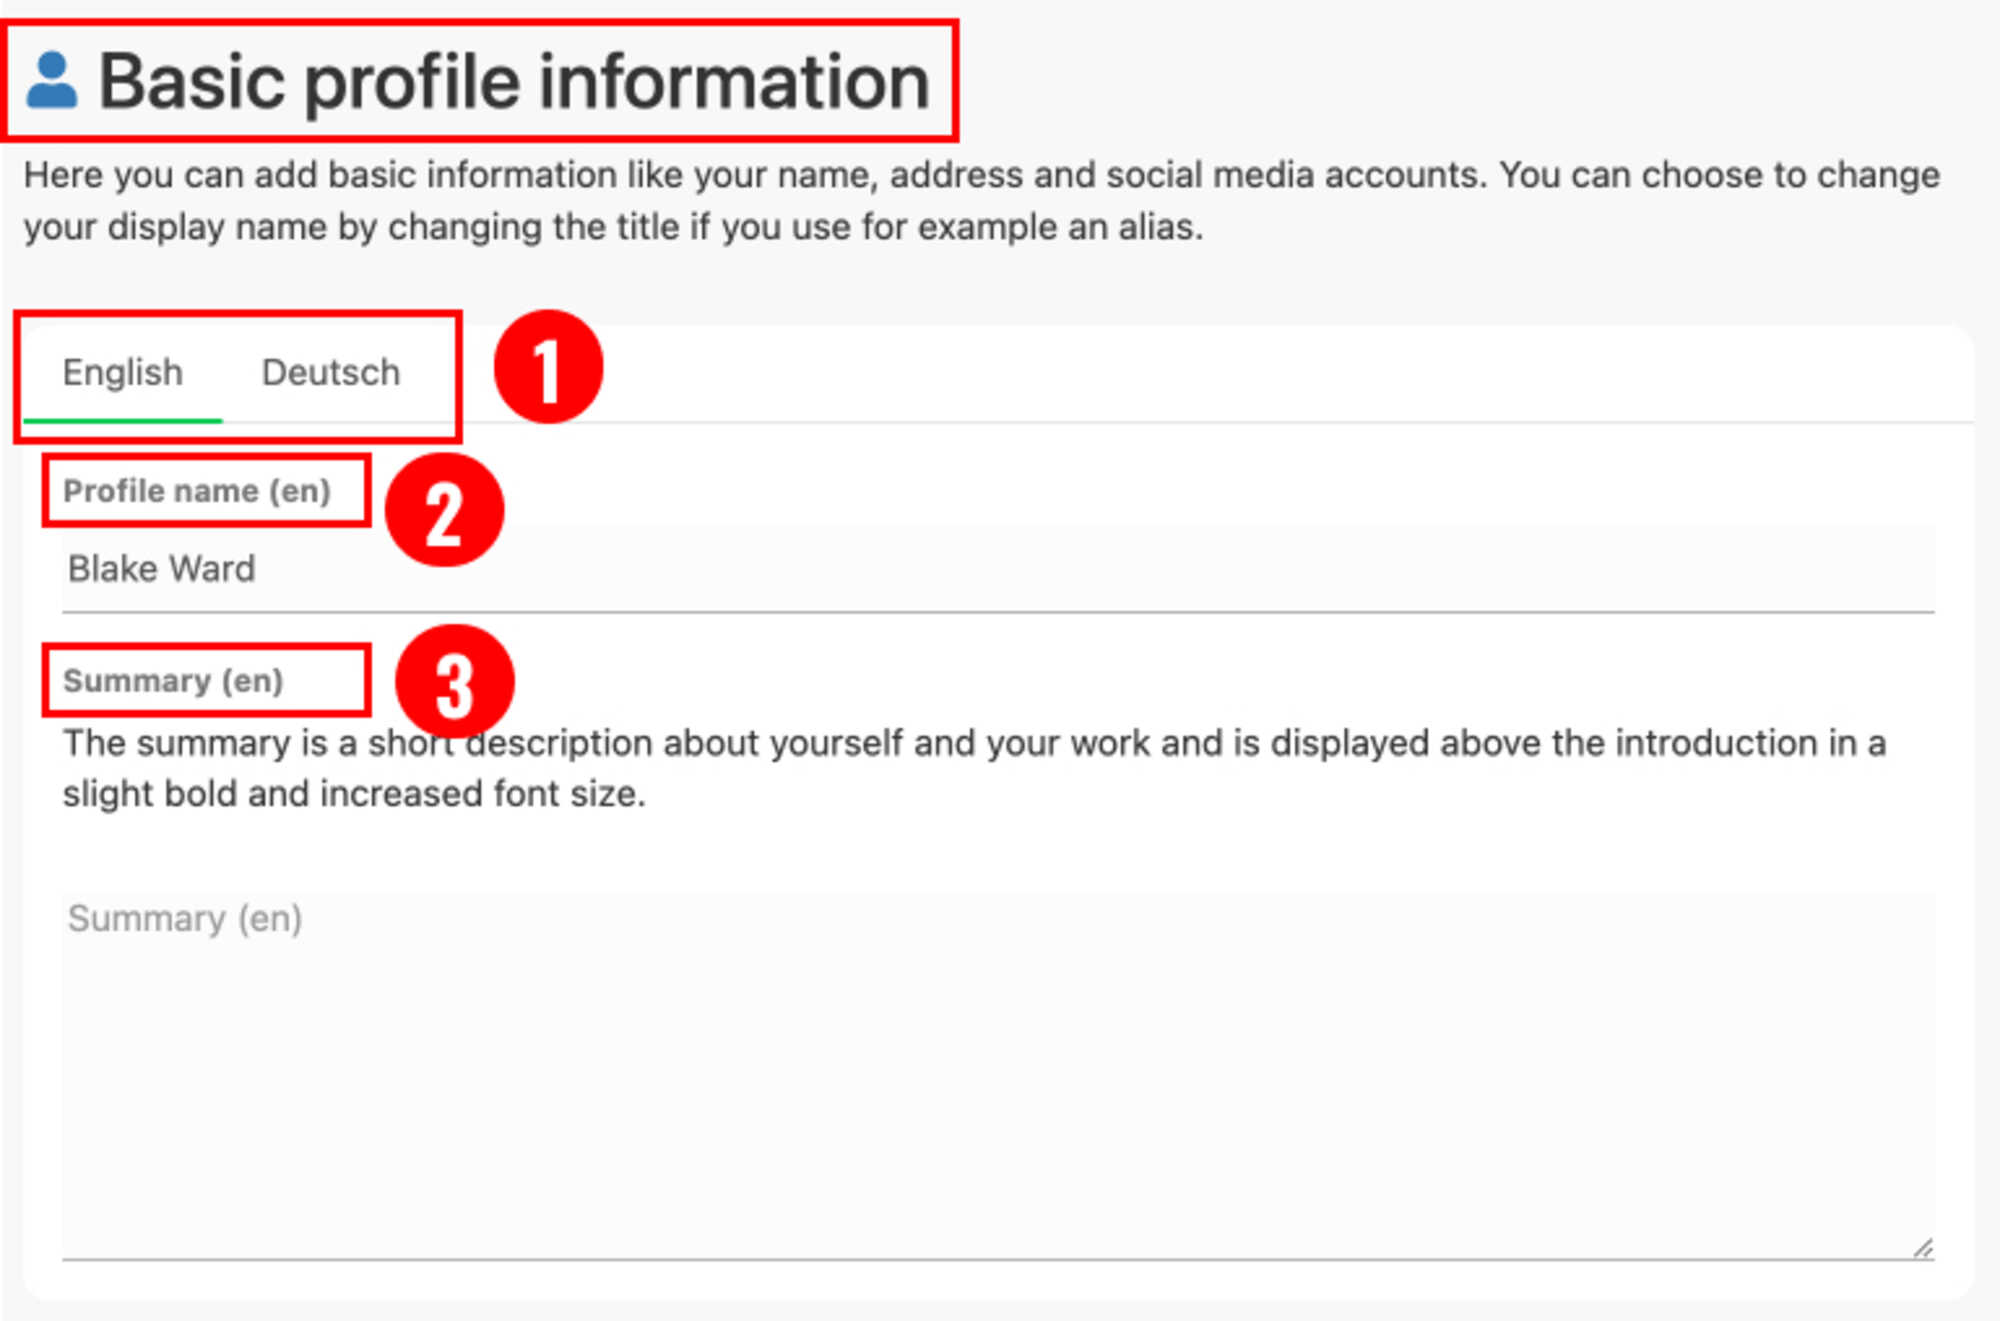
Under the Conect tab at the top of the page, you will find the Basic profile information text box. In this text box you will notice that the language you have chosen is underlined wiith a green line, this confirms your choice of language for your Profile. This is marked in the diagram below with the number 1.
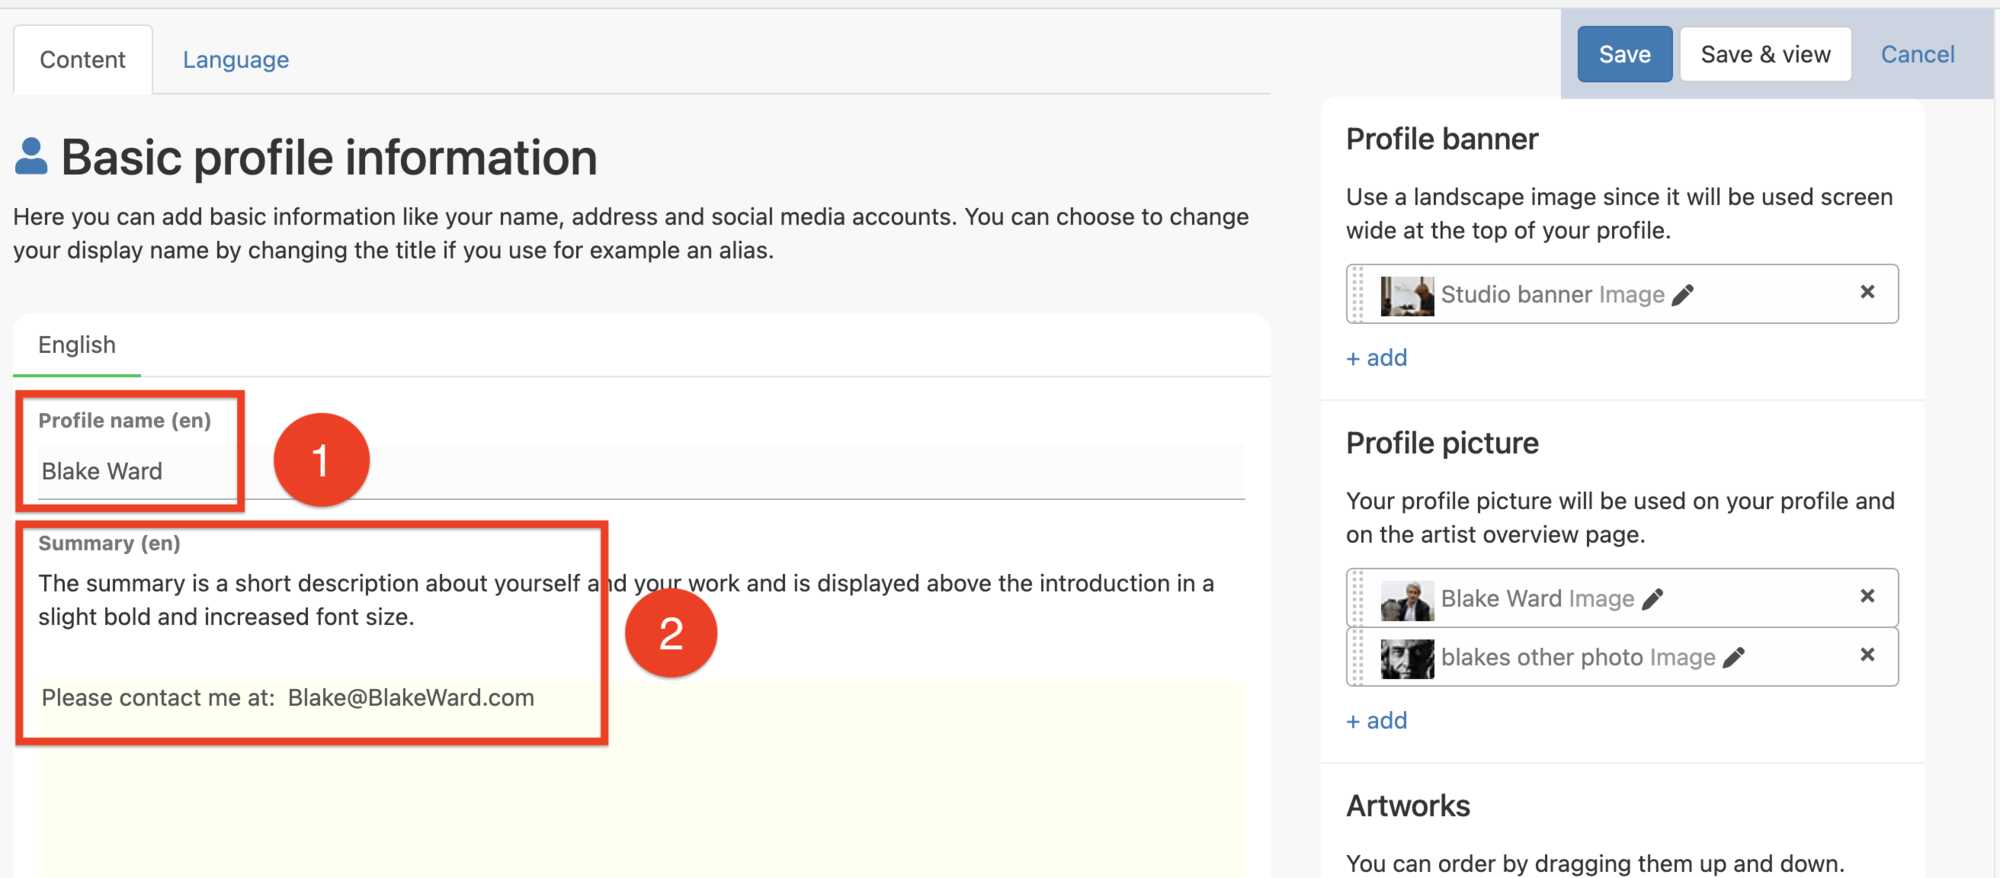
Now we will add the name you want to appear in large letters on your Profile page. Type your name into Profile name marked by the number 2. in the red box shown below.
If you wish, you can add a short summary in the area under the title: Summary in the red box marked number 3, below. This is an introduction summary only, there are other places for you to add a more complete description, a biography and other information concerning you as an Artist. I personally have used this summary area to add a "Tag Line" that I have writen to describe my artwork in an interesting one-line description, as we as presenting my email address so that it has a prominent place on my Profile page Your our email address will not be available to a public visitor on our site. So I have chosen to include it here as there is no other way for that visitor to contact me through the website.
Members can contact me by sending a message using the Contact me button that is available on our Profile page, and we will cover that later in this document. Sculpture Network does this to protect your privacy.
There are several other items to complete in this section; including entering your Address and Email address and an OPT OUT of email announcements section, so if you want to contnue working on the Basic profile information at this point then please click on any of the links below, which will to take you to Personal name and address, Social media Information, Email Address, Opt Out of receiving emails function.
Remeber, at any time, you can go to the Save & view button on the top right-hand corner of the page, marked in the diagram below with the number 1, to see how your Profile Page looks on the "front end" of the website. To get back to the "back end" of the site, all you need to do is click the Edit Profile button again to open the "back end" of your Profile Page.
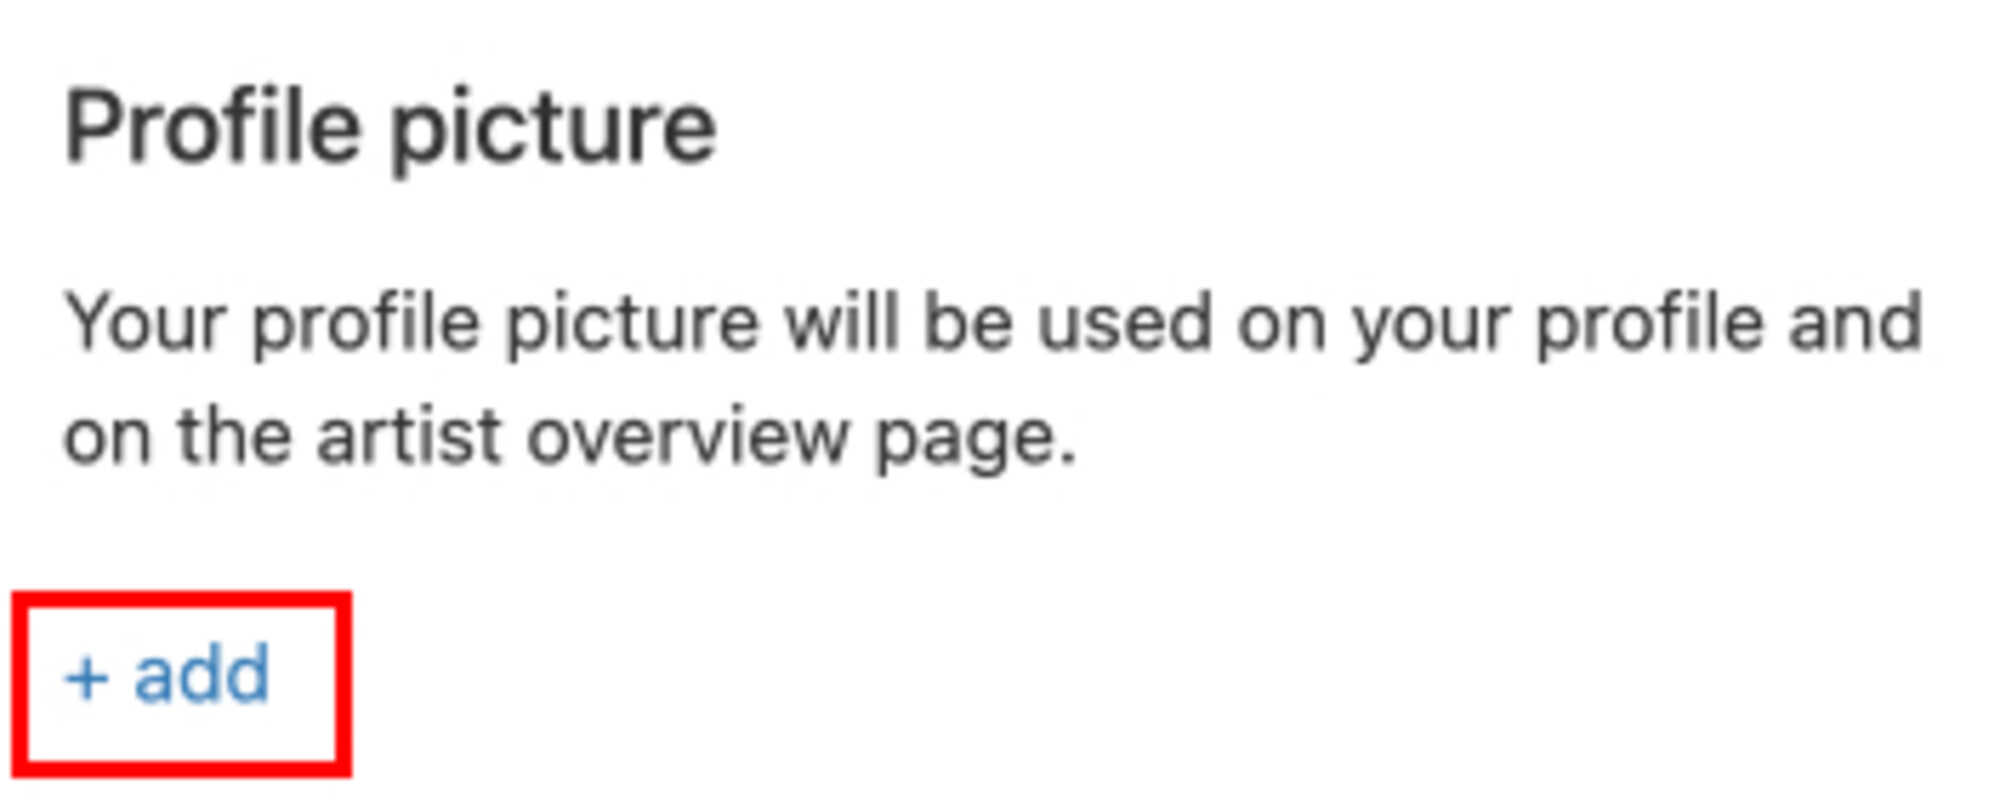
Add a profile picture
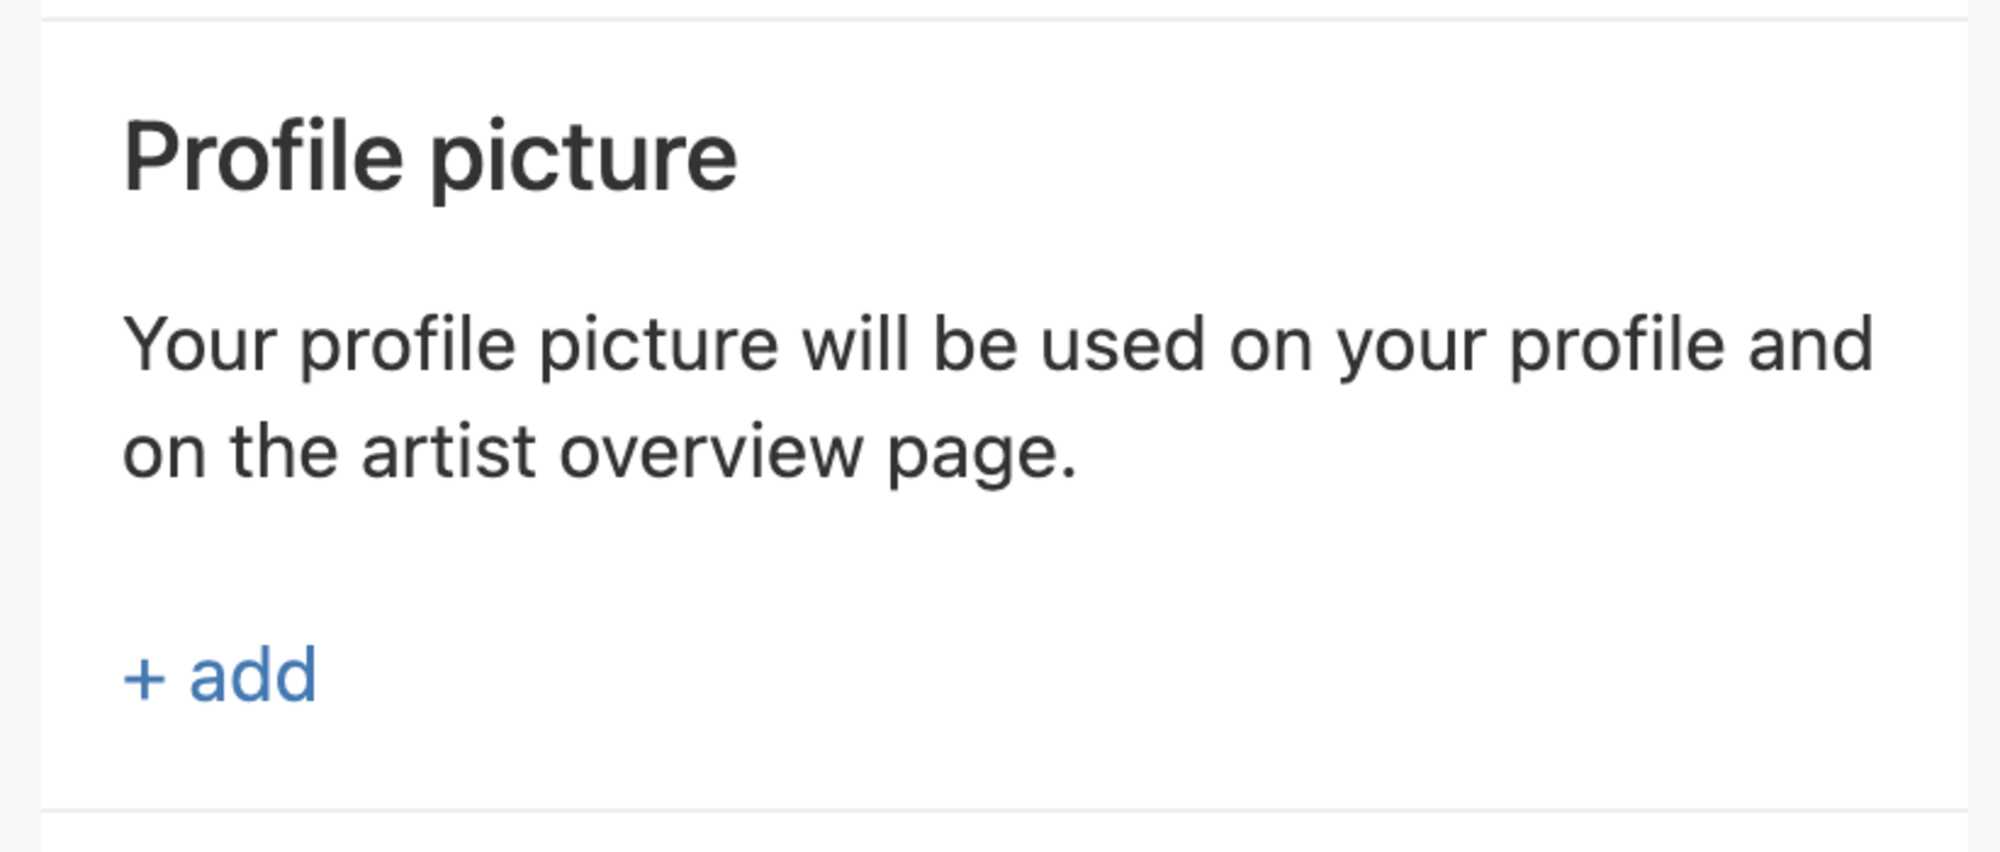
Once you have your name entered, let’s put in a Profile picture of you. You will find that button to the right of the Basic profile information window beneath the Save & view Button, it is marked with the red box and the number 2, in the photo below. The Profile picture is really important, so please choose a photo of you, or your dog, or one of your sculptures, or an or avatar, or some other image that you would like to have to represent you. It must be a .jpeg file, or a .png file for the Profile picture. (If your picture does not upload then the problem could be that it is not one of the files noted above.)
It does not matter how big your picture file is, within reason, as the website will reduce it automatically, so choose a photo around 2MB or less and we will crunch it for you.
Now Click on the +add button in the Profile picture window as shown to the right. This will open up another window, that looks like the window shown on the page below.
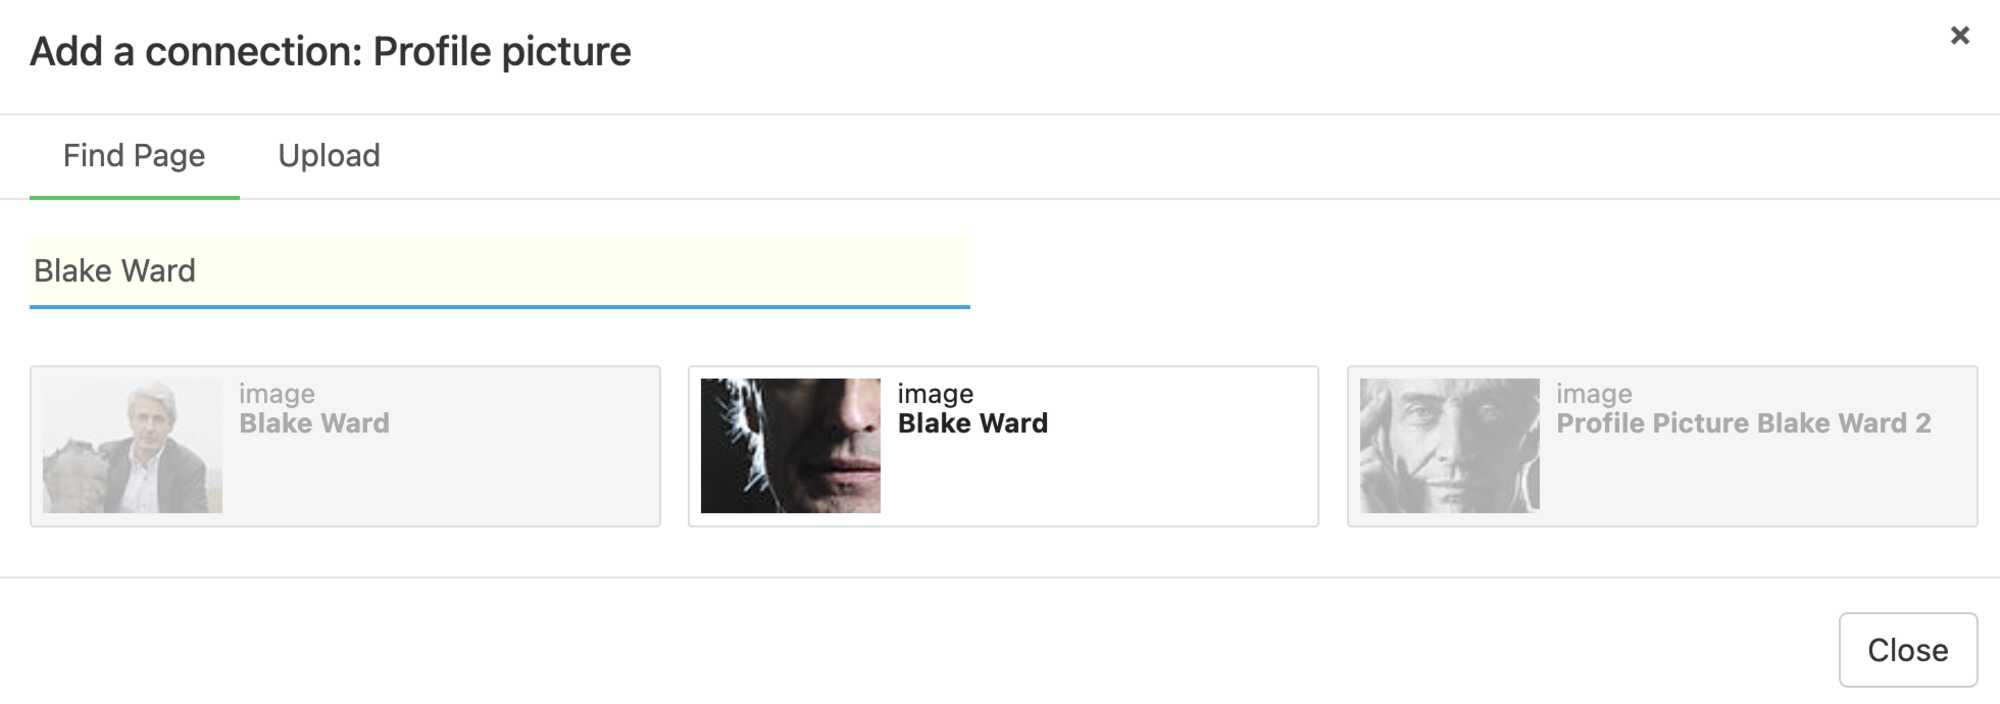
Please note that it is labelled: Add a connection: Profile picture.
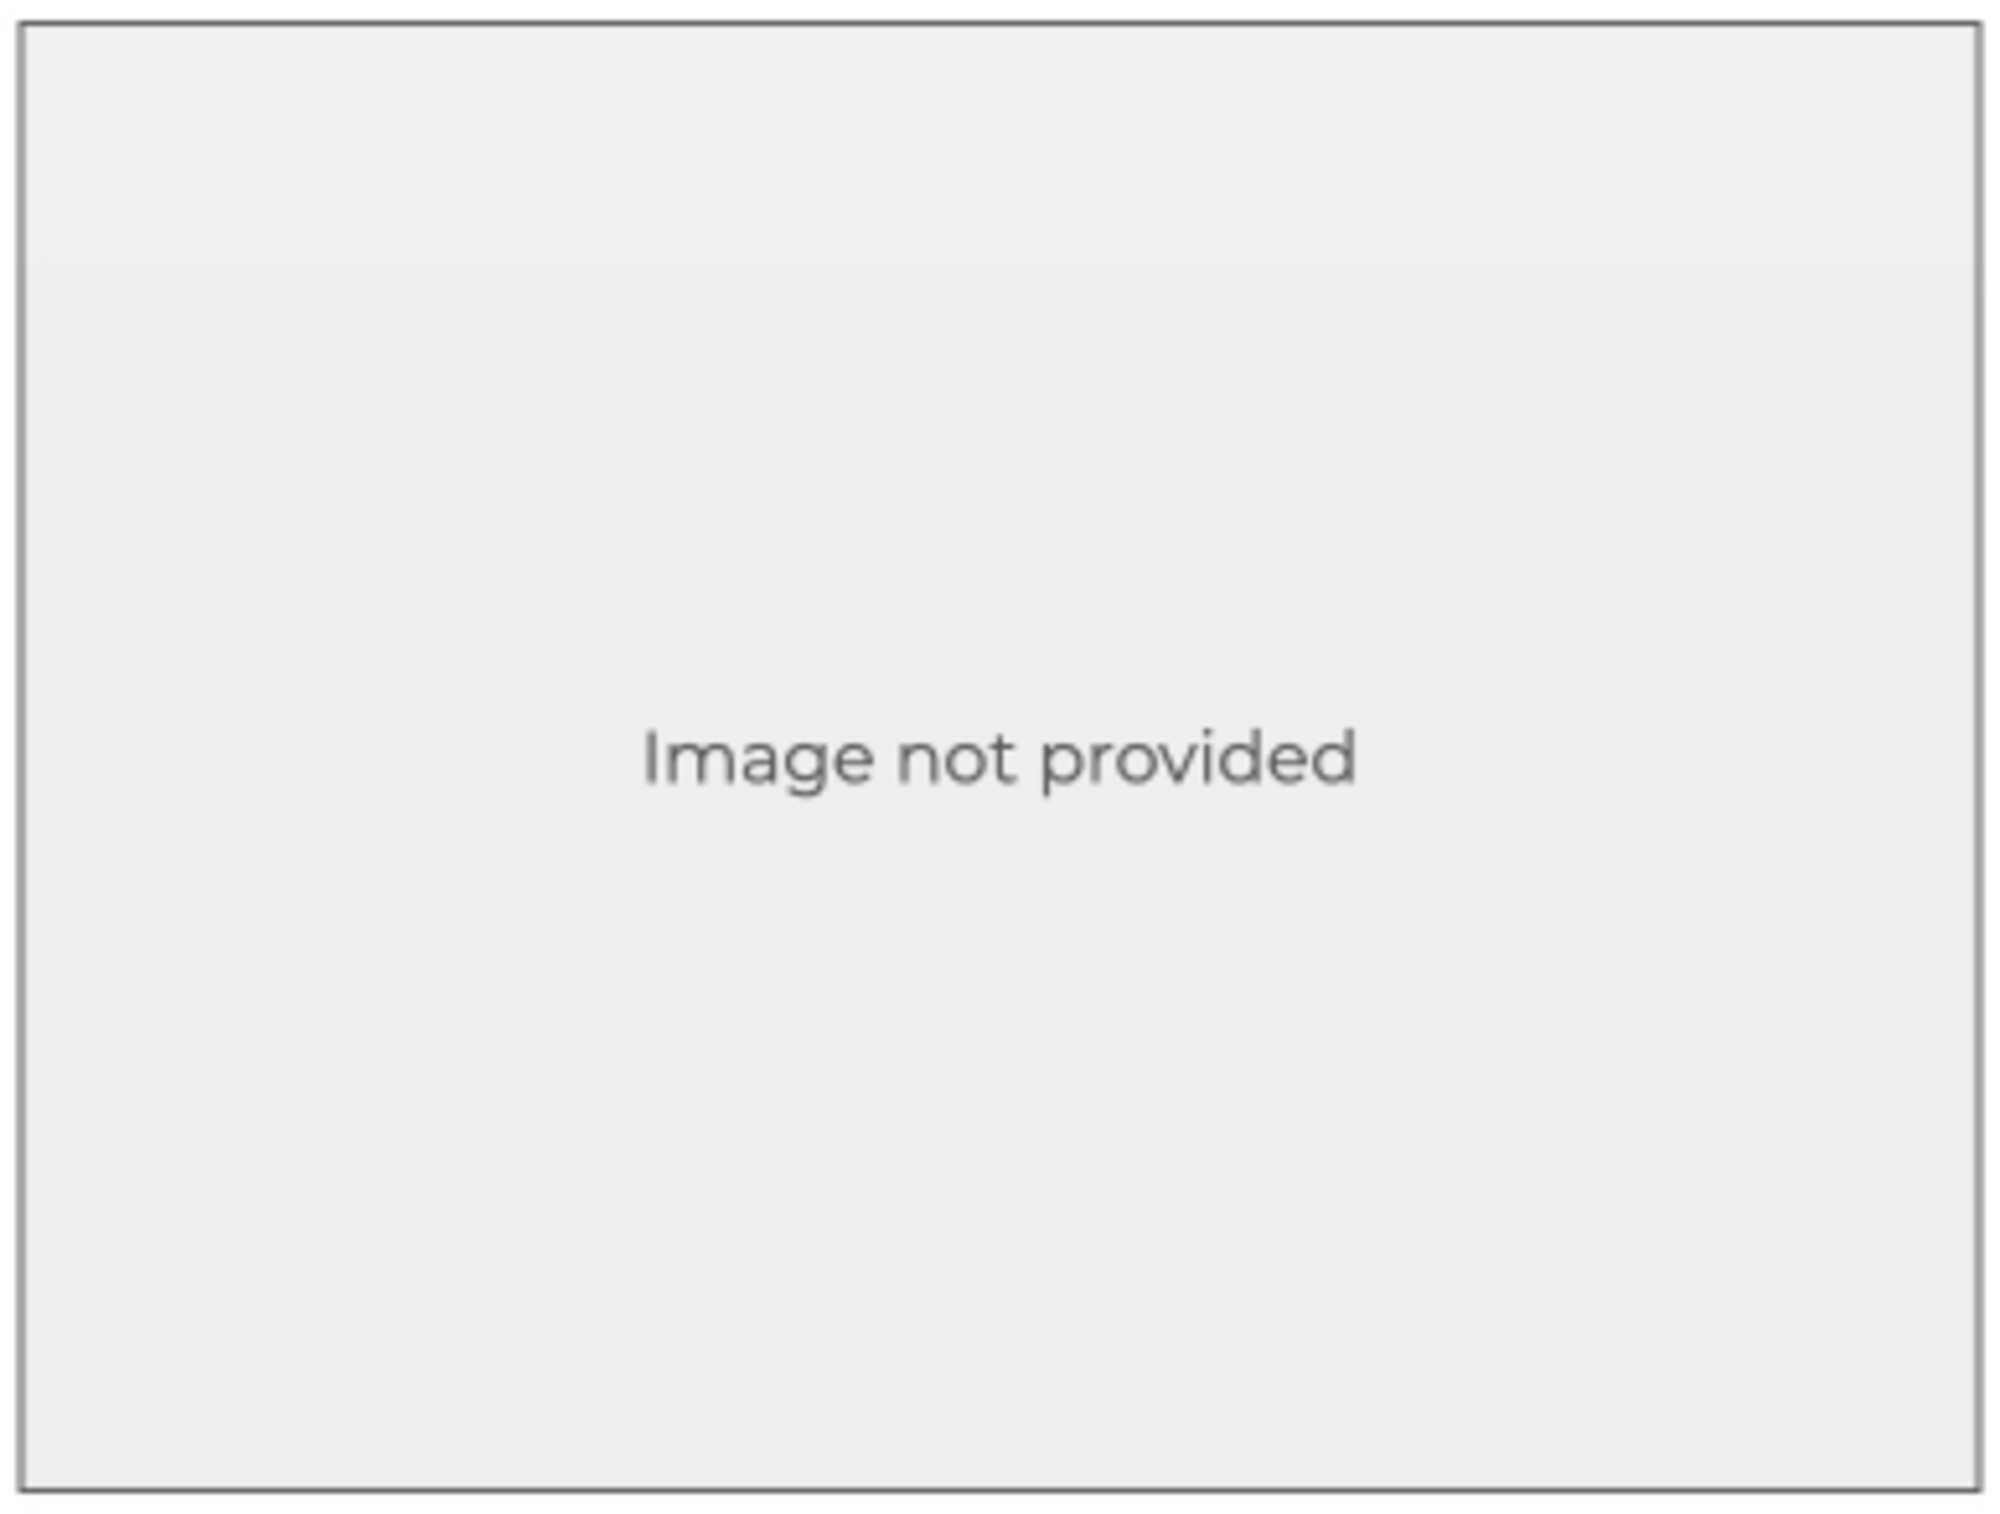
It is very important to include a Profile picture in your Profile, because your Profile picture will appear on your Profile page, as well as, in "Our Network / Artists" section on the website. In fact your Profile picture is the only photo that will show in the Artists area of the website. So if you don’t upload a Profile picture, then you are represented as a grey box with the words "Image not provided" on the page. As shown to the below.
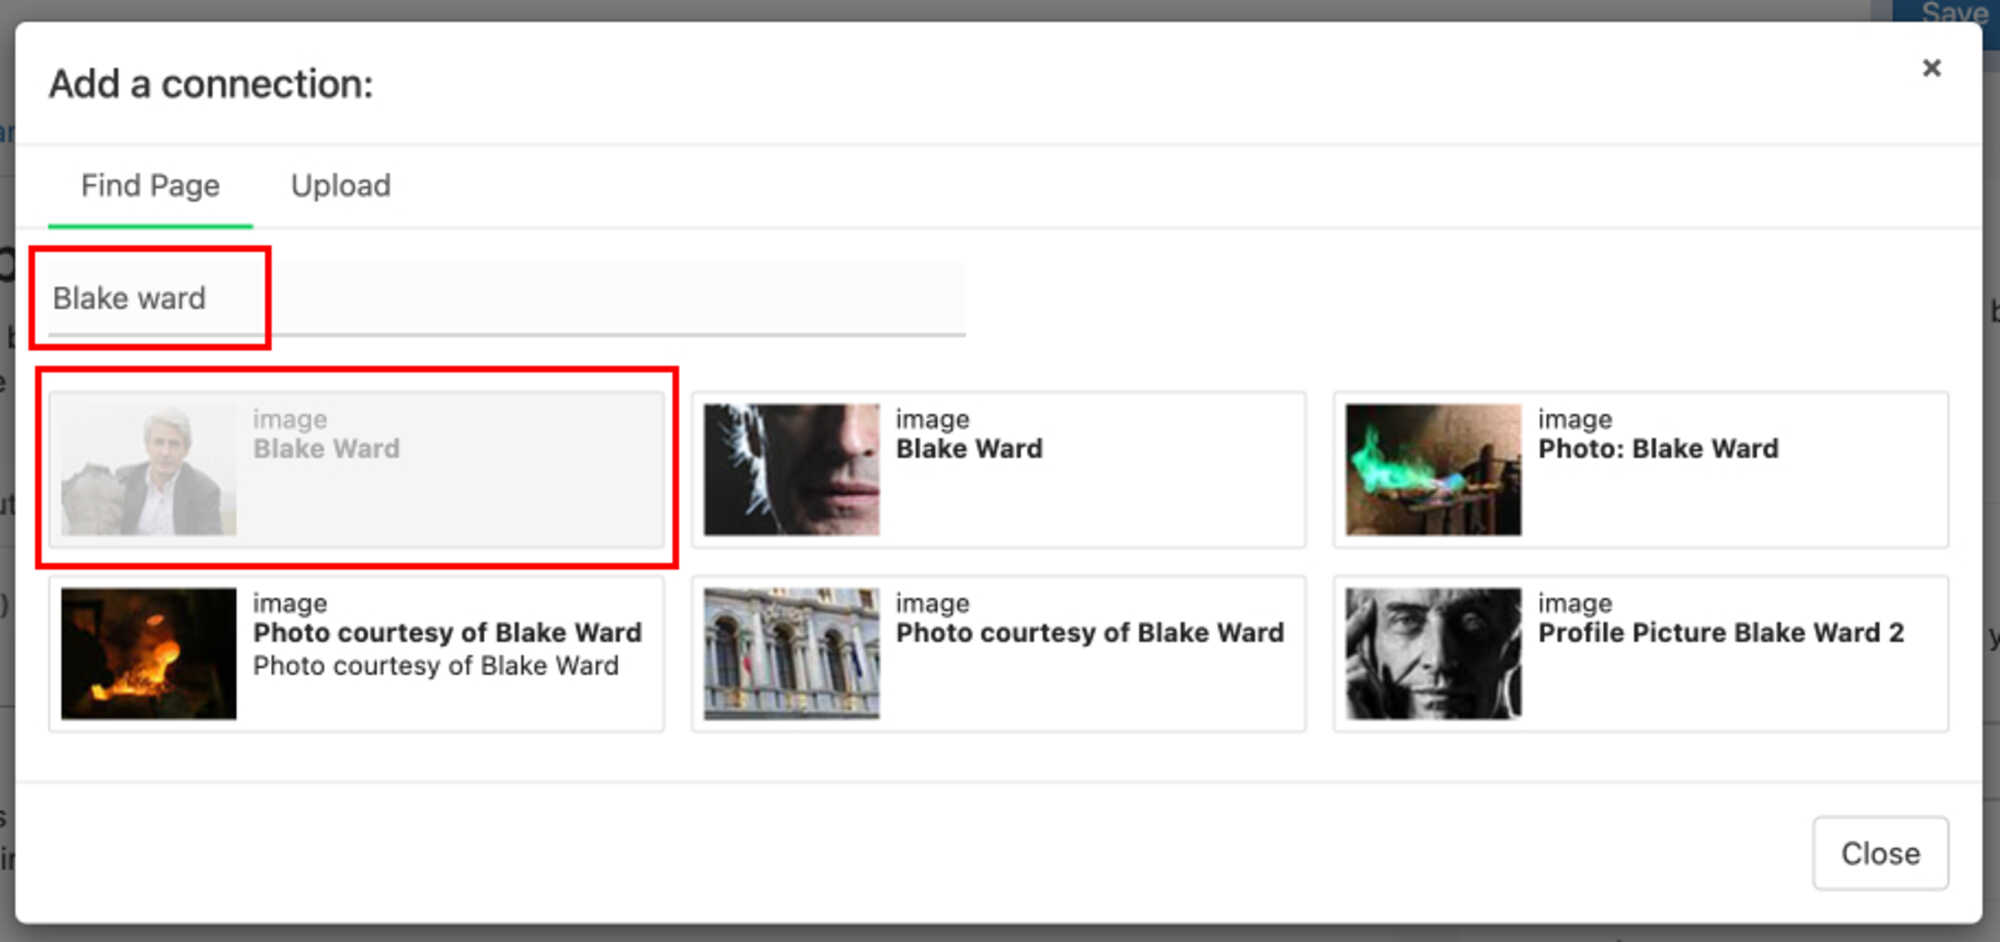
Below in the Add a connection: Profile picture window, you can see I have already uploaded my photo on the site, so I just type in my name and my picture comes up. Please notice the green line below the words "Find Page". This indicates where we are, so we can search by filling in the "type text to search" window. This "type text to search" text box is not shown in the diagram below as I have typed my name over the words "type text to search" so it now reads Blake Ward in the small red box shown below....
When I clicked on my picture to chose it, the photo box went "grey" to indicate that I have chosen that picture, as opposed to the picture of my nose, beside it. :)
If you don't have a picture on the website yet, (and if you are reading this text then it is likely that you don't), you will need to click the Upload button in the small red box marked number 1, to the right of the Find Page button as shown in the diagram below. The green line will slide over underneath the Upload button in the small red box, to indicate that you are now going to upload a new photo. When you click on this Upload button you will be given a new window that looks like the window below.
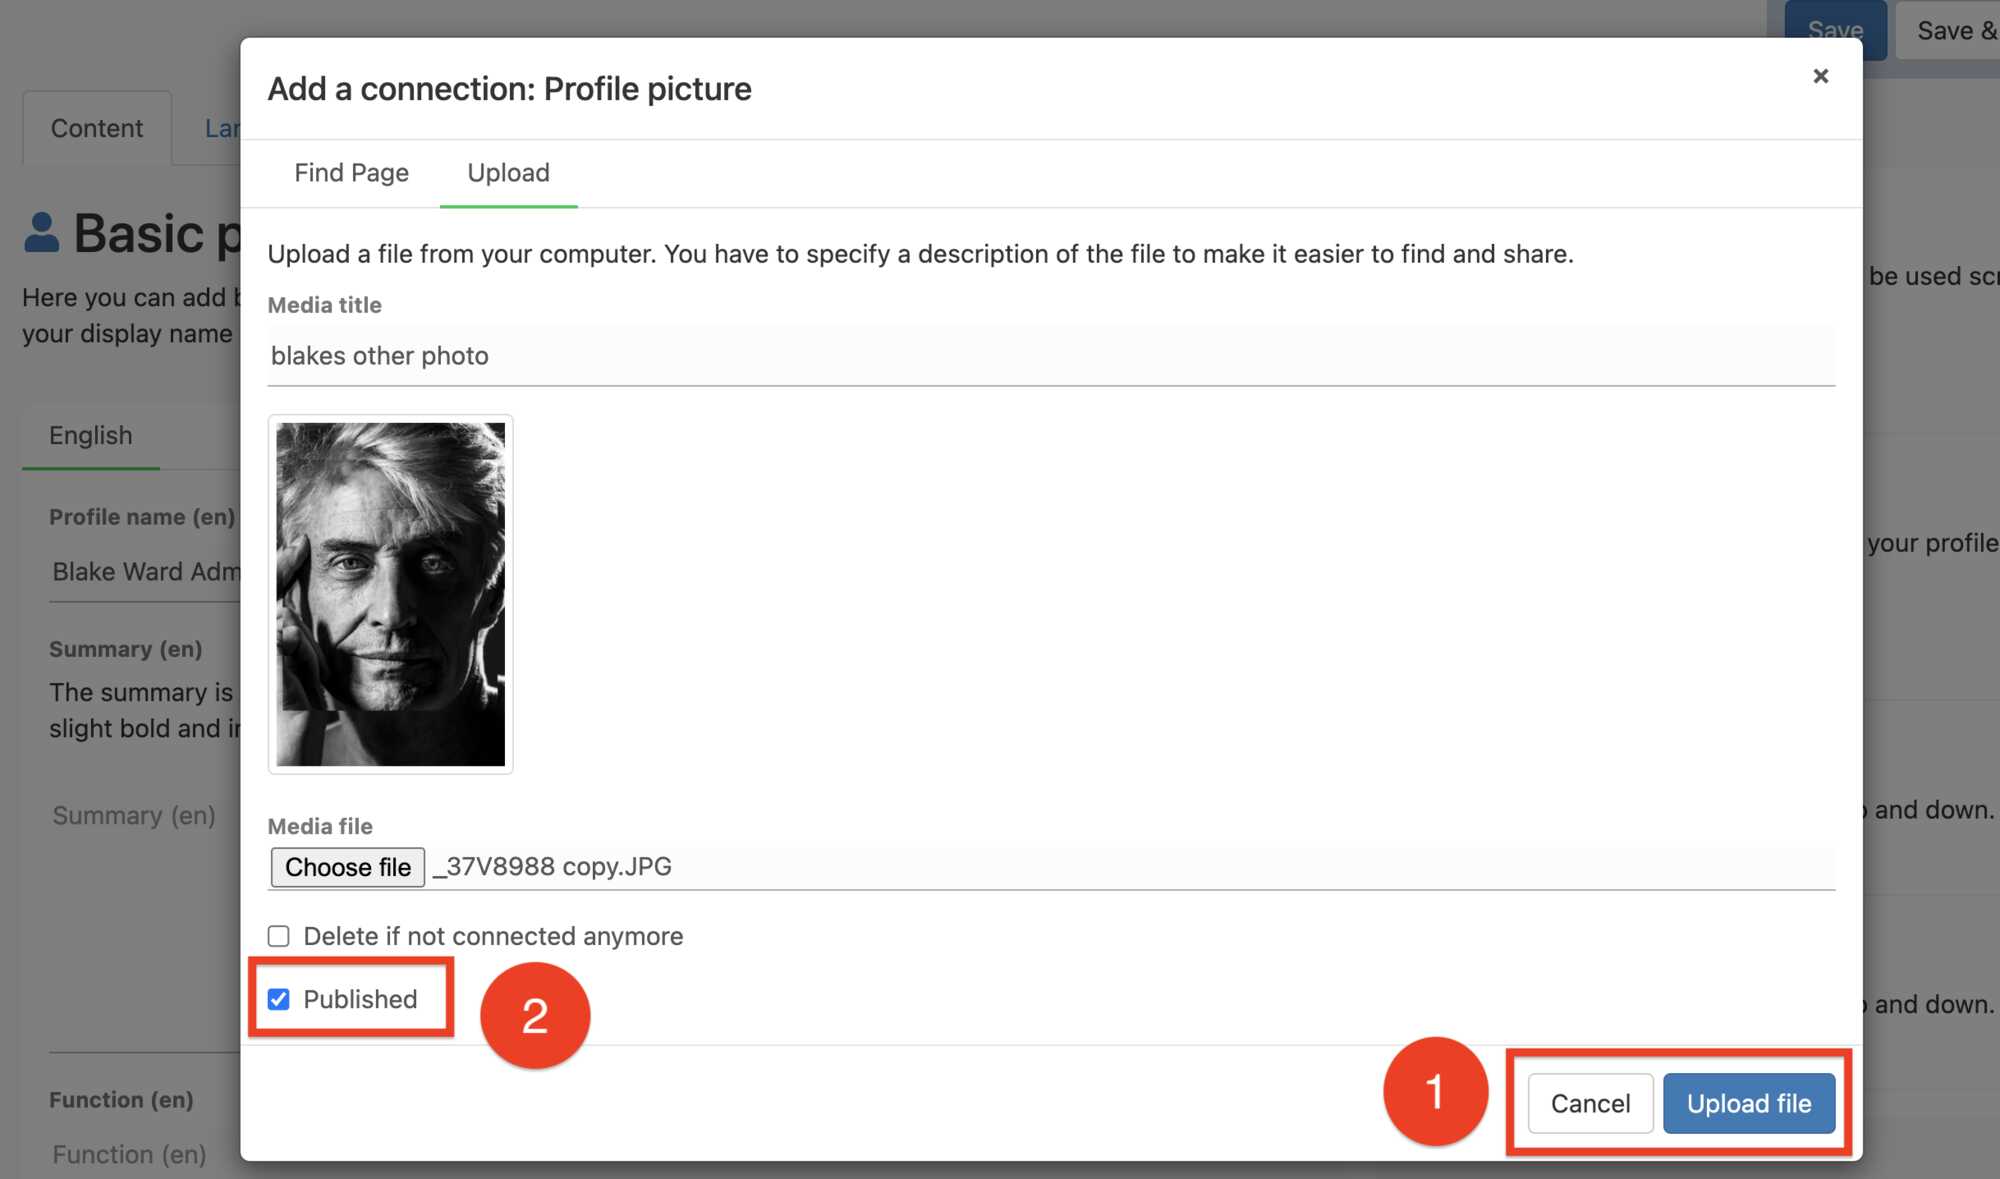
Notice the difference in this "Add a connection:" window below, now there is a place to add the title or name of your Profile picture underneath the words Media Title in blue, this is marked with the number 2 in the diagram below. Under the Upload Button there is the green line to indicate that we have chosen to upload a picture. In this example below, I have filled in the Media Title, marked by the number 2 and next; I will click the Choose file Button marked number 3, under "Media file" in order to upload a Picture from my computer.
Clicking on the Choose file button, marked as number 3 above, will open a "Finder window" on my computer. As shown in the below.
On your computer you would find the photo that you want to upload and then select or highlight the picture you want to insert into your Profile page. From here all you need to do is to transfer that picture to the website. The slide above, shows my "Mac Finder Window," where I have selected a file called Portrait of Artists and I have choosen a picture of myself. Now I will click on "Open" in this Finder window, to choose this photo to upload from my computer to the Sculpture Network website.
This picture will then appear on the website in the "Add a connection: Profile picture" window, shown the below. At this point I will click on the button: Upload file in the little red box marked number 1 at the right hand bottom corner of this "Add a connection: Profile picture" window shown above.
Please notice the blue check mark beside Published in the red box marked number 2 in the diagram above. You can use this to "Publish" a picture, this means to make it visable on the website, or you can click on the checkmark beside the Published button and "un-Publish" this picture. This means that after I have uploaded the picture to the website, it will still stay in the memory on the website, but will not be visible for anyone to see. By default, this box is blue and shows a checkmark inside it.
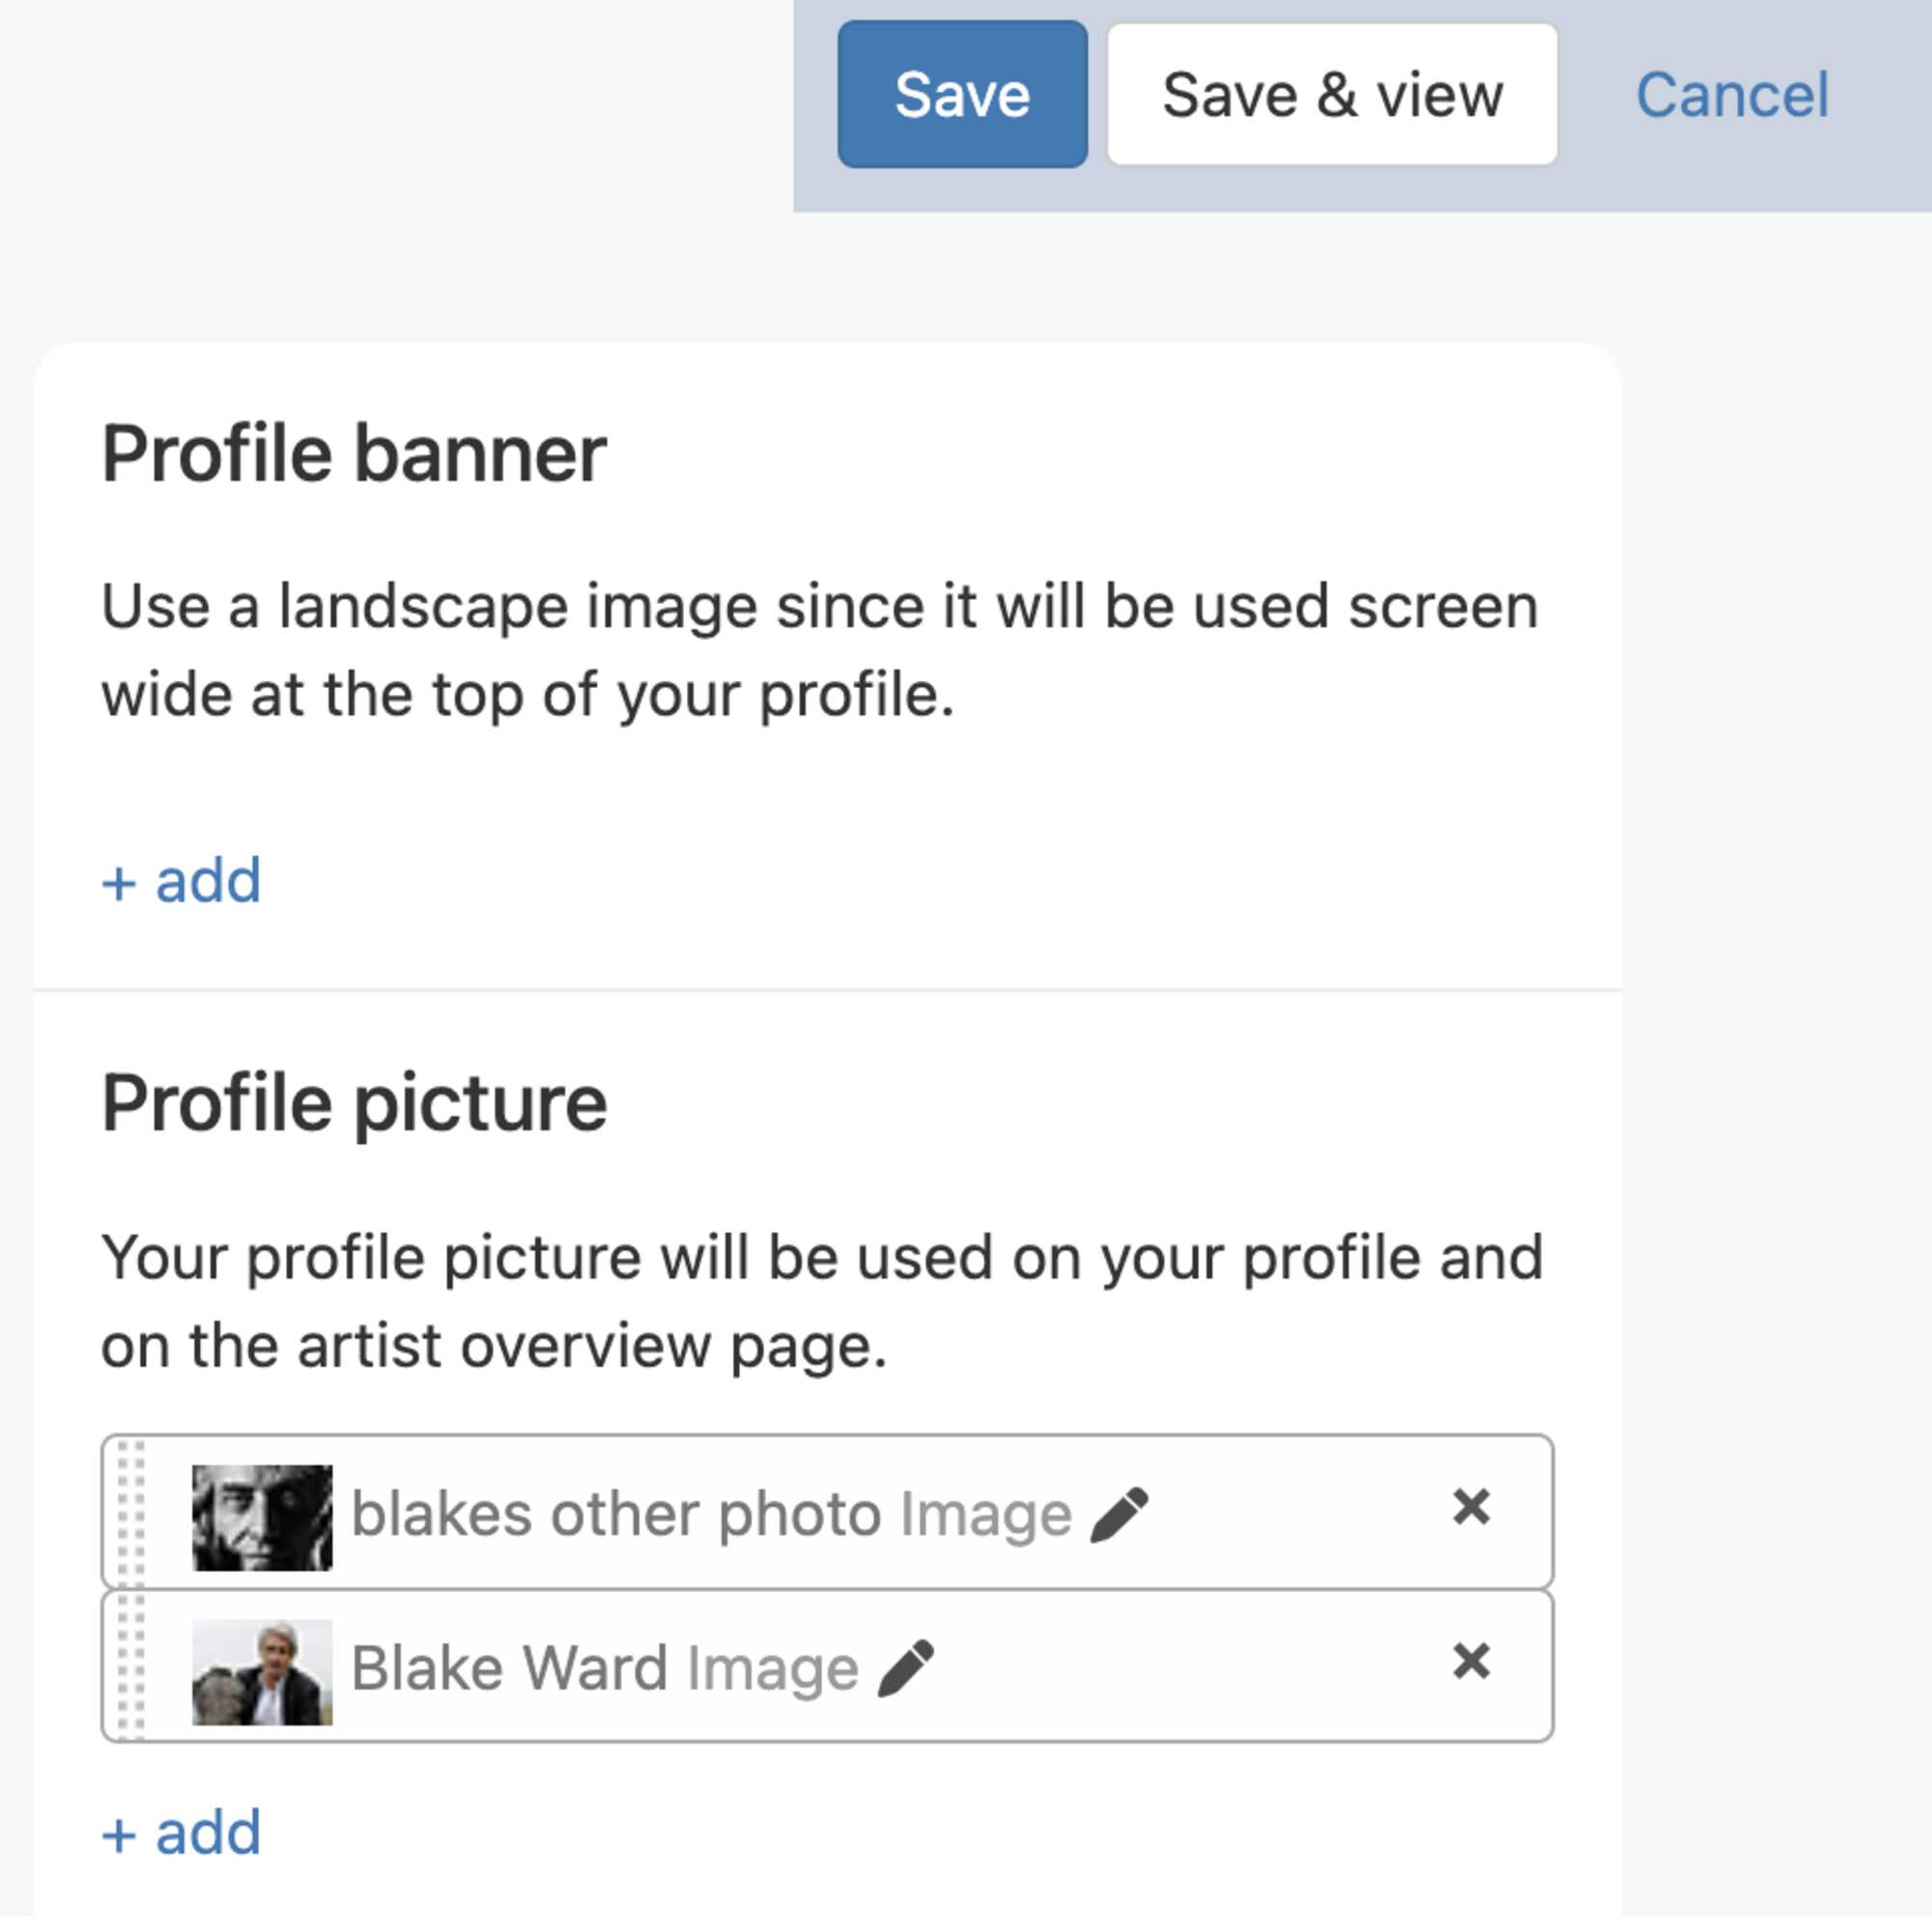
After all this, when I click on the Upload file Button shown in the little red box in the bottom right hand corner, of the "Add a connection: Profile picture", number 1, above, you will be returned to the "back end" of the Profile Page, and the Profile picture window that originally looked like this, below.
Now looks like this one below, with the picture that I uploaded in the Profile picture window.
Even though there are two pictures in the Profile picture window shown above, only the first or top picture in the column will be the one shown on the "front end". That is to say, the top photo is the one that everyone will see on your Profile page. If you "drag and drop" the bottom picture to the top place, then that photo would be the picture shown on your Profile page. You can upload as many photos as you like for your Profile picture, within reason, but only the one at the top of the stack will be seen on your Profile page.
Edit you profile picture
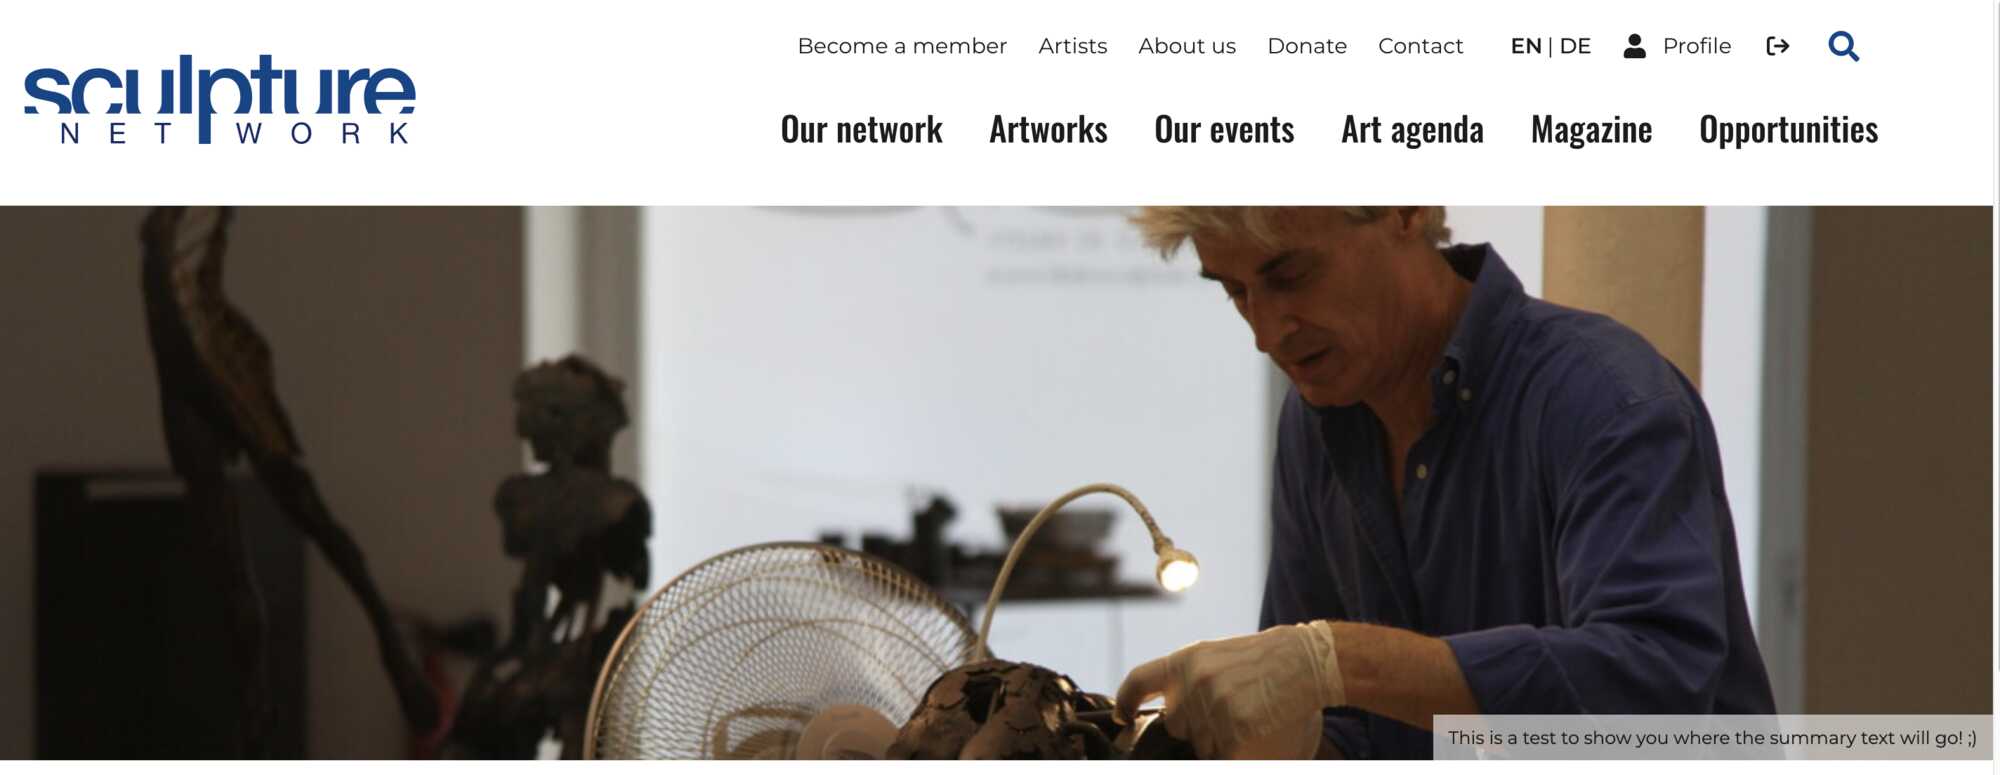
Ok, so now you have uploaded a Profile picture on your Profile page on the website. Now you can click the Save and View, button in the top right hand corner of the diagram above, in order to admire your picture. Once on the "front end" of your Profile page, and can you see your picture.... but it is not well framed!
There is a fabulous picture of you, showing the Fabulous You, from the neck down! There you are, with your head chopped off!
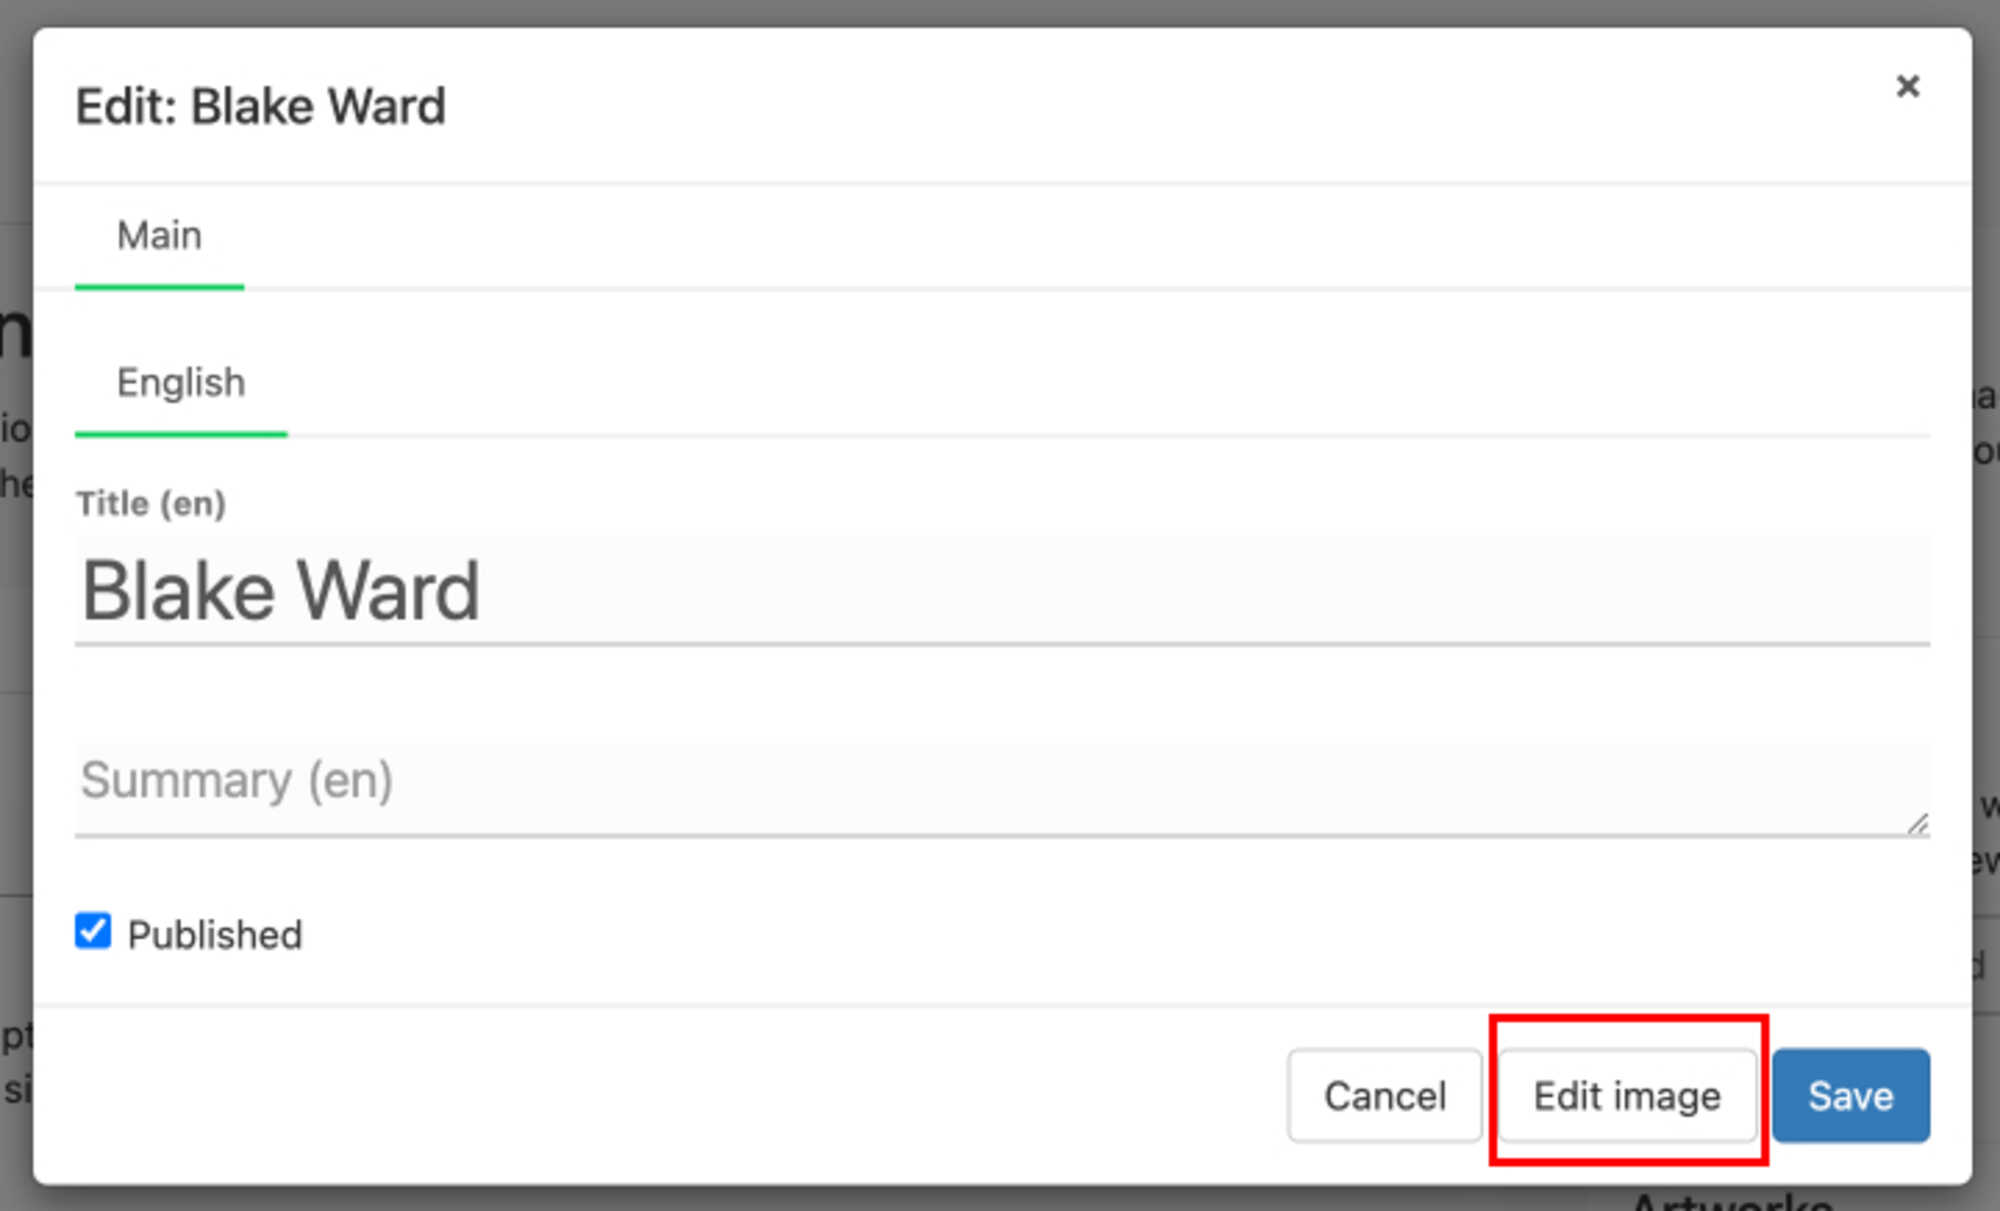
However, do not despair as we can save you very easily. All you need to do is click on the little pencil in the red box, to the right of the word "image", as shown below, in the Profile picture window.
When you click that little pencil, shown in the diagram above, another "Edit:" window , will open and it looks like this window shown below.
So now, when you click the Edit image button, in the red box in bottom right hand corner of the window that has just appeared, as shown in the diagram above.
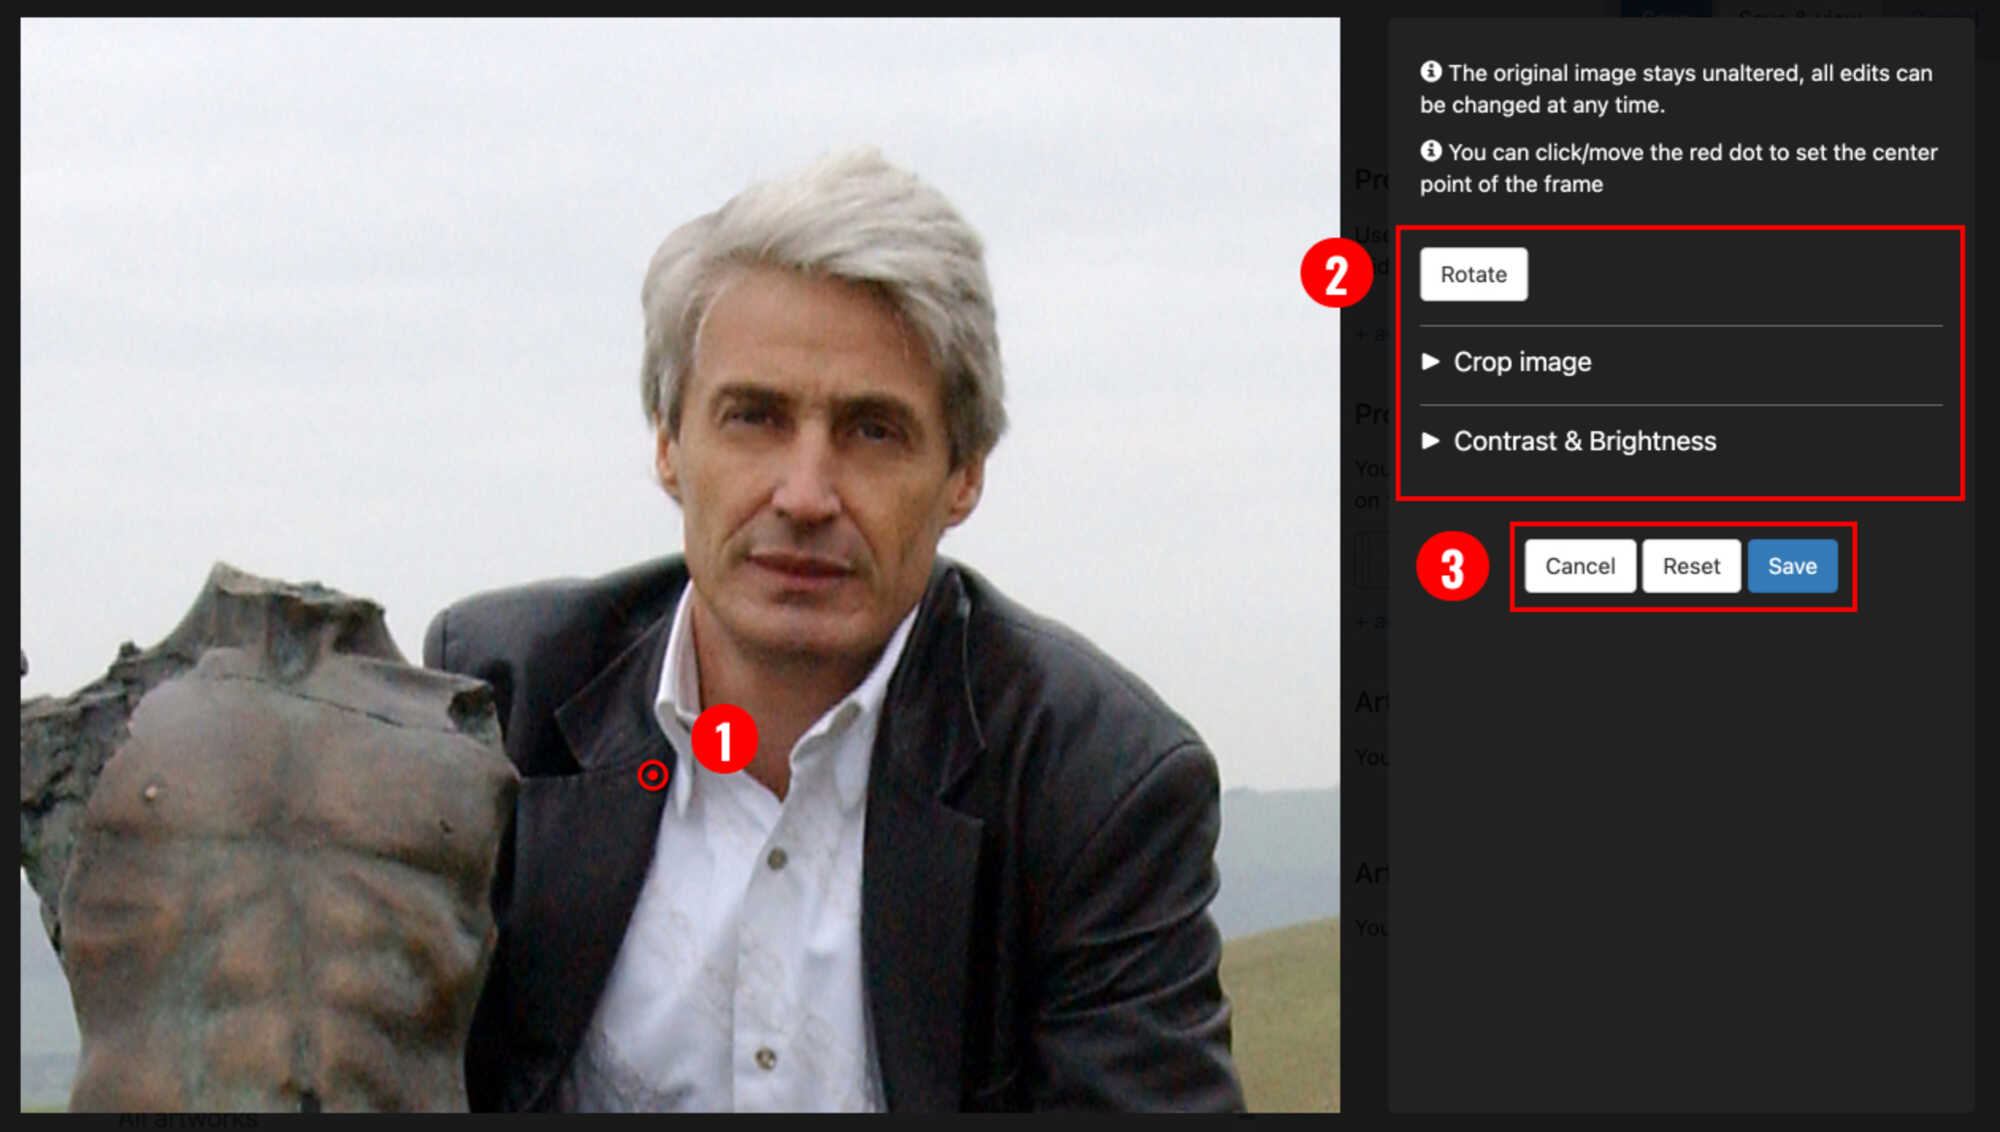
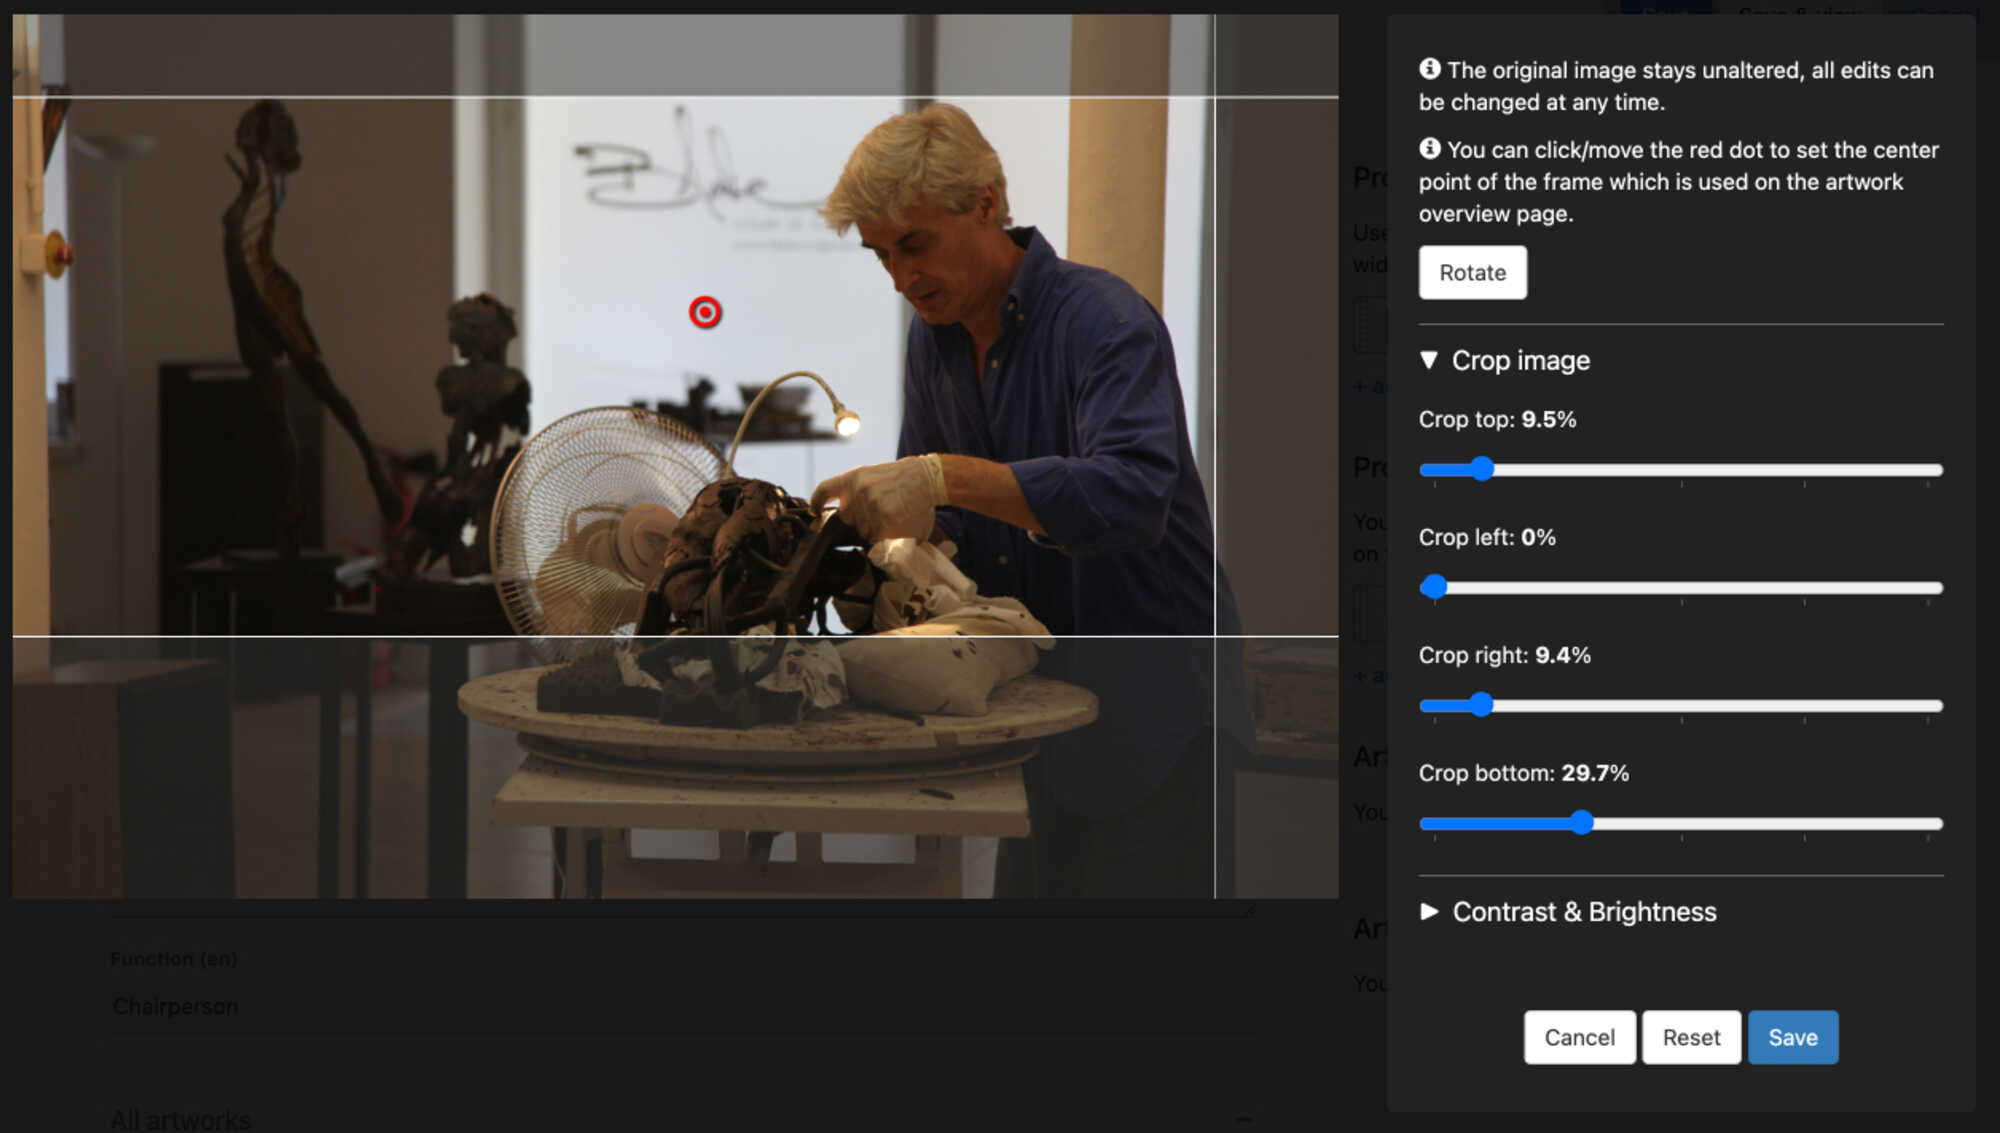
You get, yet another Picture Editing window, shown below, with your whole picture head and all and there is a black panel on the right side with some tools in it. Any changes that you make to your photo will not alter the original photograph. Only the view of your photo will change on the site your photo will always remain the same.
In this Picture Editing window shown above there are some tools in the red box marked by the number 2; Rotate, and Crop, Contrast and Brightness, they are, for the most part, self-explanatory.
However, the Red Dot in the red circle in the middle of the photograph above, imarked with the number 2, is the tool that will allow you to set the centre point of the photo relative to the frame. This will help you to centre the photo within the frame on the front end of your Profile page.
When you click on the picture the Red Dot will appear, click again and it will disappear, as well you can click on the Red Dot and drag it around in the photo. With a few attempts you can change the position of the photograph in the frame. So, you can include your head in your profile picture, instead of remaining headless. :) If you don't see a Red Dot somewhere on the photograph, just click on the photograph and one will appear like magic, then you can use your cursor to move it around.
You will have to hit the Save Button in this Edit Window to save the position of the red dot, as well as any of the other adjustments that you might have made to the photograph before you exit this window. You must Save, Reset or Cancel, in order to exit the window. Then you can go to Save & view to see the results of your edit and how it looks on your “front end” Profile page. It may sound complicated but it is really pretty easy. Just play around with it a little, you can't damage your photograph, so don't worry.
Add a profile banner picture
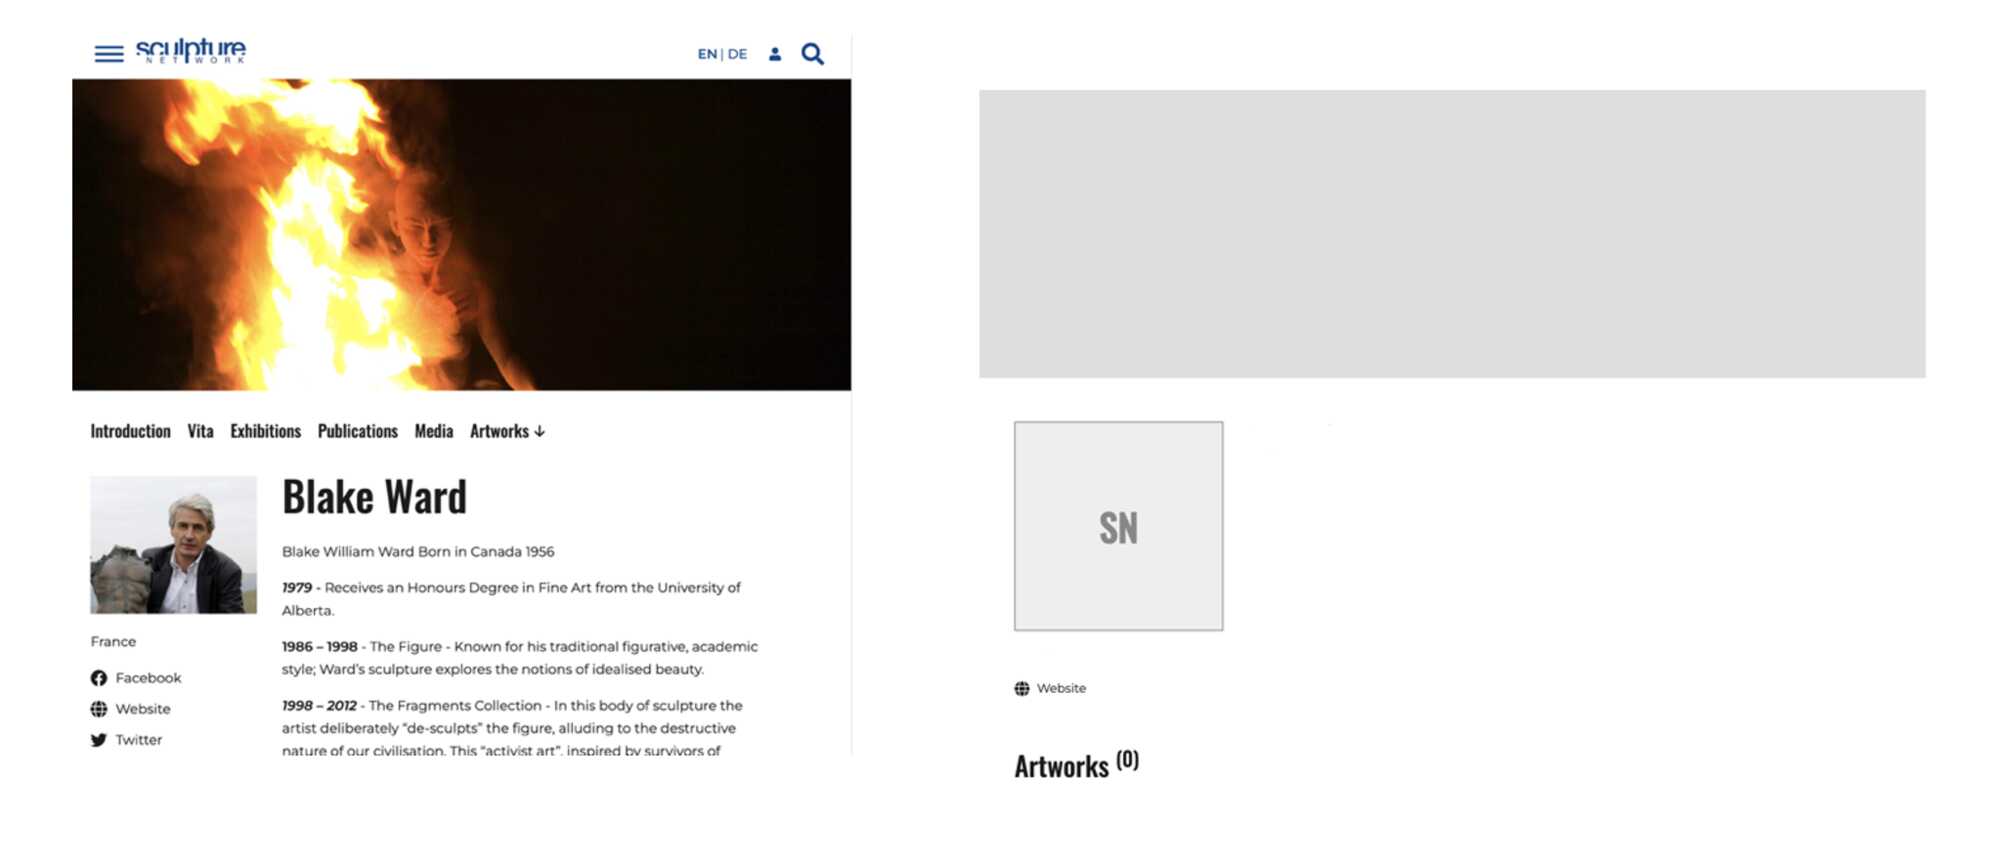
Next we need to create a Banner to go across the top of our Profile page. The difference between a Profile with a Banner and a Profile picture, and one without a Banner and a Profile pictureis shown below… the choice is yours.
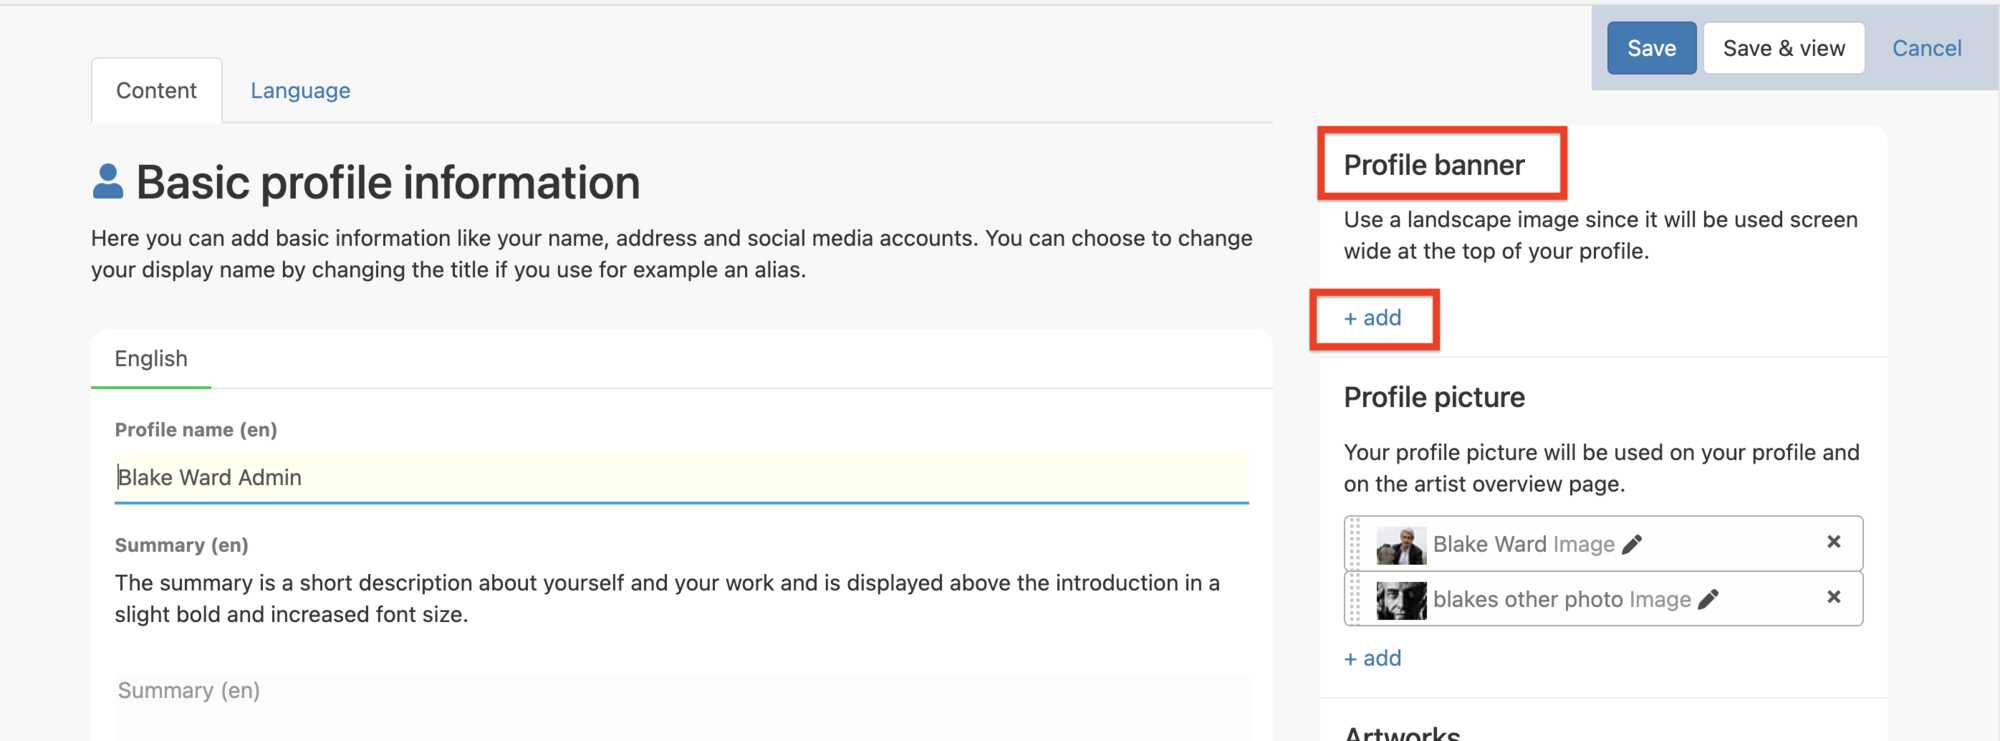
The Profile banner window is found at the very top right of the “back end” of your Profile Page, just under the Save & view buttons that we use so often. As suggested in the instructions in the window we need a picture that uses a “landscape view” format so that the picture that you use covers the complete width of the page. So we go back to the Basic profile information text box shown below.
Just like with the Profile picture, to upload a Profile banner picture, we need to click on the small +add button in the small red box, in the Profile banner window shown below.
When you click on the +add button a new window opens that looks like this below.
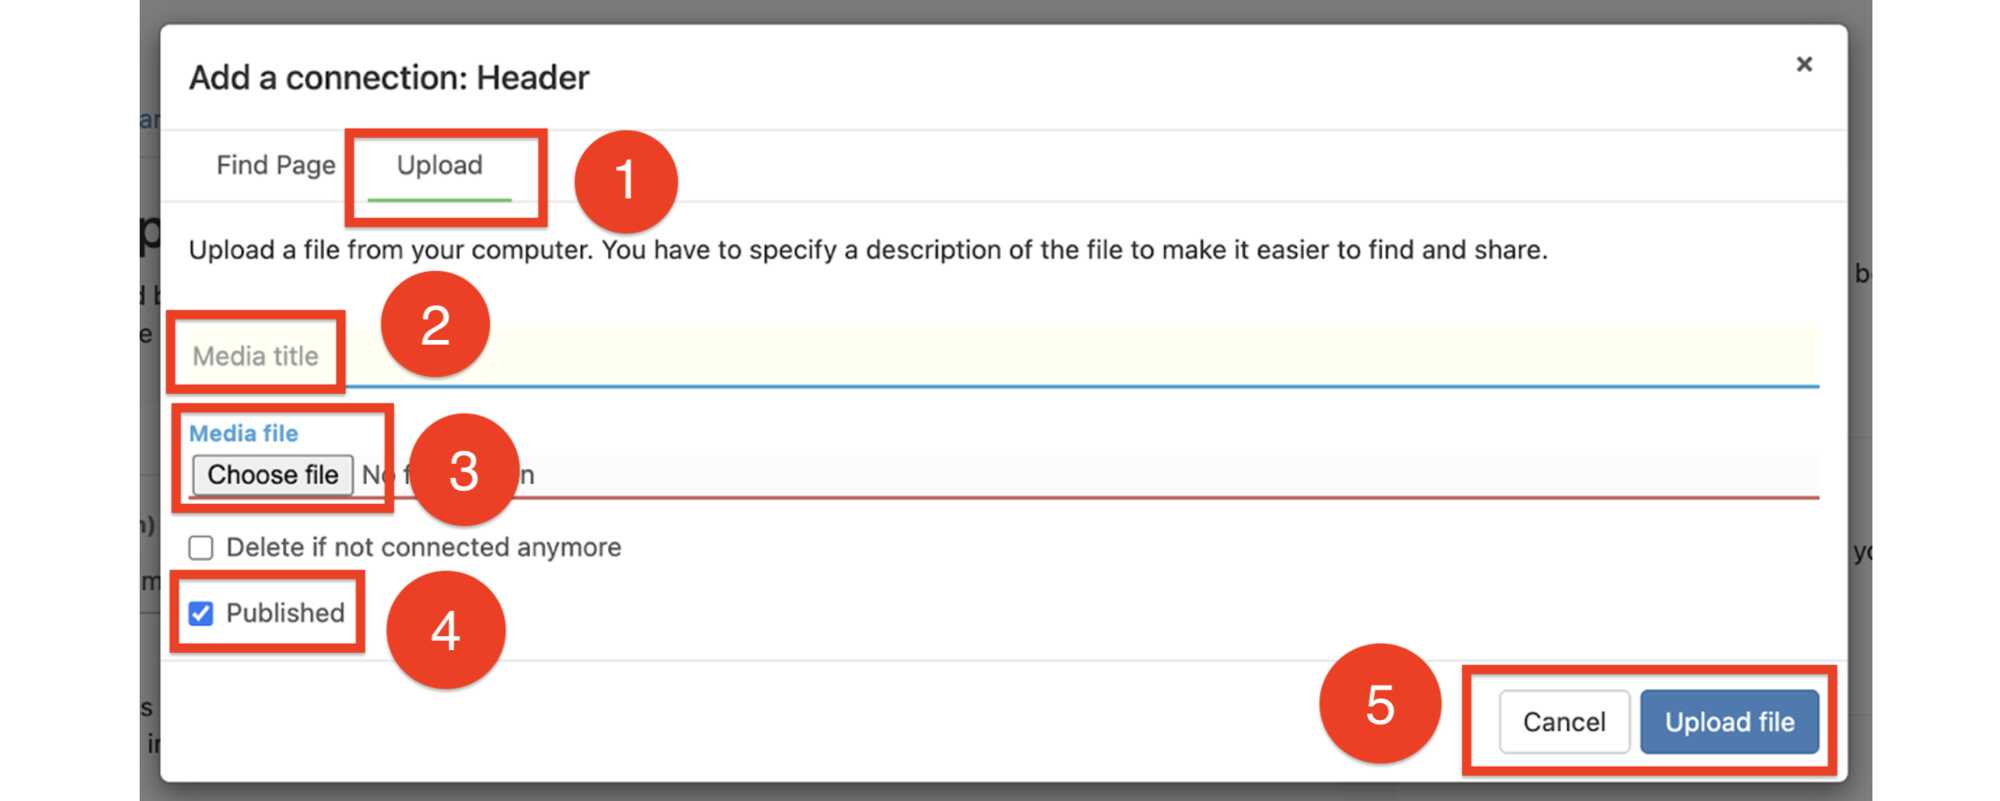
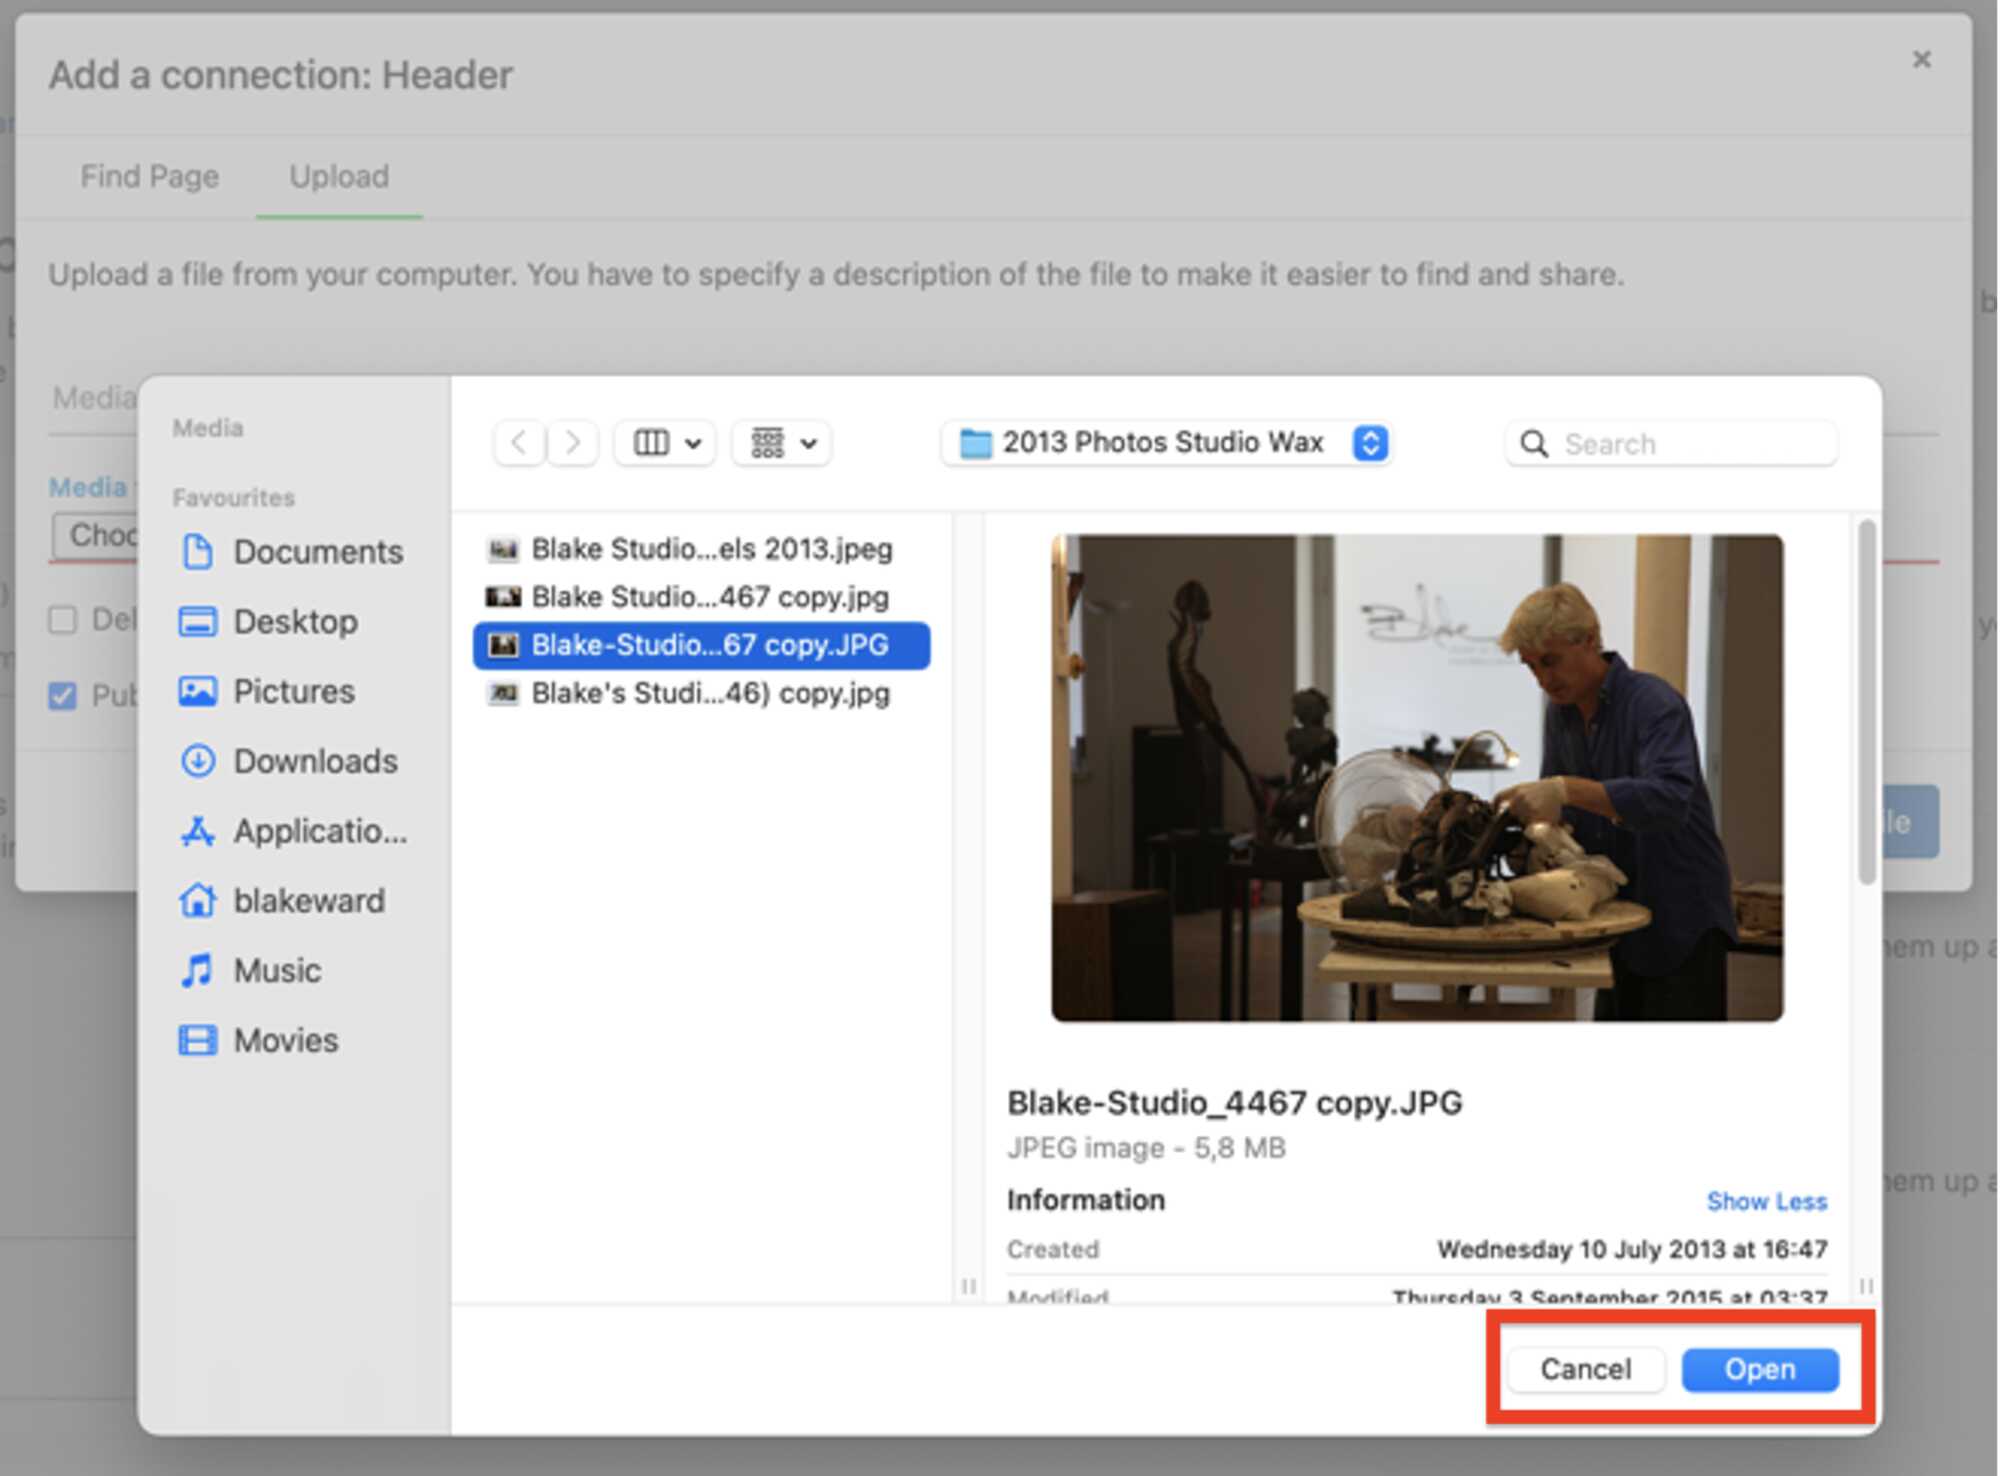
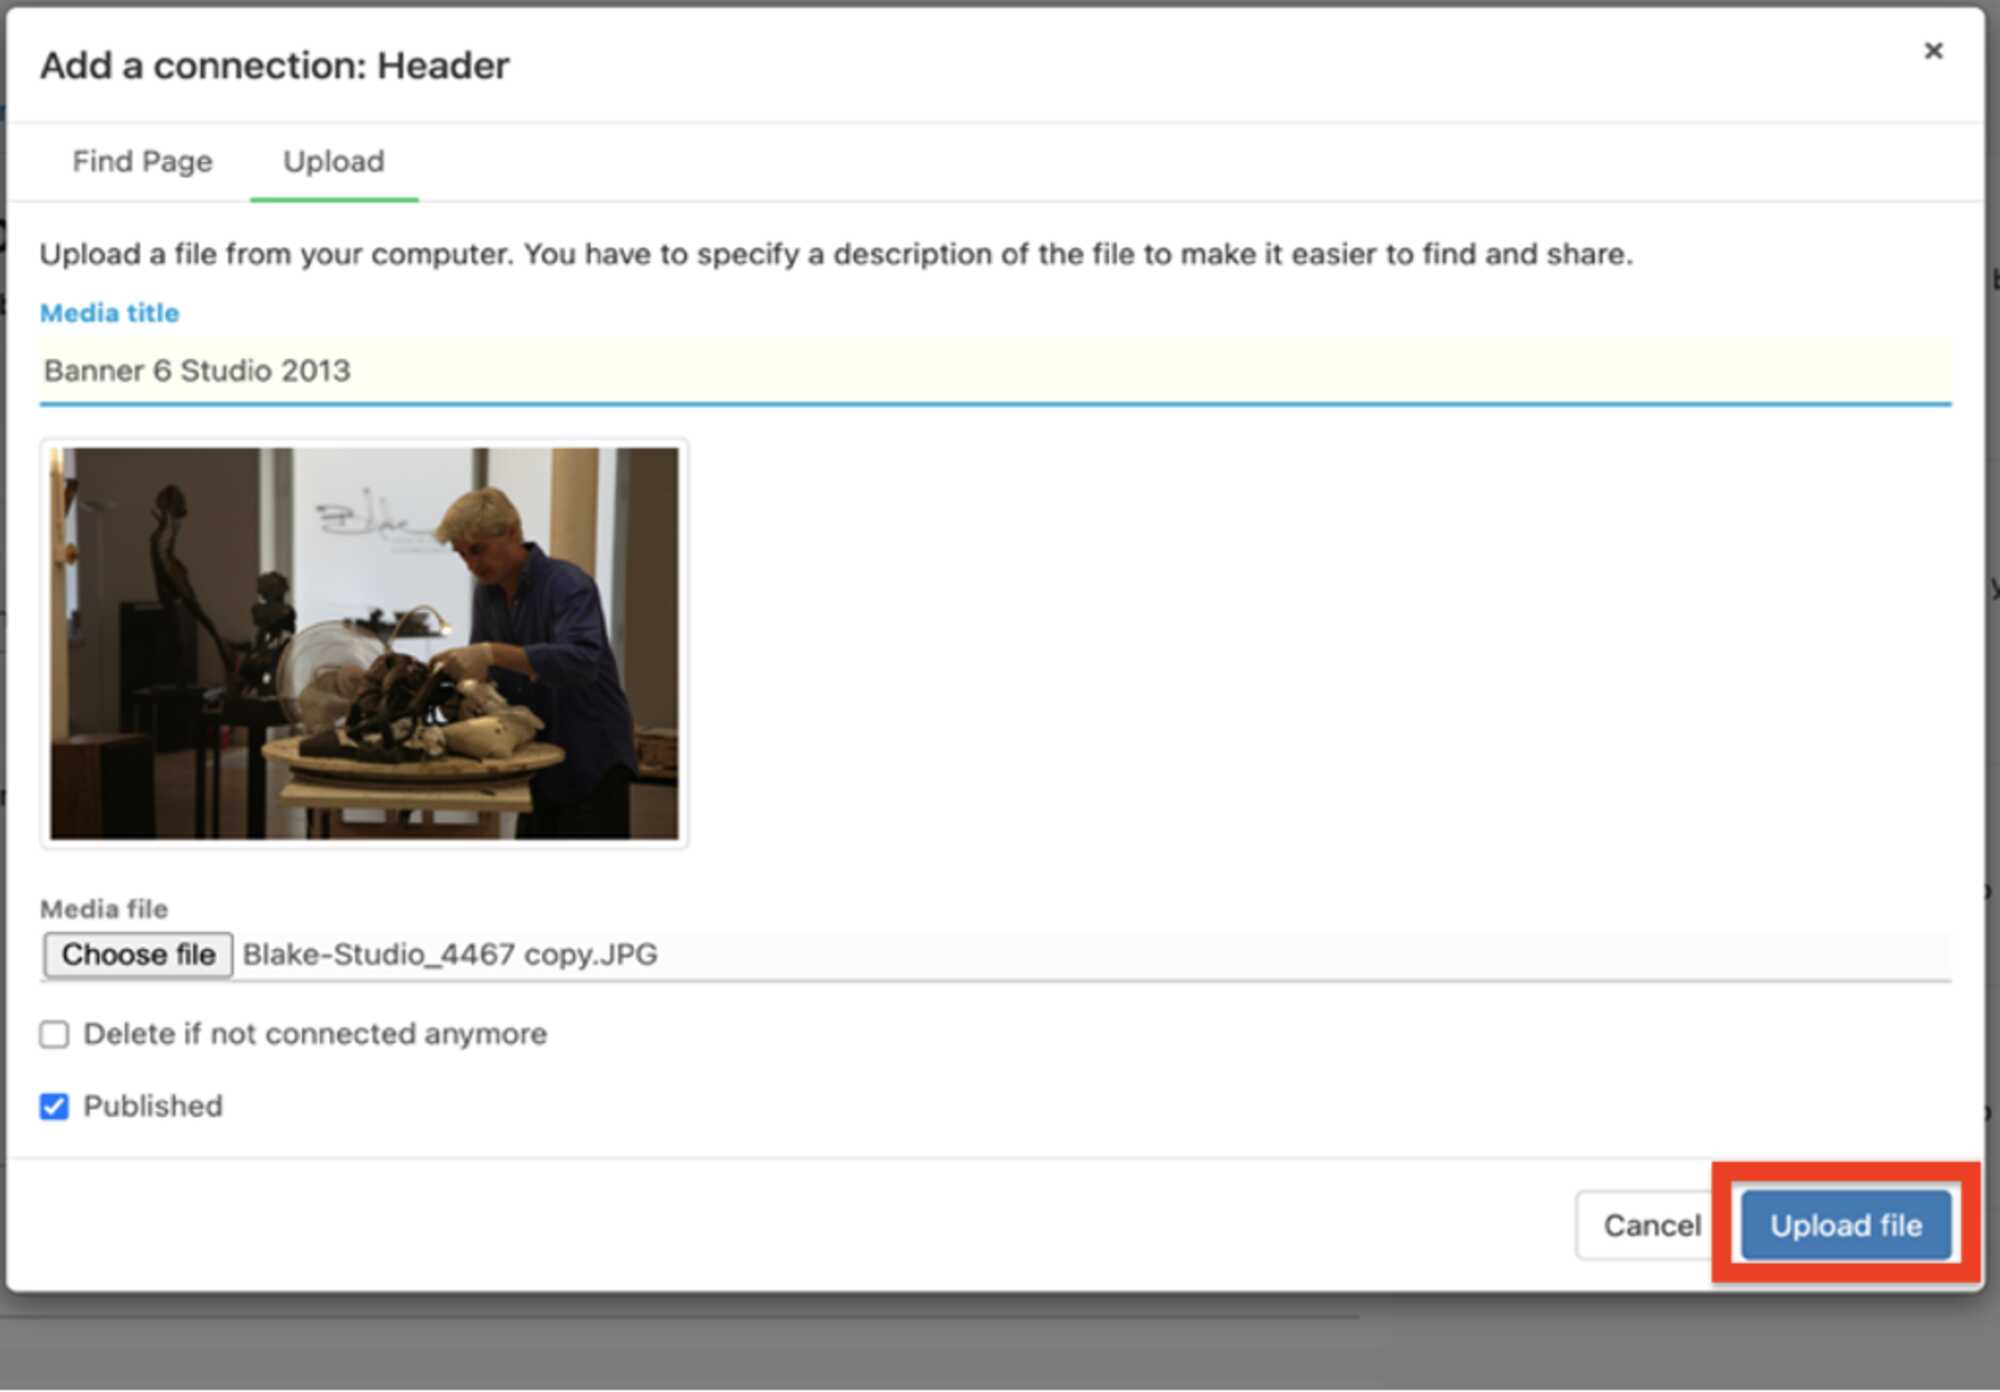
Notice in the Add a connection: Header window above that the green line is below the Upload button; number 1, to indicate that we have chosen to upload a picture. Next, please fill in the Media title; number 2,in order to give your Banner picture a name, and then click the Choose file Button under your new Media file; number 3, to identiffy the picture on your computer that you want to upload. Ensure that the Published has a blue check mark in the little box; marked as number 4 in the diagram above and finally click on the Upload file button indicated by the number 5, in the ower right hand corner of the window. This will open a "Finder Window,” on your computer with where you can choose a Photo from a file on your computer.
Below we have an example of my computer “Mac Finder Window,” showing the Banner picture that I would like to upload into the Banner or Header window on my Profile page. All I need to do is click on the Open button on my computer and the picture will transfer to the website.
This will open the Add a connection: Header window shown below, there we can see that the same picture is ready to be transferred over to the website.
Now choose the Upload file Button in the bottom right hand corner of this Add a connection: Header shown above, and we will have completed the upload of the photo to your Profile.
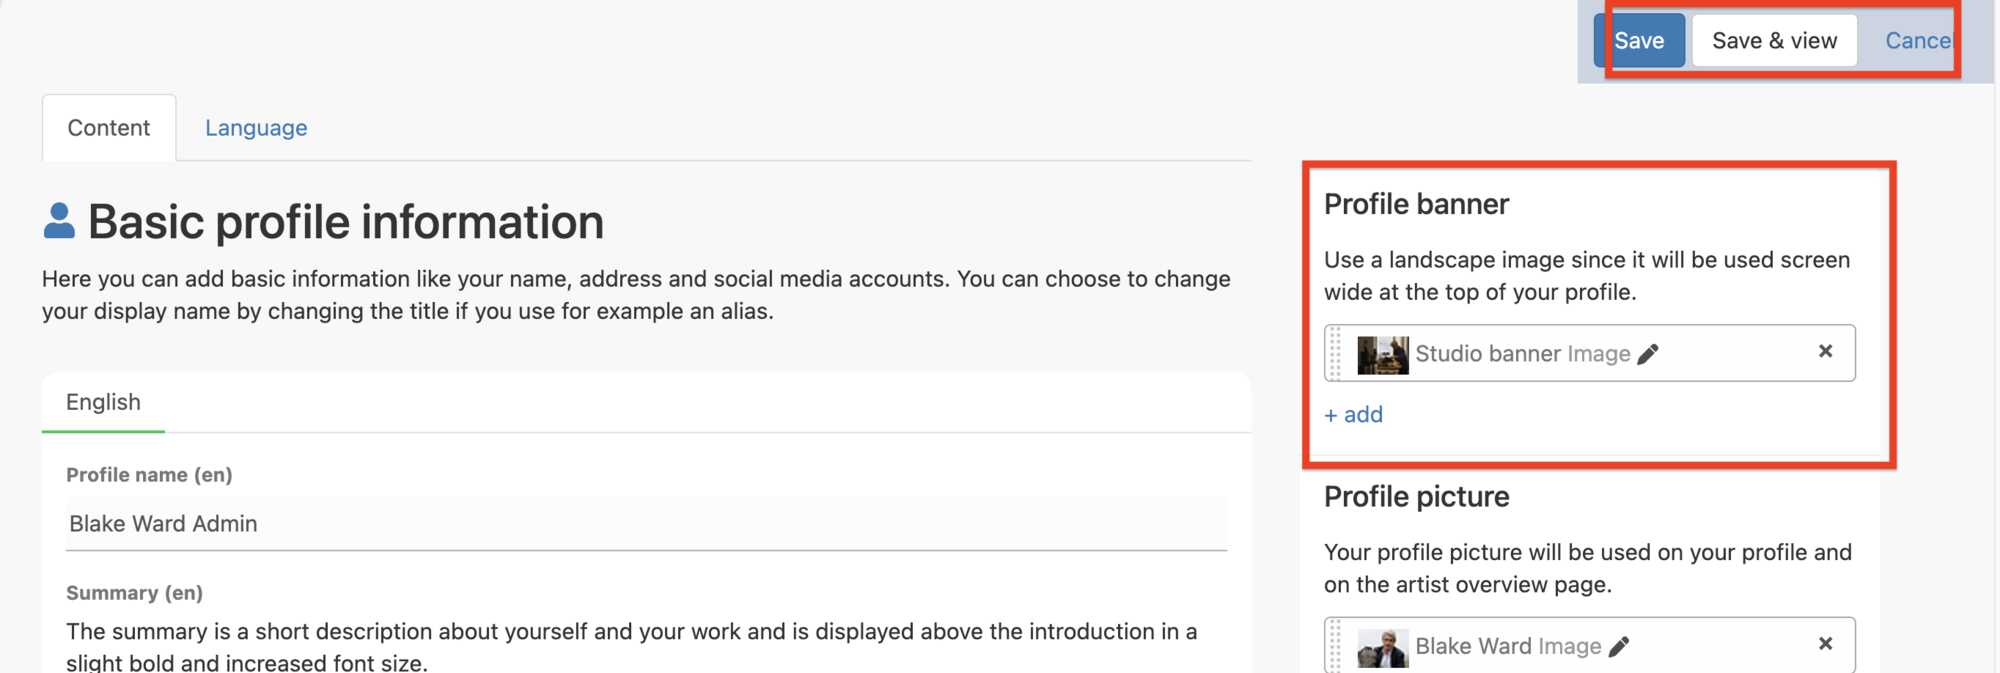
This will automaticly return you to the “back end” of your Profile Page, where you will see that the picture that you uploaded has been saved into the Profile banner window as shown below.
Now you will want to click on the Save & view button in the top right hand corner of the Profile page shown above, and check to see how it looks in the “Banner frame” showing your Banner picture across the top of your Profile page, on the front end of your Profile page.
Edit you profile banner picture
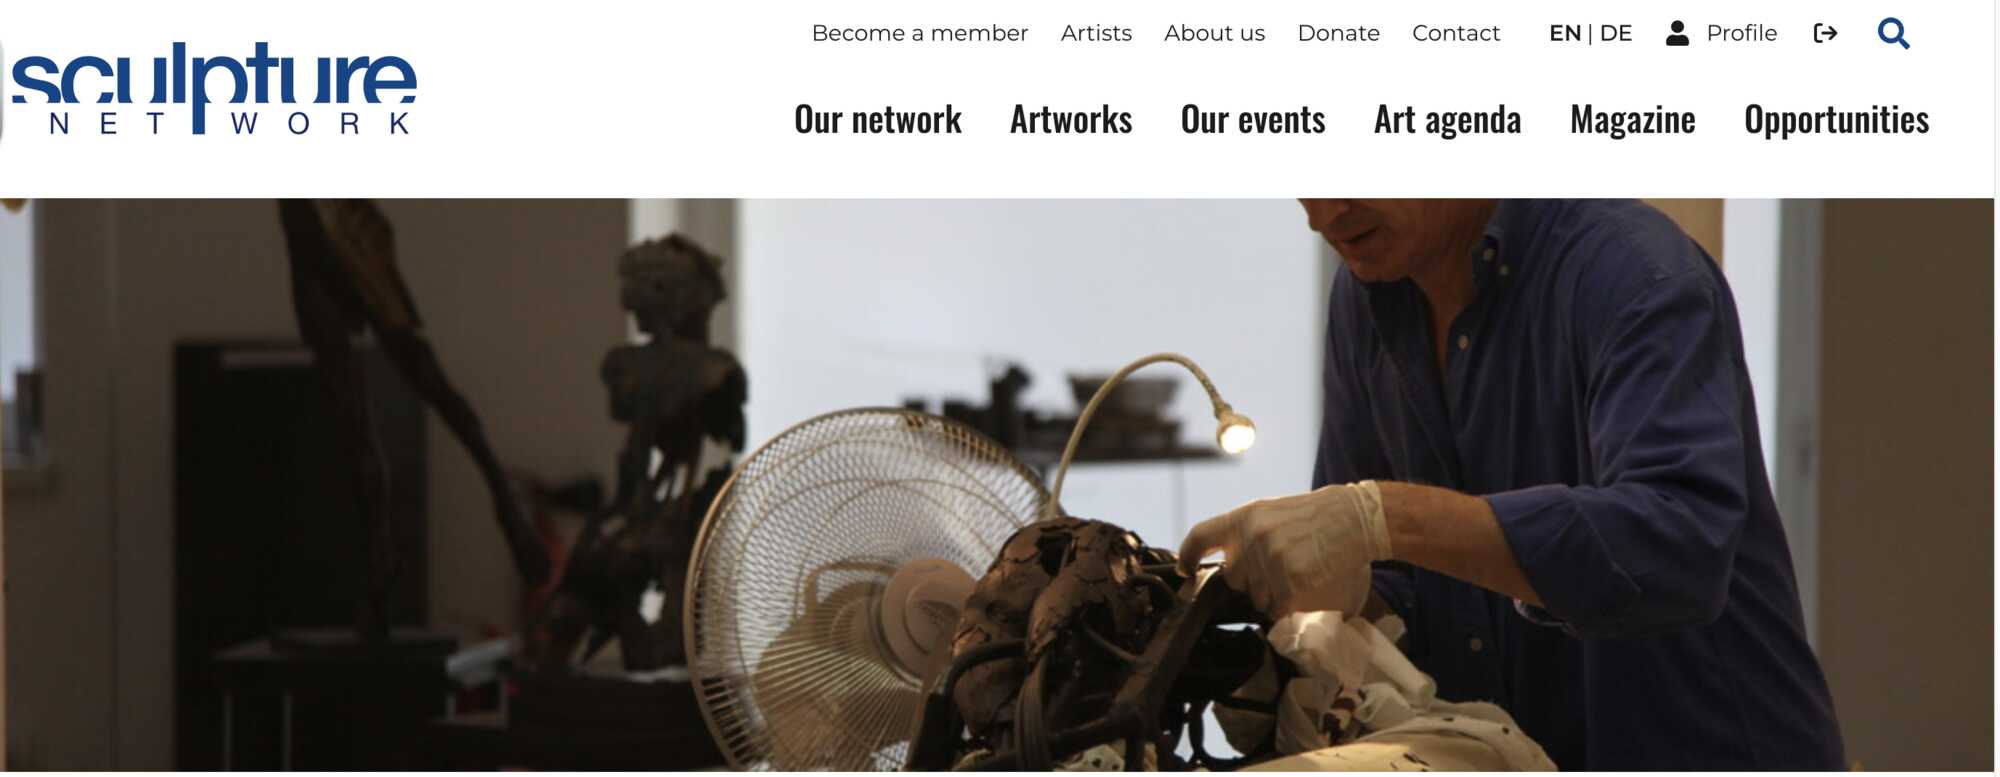
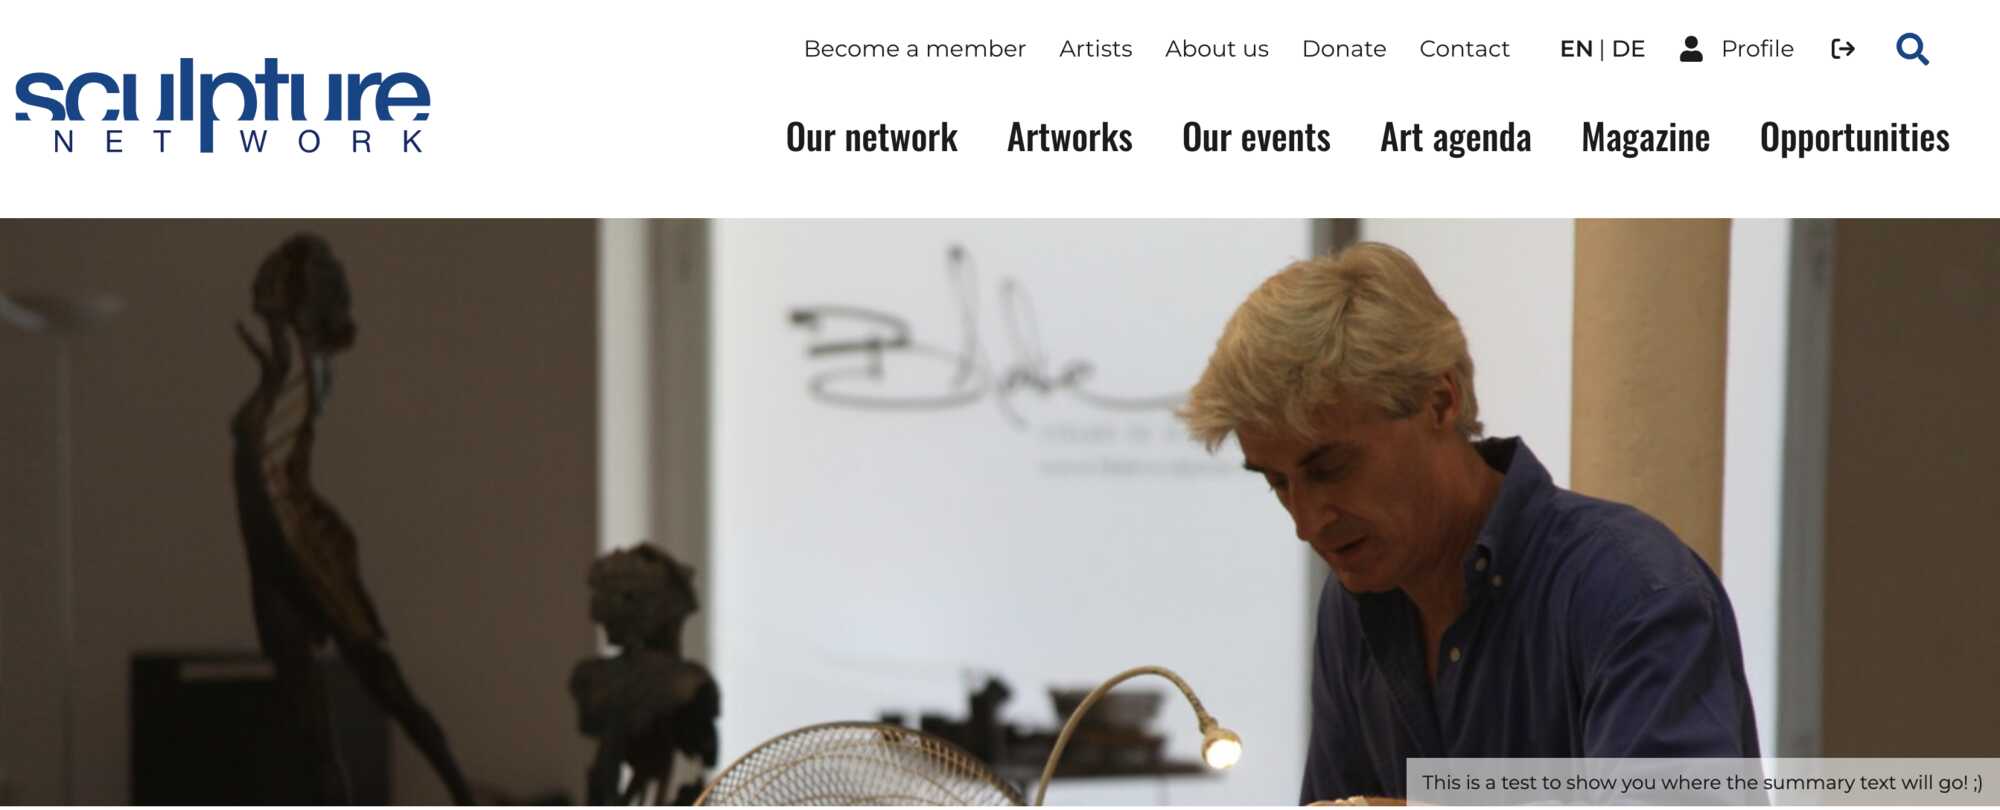
As you can see the picture has been centred incorrectly and again I have no head! :( So we will need to change the centre point of the picture, in order to correct this Banner picture.
Let's return to the "back end" of the Profile page by clicking on the Edit Profile button, found on your Profile page below the Profile picture of you and the “Contact me” Button.
As shown in the diagram to the right, if you are on your computer, or above if you are working on your mobile phone.
Once we are on the back end of your Profile page again, on the left side of the page at the top, you will see your Profile banner text window, shown below.
To edit the banner picture that you uploaded, so that we can change the centre point of the photo and place it correctly in the banner frame, click on the icon of the pencil beside the word “Image”, shown in the red box in the Profile banner window below.
When we click on the Edit pencil we are taken to another window that looks like the slide below.
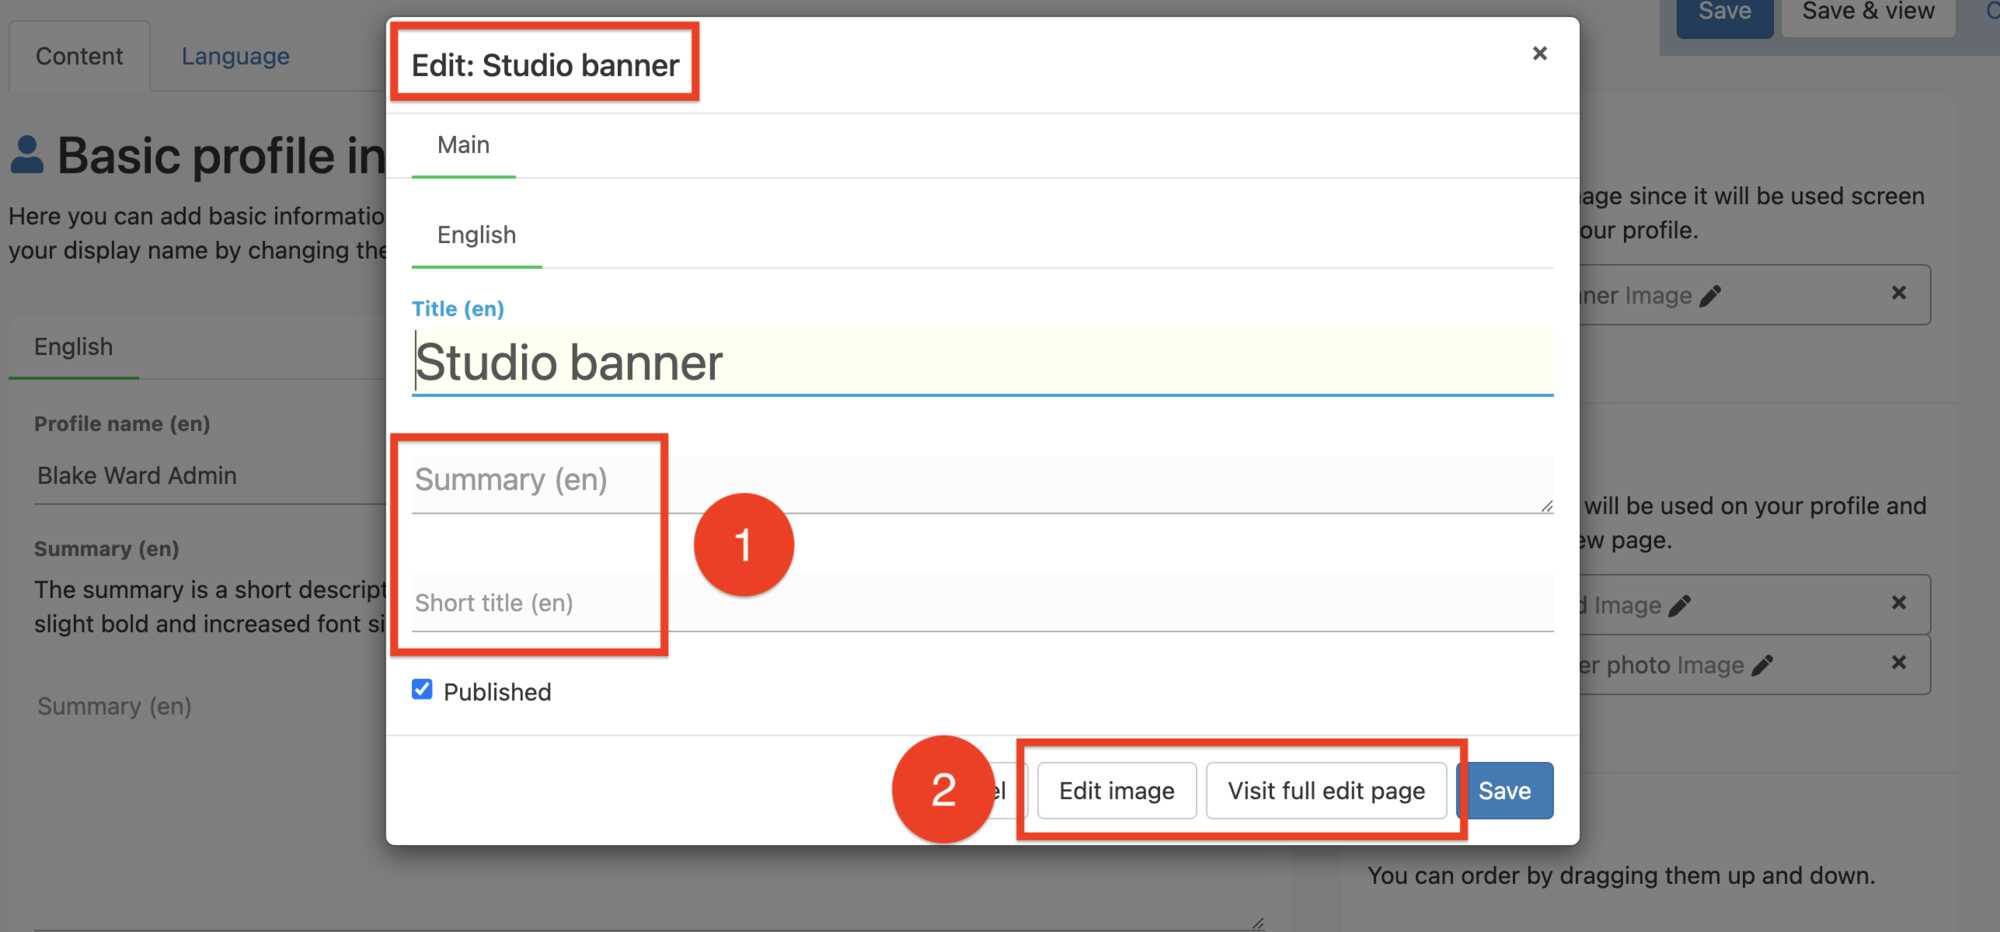
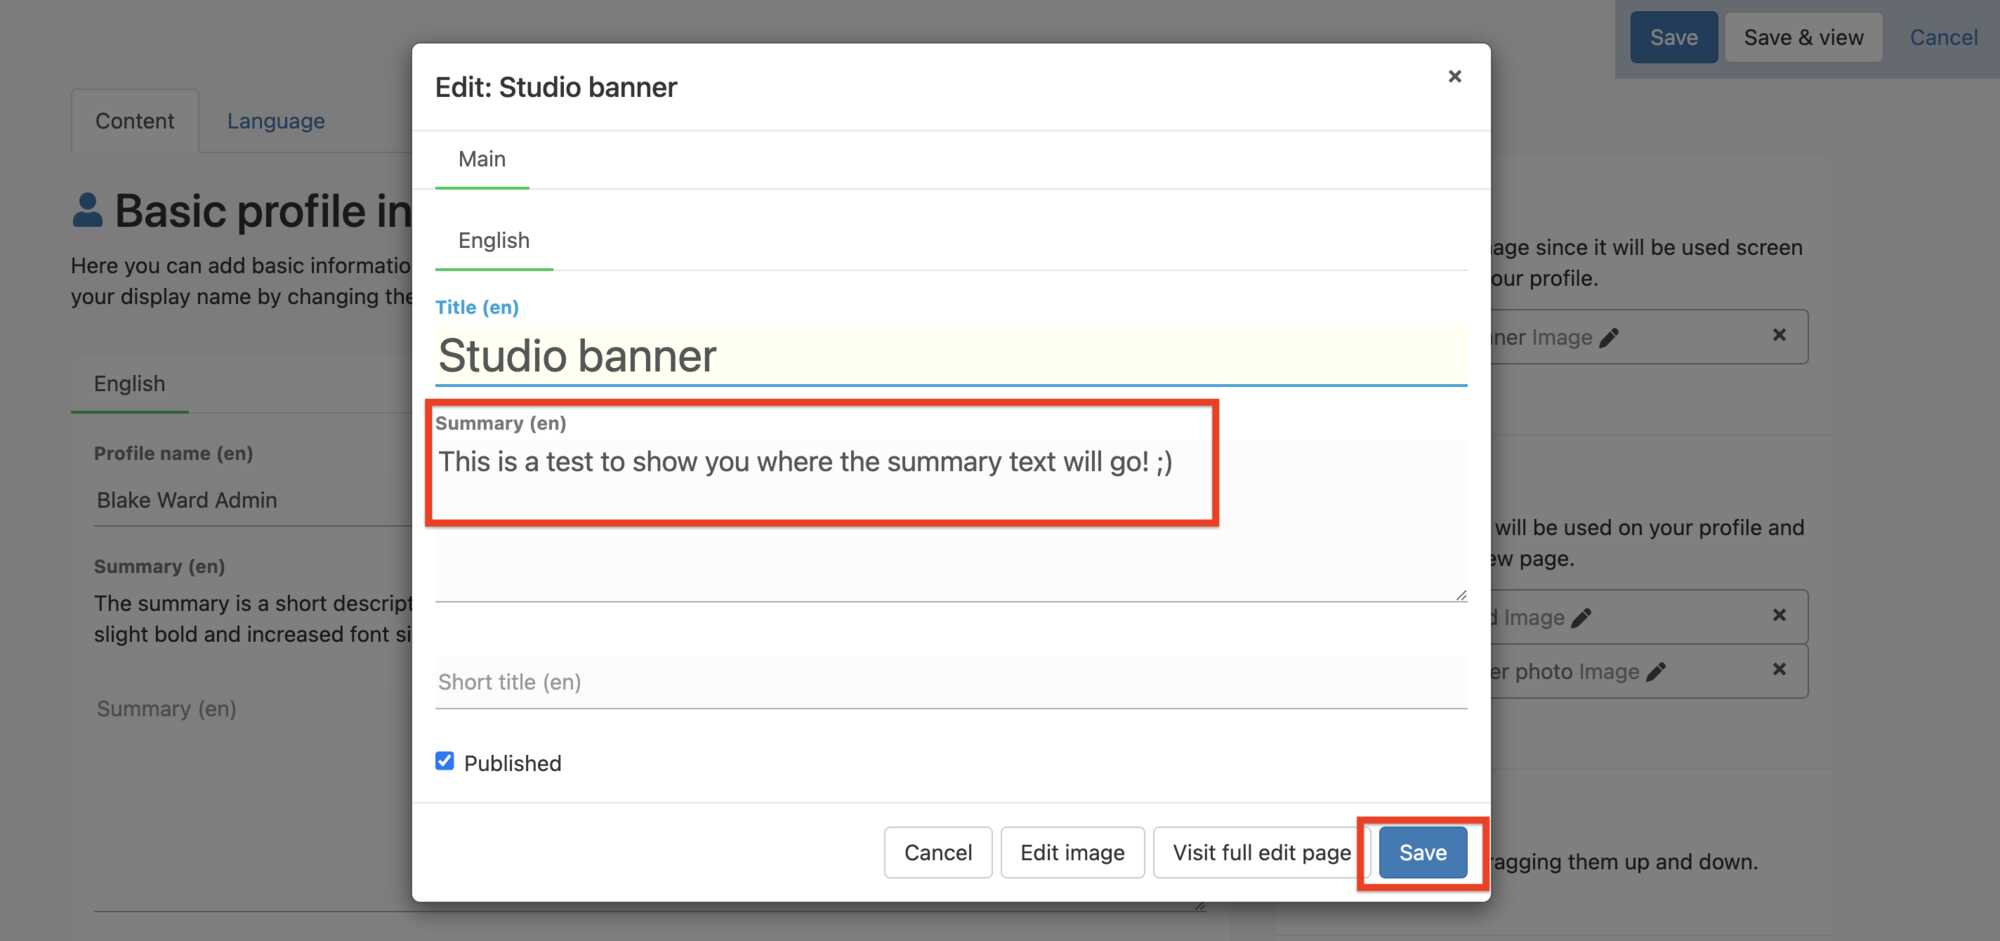
This window called “Edit: Studio banner”, indicates the name of the picture that we are going to edit. Here we edit the title of the banner picture that we uploaded and below the Title text area, if we wish, we can add a summary of the photo. Any text placed in this "summary text area" indicated by the number 1, will appear at the bottom of any of the photographs that you edit, and will be visable on the "front end" of your Profile. The text will appear on the photo in a small grey text box in the bottom right hand corner of the picture being edited. You can use this text box on any photo that you upload to add a note or perhaps credit the photographer who took the picture, for example.
In the bottom right-hand corner of this “Edit: Studio banner” window, shown above, we find the Edit image button, in the red box number 2, we have used before in this guide, to edit our Profile picture. If you click on the Edit image you will be taken to the Editing window shown below.
You can Click on View full edit page, in the area marked by the number 2, you will be taken to a page where you can see the whole photo, with the title and summary text boxes. Here you will also find information on the photograph, the size of the photo and when it was downloaded to the website, and a download link to the photo on the Sculpture Network website, as well as a Replace button if you want to replace this photo in the place that it is shown in your Profile.
If you Click on the Edit image button we find ourselves at the final Editing window shown below.
In this Edit image window, above I have clicked on the picture to place the Red Dot shown in the blue circle, and tried to move it to a higher position and then a a still higher position in the photo to see if that would centre the photo correctly in the banner frame, and not cut off my head!
After each time that I repositioned the Red Dot, I would click on the blue Save button in the side panel in this window shown above, which will take me back to the "back end" Profile page, shown below. Then hit the Save & view button in the upper right hand corner of the back end Profile page shown below, so that I could see if the picture was correctly placed in the Banner frame on the front end of my Profile Page.
I took a couple of tries and I always came up with this bl###y: result below ! :(
So the picture is still not placed correctly in the frame… so I have to go back..... to the "back end" of the Profile page by clicking on the Edit Profile button, found on your Profile page below the Profile picture of you and the “Contact me” Button.
Then, click on the Edit pencil in the Profile banner window again.
And we are taken to another window again; the Edit: Studio banner.... and while I am here, again, I thought I would put in an example of where you can put your text for the credits that will then appear on the photo, as shown below.
Then we hit Save. In order to save the text in the text box and we return to the same page as shown above and we click on Edit Image to the left of the Save button above.(Not in red box this time).
And we arrive back at our Edit Image window shown below.
Ok, now moving back to the problem of being headless.
I placed the Red Dot placed as high as it would go, and still the frame is not in the correct position, so we needed to crop the photo.
In the slide below, click on the Crop image button in the panel on the right hand side of the photograph, and the four crop tools will open, as shown below, adjust the Crop bottom slider to where you think it might be bottom of the banner frame and place the Red Dot tool up higher in the photo, and let’s try again. The original image will not be changed, only the way the website editing program reads the photo will be different.
Now click on the Save button in the lower right hand corner of the window as shown above and then, of course we will have to click the Save and View button on the "back end" Profile page that you are taken to, in order to get back to the "front end" of you Profile page!
Almost there, however, notice that the photo summary that I mentioned in the “Edit: Studio banner” window, where you can edit the name of the picture and add a summary text… while there it is in a little grey text box in the bottom right hand corner of the picture! :)
So lets do it again and move the Crop tools around until you get the photo in the frame correctly.
It will take a number of tries to get this right, so take your time and keep going.
So to recap, once we have uploaded a photograph into the Profile banner we hit the little pencil to edit and then we hit Edit image in order to see the photograph that we want to edit. We click anywhere on the photograph to place a Red Dot tool and then move the dot around to centre the photo in the banner frame. To assist in centring the photo in the banner frame we can crop the photo then clicked on the Save button in order to exit this window and we are returned to the “back end” of your Profile Page. In order to see the picture in the Profile banner window in the front end of the Profile Page you click on Save & view and we will find ourselves on the “front end” of the Profile Page.
This will take a few tries but you will figure it out and your Banner will be spectacular.
Personal name and address
Now that we have the Profile picture and the Banner picturecomplete we will continue to fill in written information about ourselves. We start again by click the Edit profile button beneath your Profile picture on the front end of your Profile page.
After clicking on the Edit profile button you will be returned to the “back end” of your Profile Page, you will see the Basic profile information text box, as shown below.
Of course, we will start with your Profile name in the first red box, number 1, shown in the diagram above. The name you put in here will appear in large text at the top of your Profile page.
Under that you can place a short summary if you wish, marked by number 2, which will be in a slightly larger text size than tha "Introduction paragraph", which we will enter in the "Introduction text box" located further down the page.
As you can see, I have placed a short note "Please contact me at my "email address" in this summary text box, as I would like to be contactable by any public viewer that may come across my Profile. Unless you put a contact address here you will only be contactable by other Sculpture Networks members, as the public will not have access to your email address through our website.
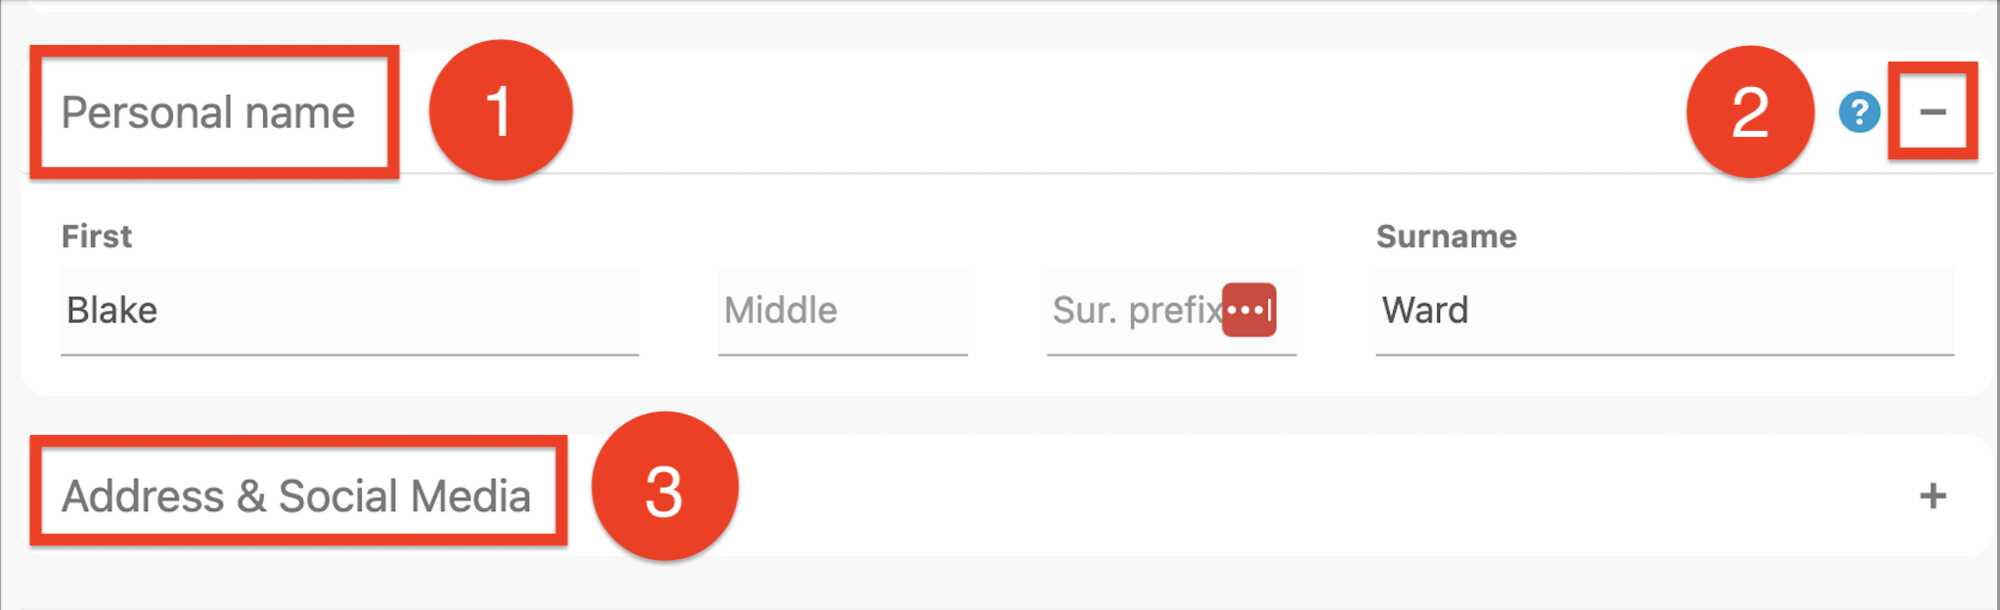
Now lets scroll down the page to the thin rectangular text box titled “Personal name”, number 1 in the diagram below, please enter your First Name and Last Name in here.
This is for the administration end of the website and will not be shown on your Profile page.
You can click anywhere within the thin rectangular text box or on the plus "+" or minus sign, or dash “–“ signs, marked by number 2, shown below, to collapse a window and click on the “+” to expand the window or collapse the window.
Social media addresses
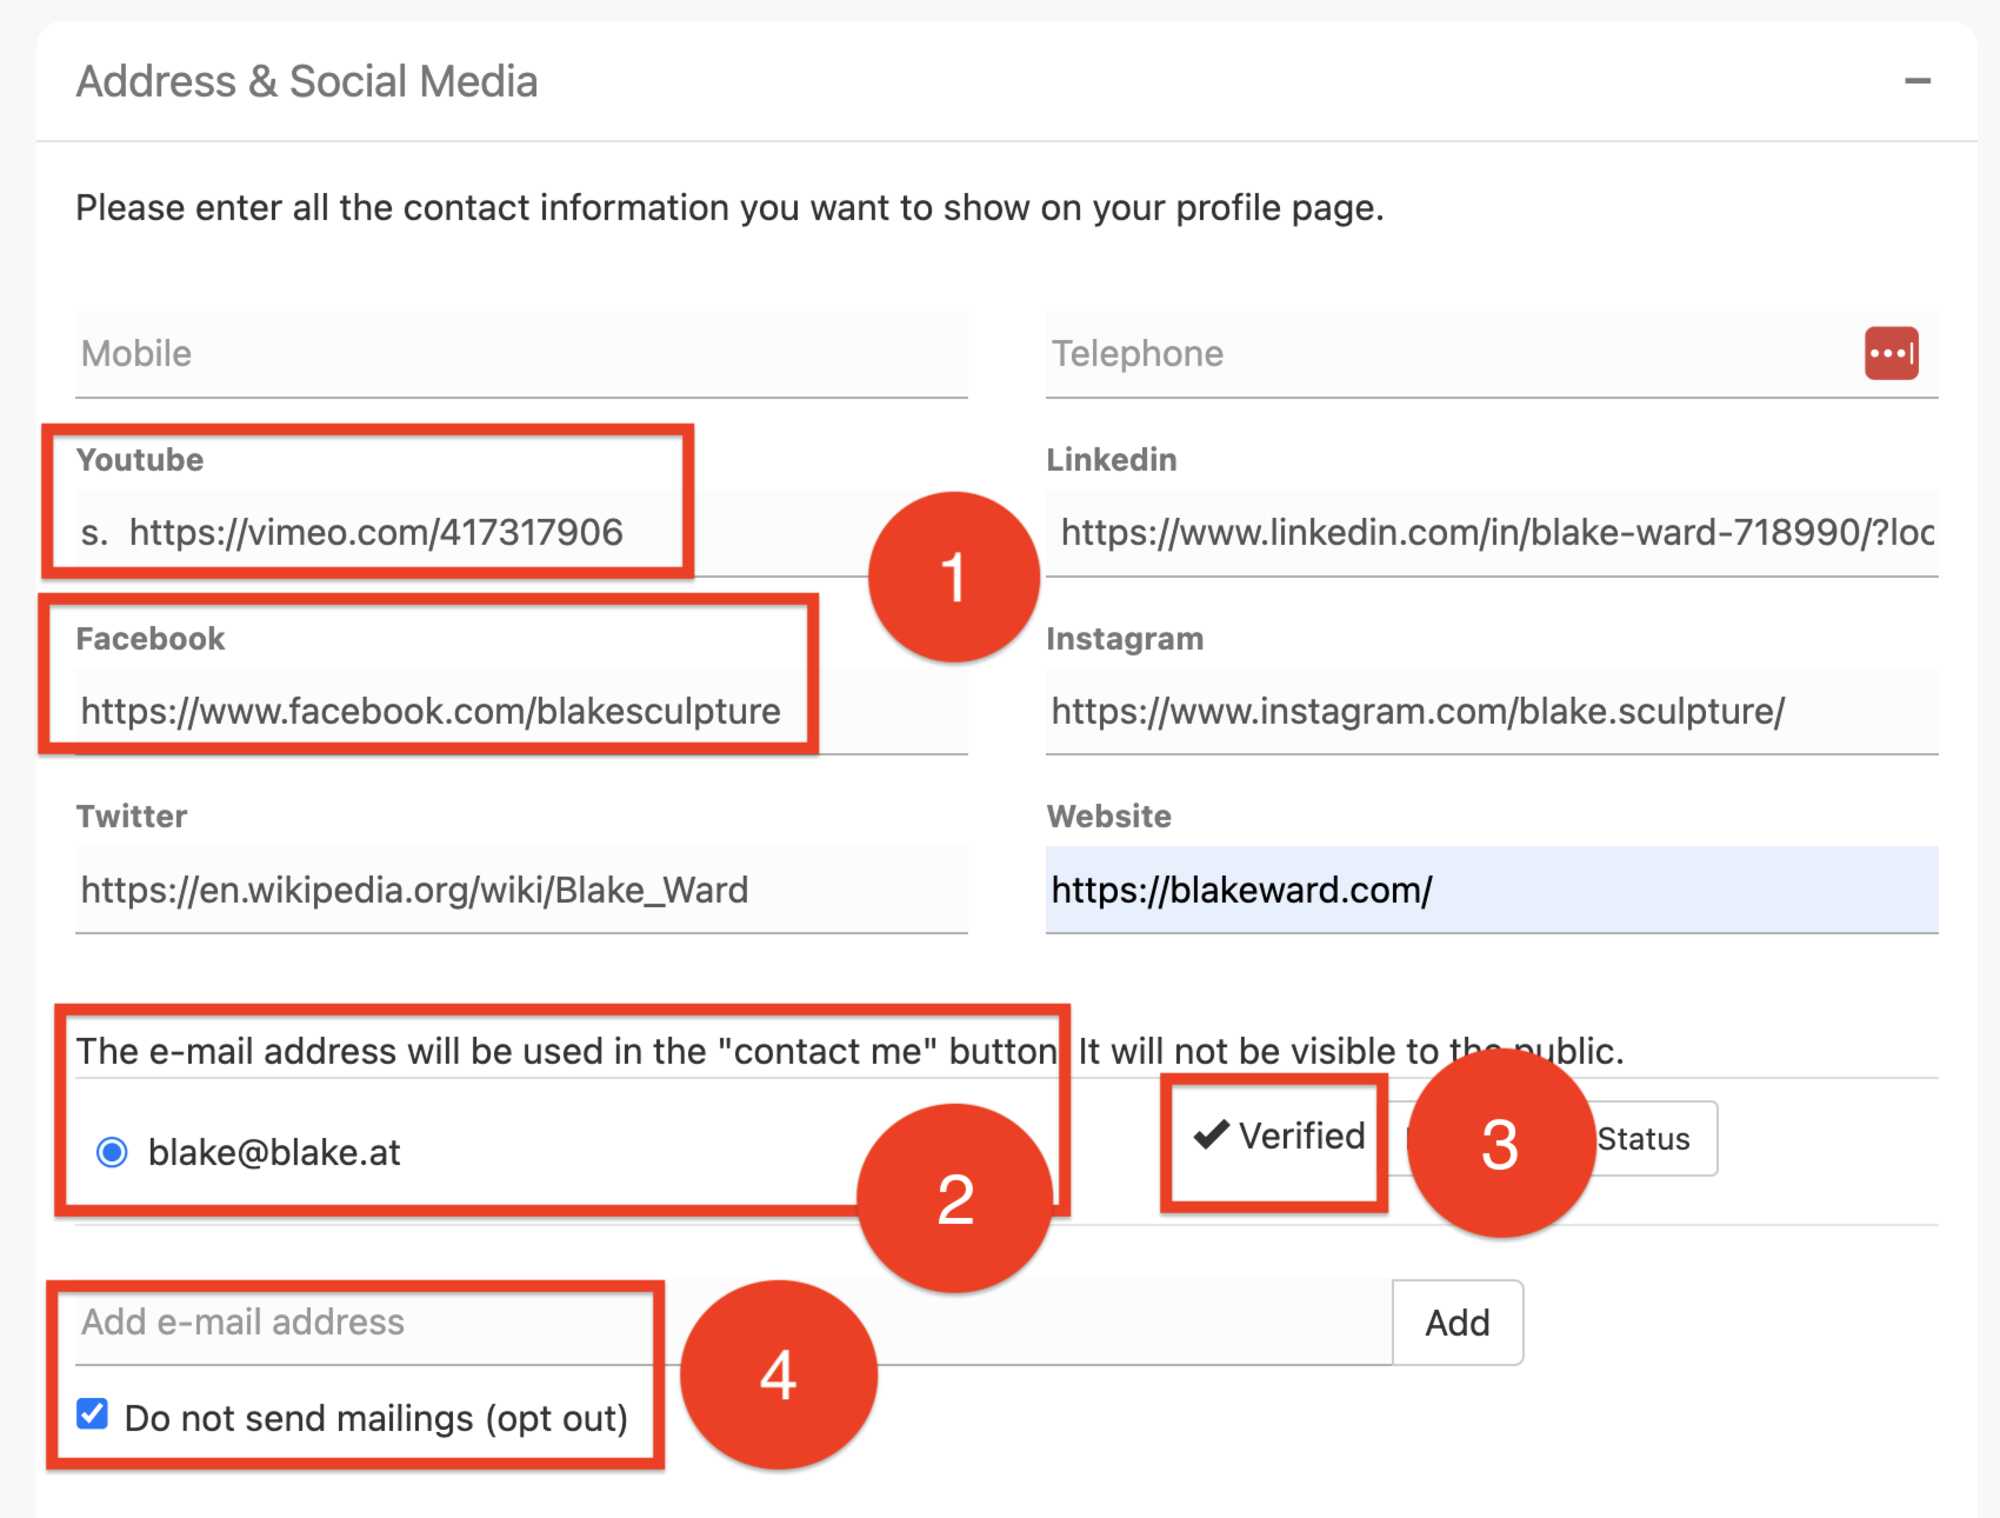
Add your Social media addresses to your Profile page, within the Address & Social Media window beside the number 3 shown above.
If you enter your social media addresses in the space below the name of each media platform, then the corresponding icon and the name of the Social media platform will appear as a button on the “front end” of your Profile page on shown to the right.
The link to your Social media page, will open in an exterior web browser page. If you do not enter an address, neither the label “Facebook”, for example, nor the icon will show on your Profile page.
As you can see in the diagram above, number 1, the social media addresses may not match the social media symbol, as I have entered a Vimeo address instead of youtube, and my Wikipedia page instead of Twitter.
Although the social media symbol is displayed in the diagram to the right, (and above if you are editing on a mobile phone), when you click on the youtube symbol you will be take to the vimeo address that I entered above, and the same for Twitter, the media symbol is not correct but the link will work all the same.
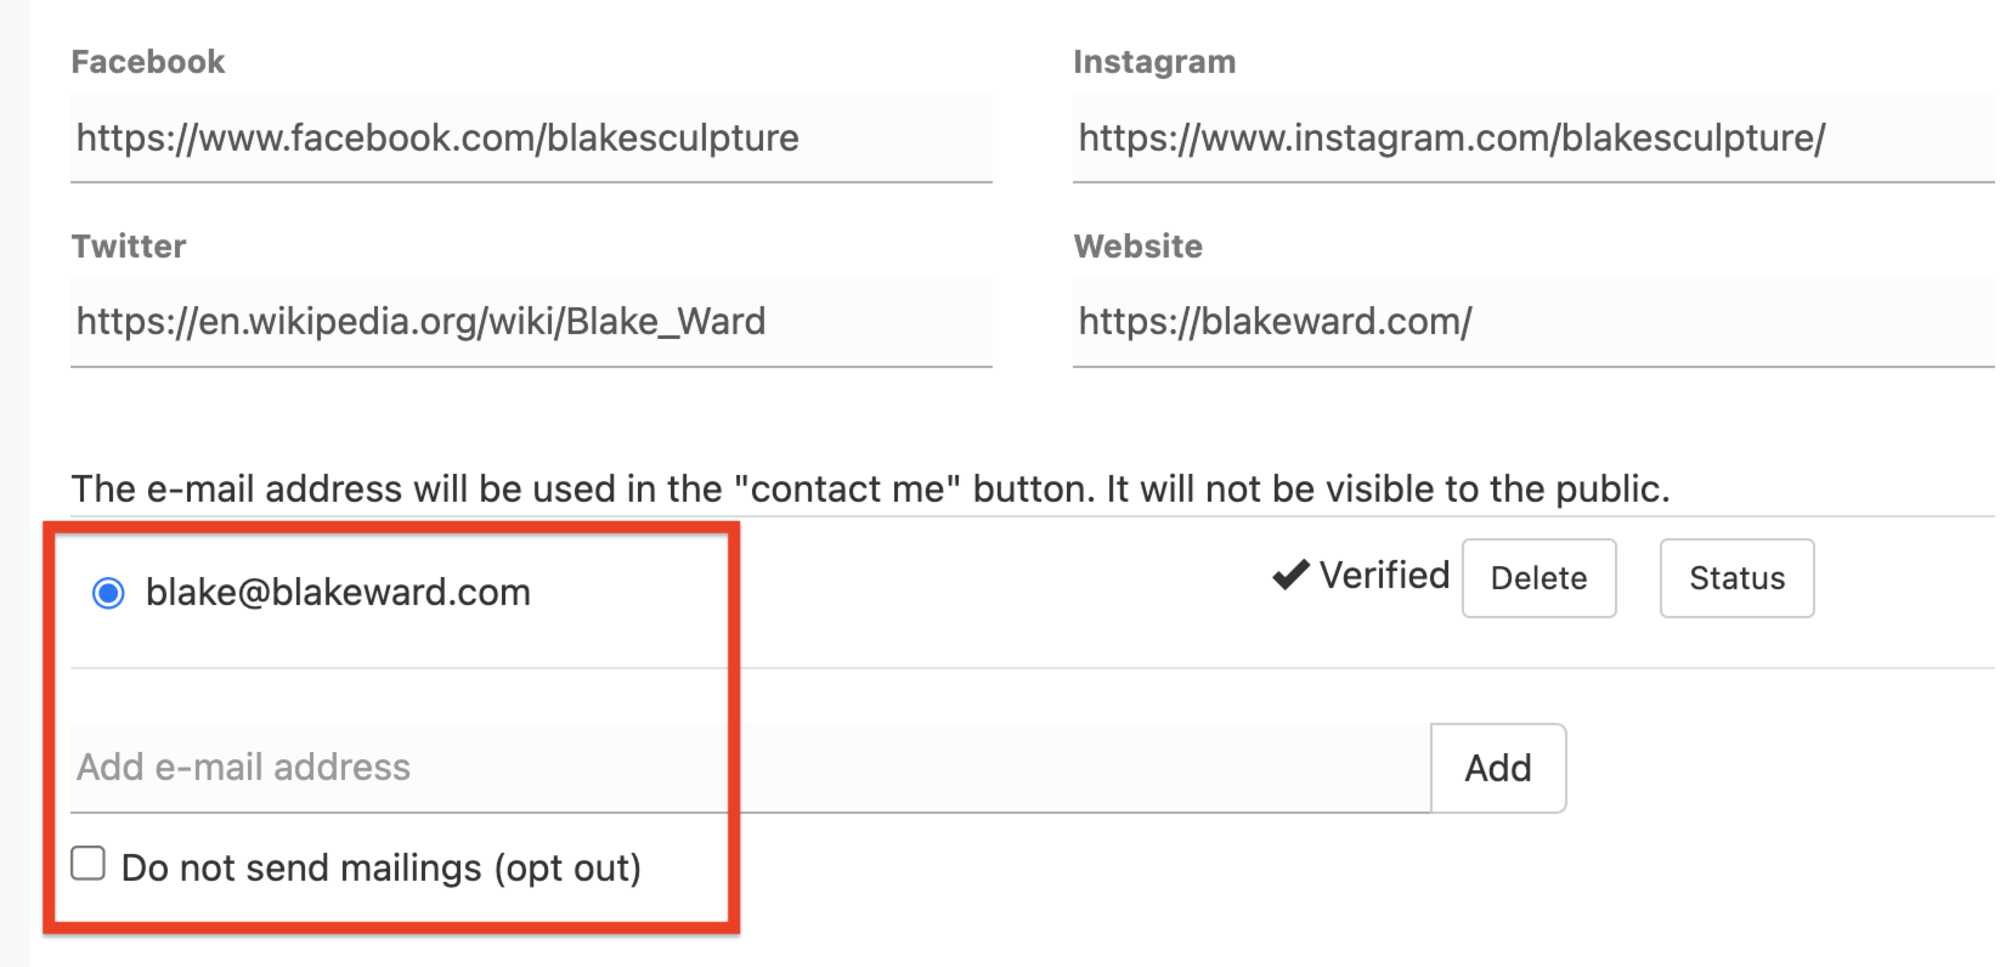
Email Address
Please enter an Email address in the space identified with the number 2, as shown in the image above. This address will be used in the case that you forget your password and for email announcement and other email coming from Sculpture Network, unless you "Opt out", describer below.
The Email address that you enter in the form must also be Verified. To Verify your email address please click on the Verify box across from you email address and the system will send a verification link to the address that you have entered. Once you receive our email with the verification link, click on the link and a check mark will appear next to the word “Verified”, as shown in the small red box above indicated by the number 3.
Opt Out of receiving emails
The Opt Out Feature; marked as number 4 in the large diagram above. The email address that you have entered in this section will also be used for mail outs issued by Sculpture Network administration, unless you check the box beside the text “Do not send mailings (opt out)", as shown in the large diagram marked number 4 above, and hightlited below in the red box. If checked you will not receive any Event, Announcement or Newsletter mail outs issued by Sculpture Network.
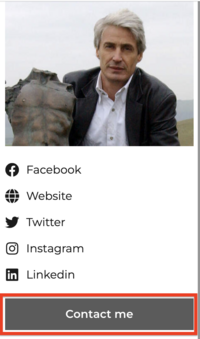
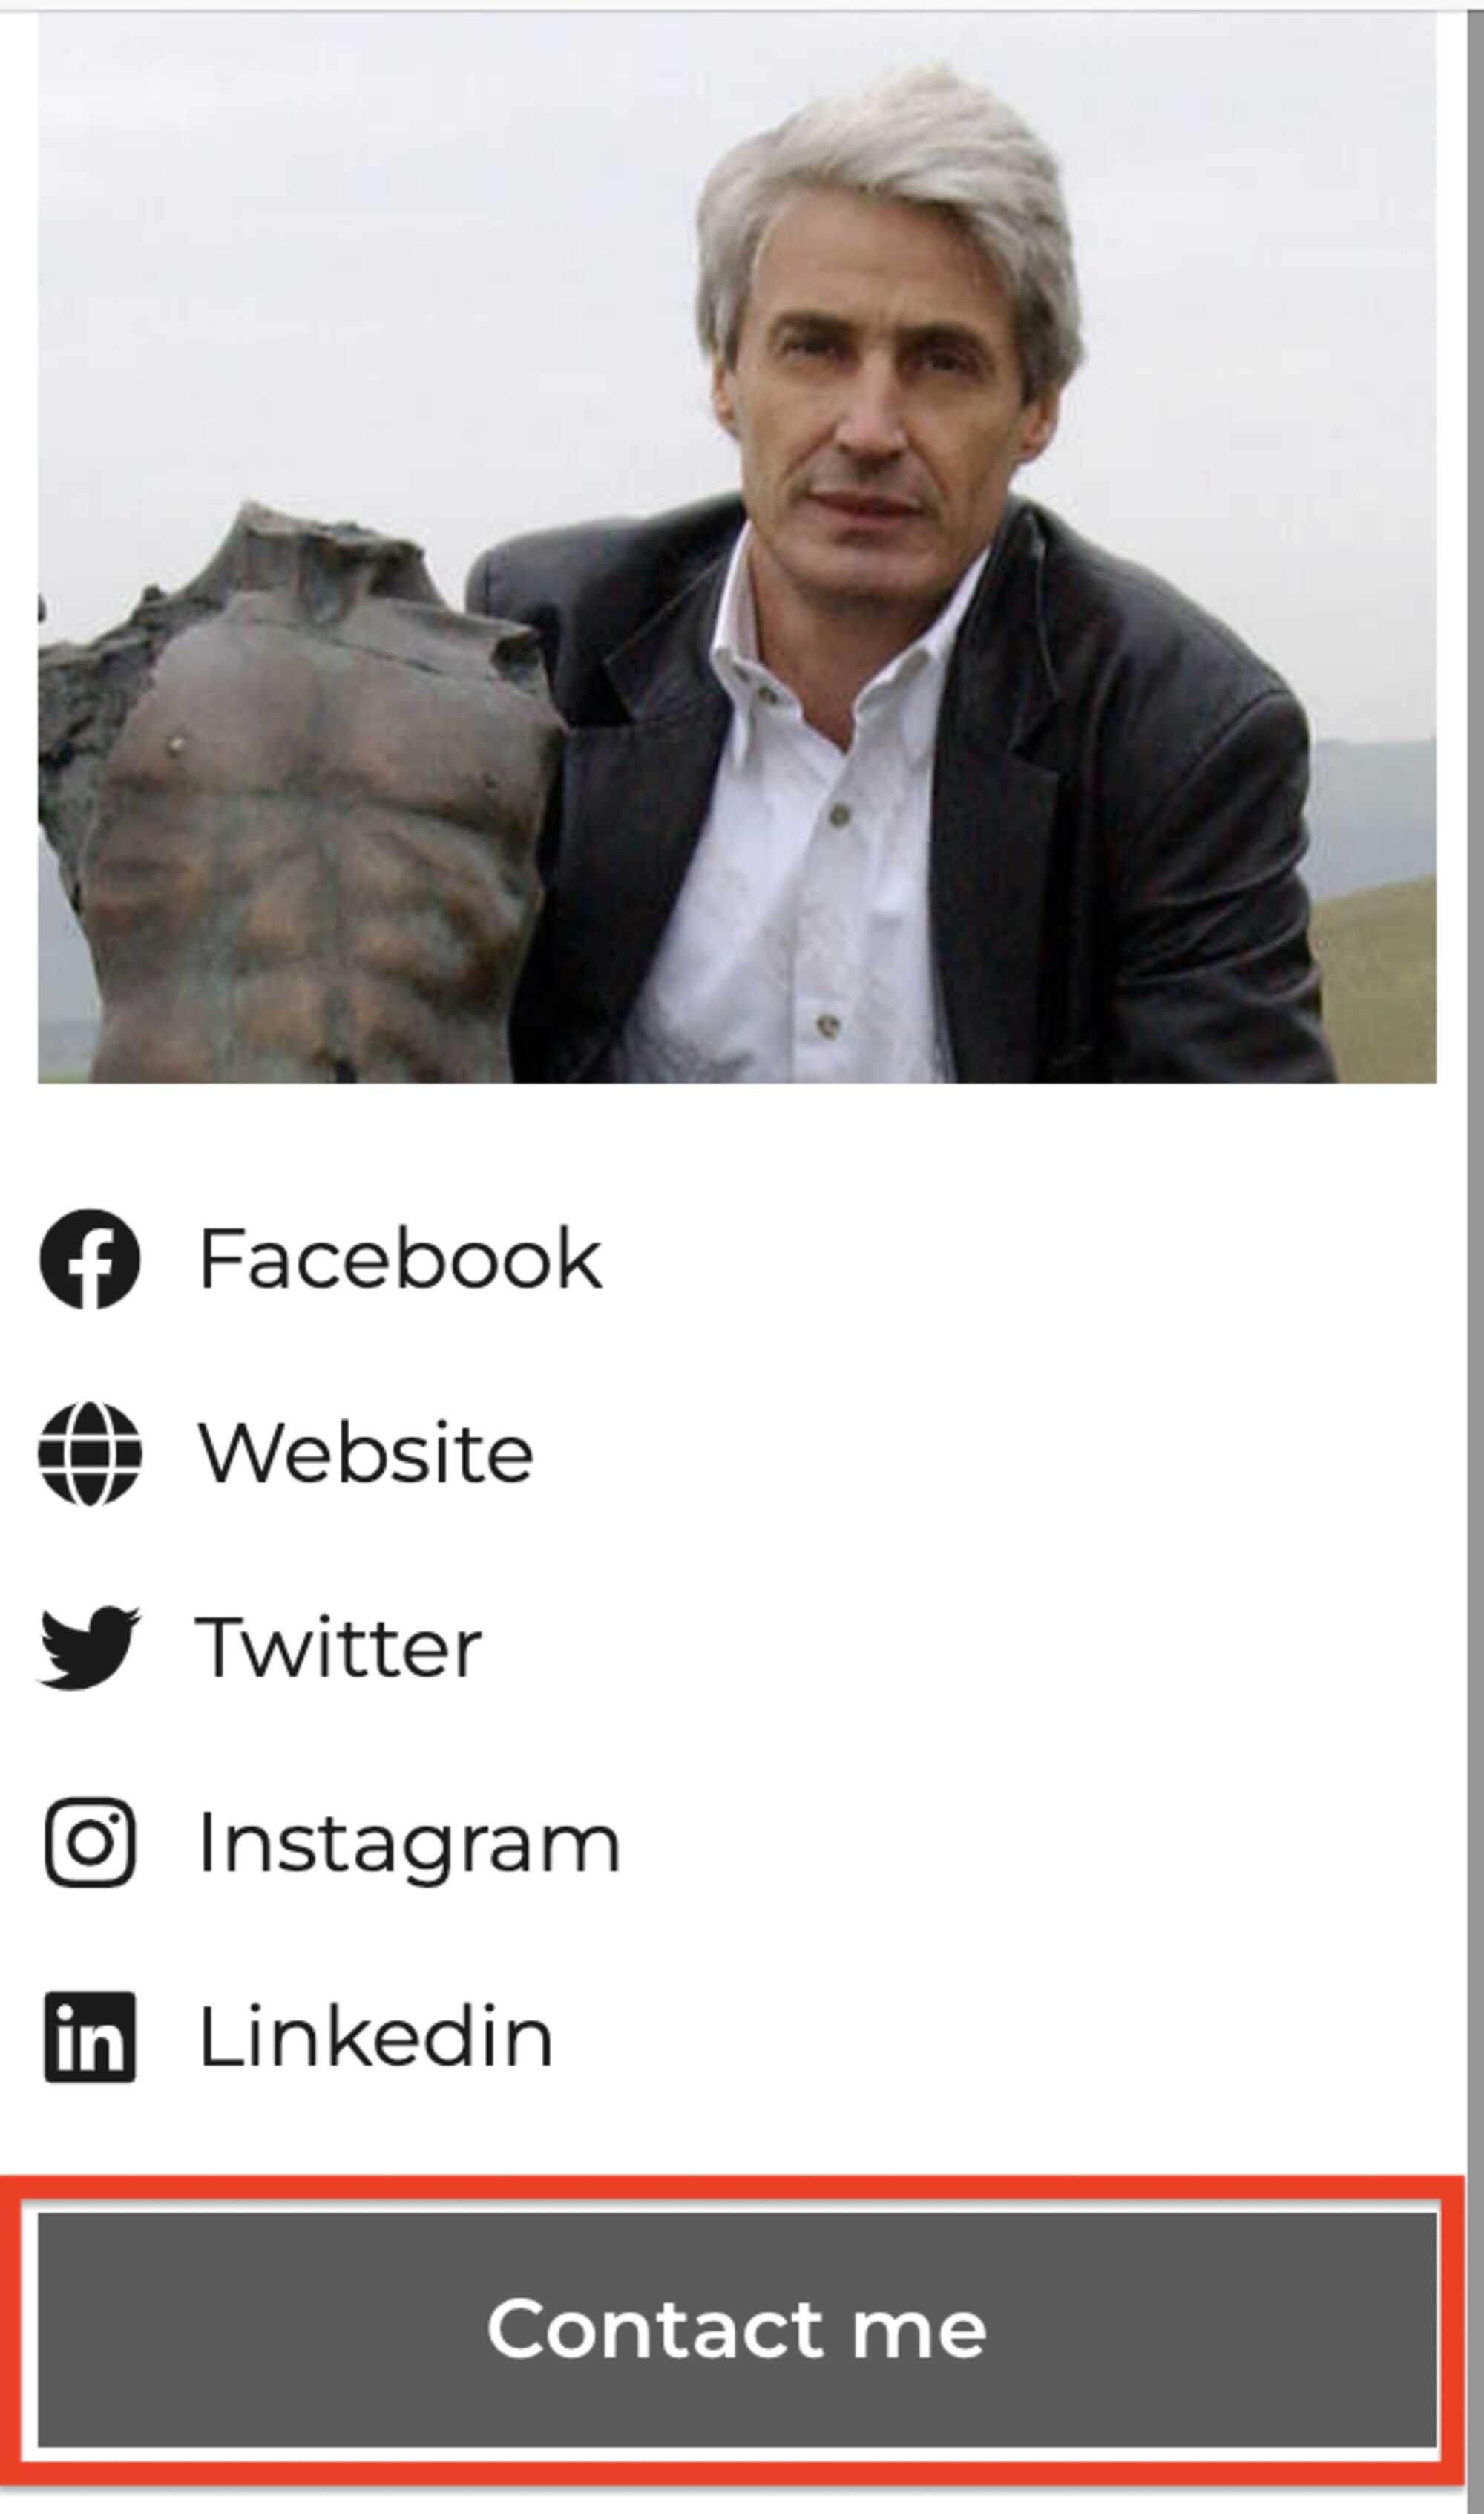
Contact me
This email address will also be used for the Contact me button on the “front end” of your Profile page, shown in the red box in the slide to the right.
You will be contactable only by other Sculpture Network members through this contact feature. This button is not shown on your public Profile page, it appears only when members are logged into the website. When the contacting member uses this feature to contact you, the email address of the sender is revealed to you as the receiving party.
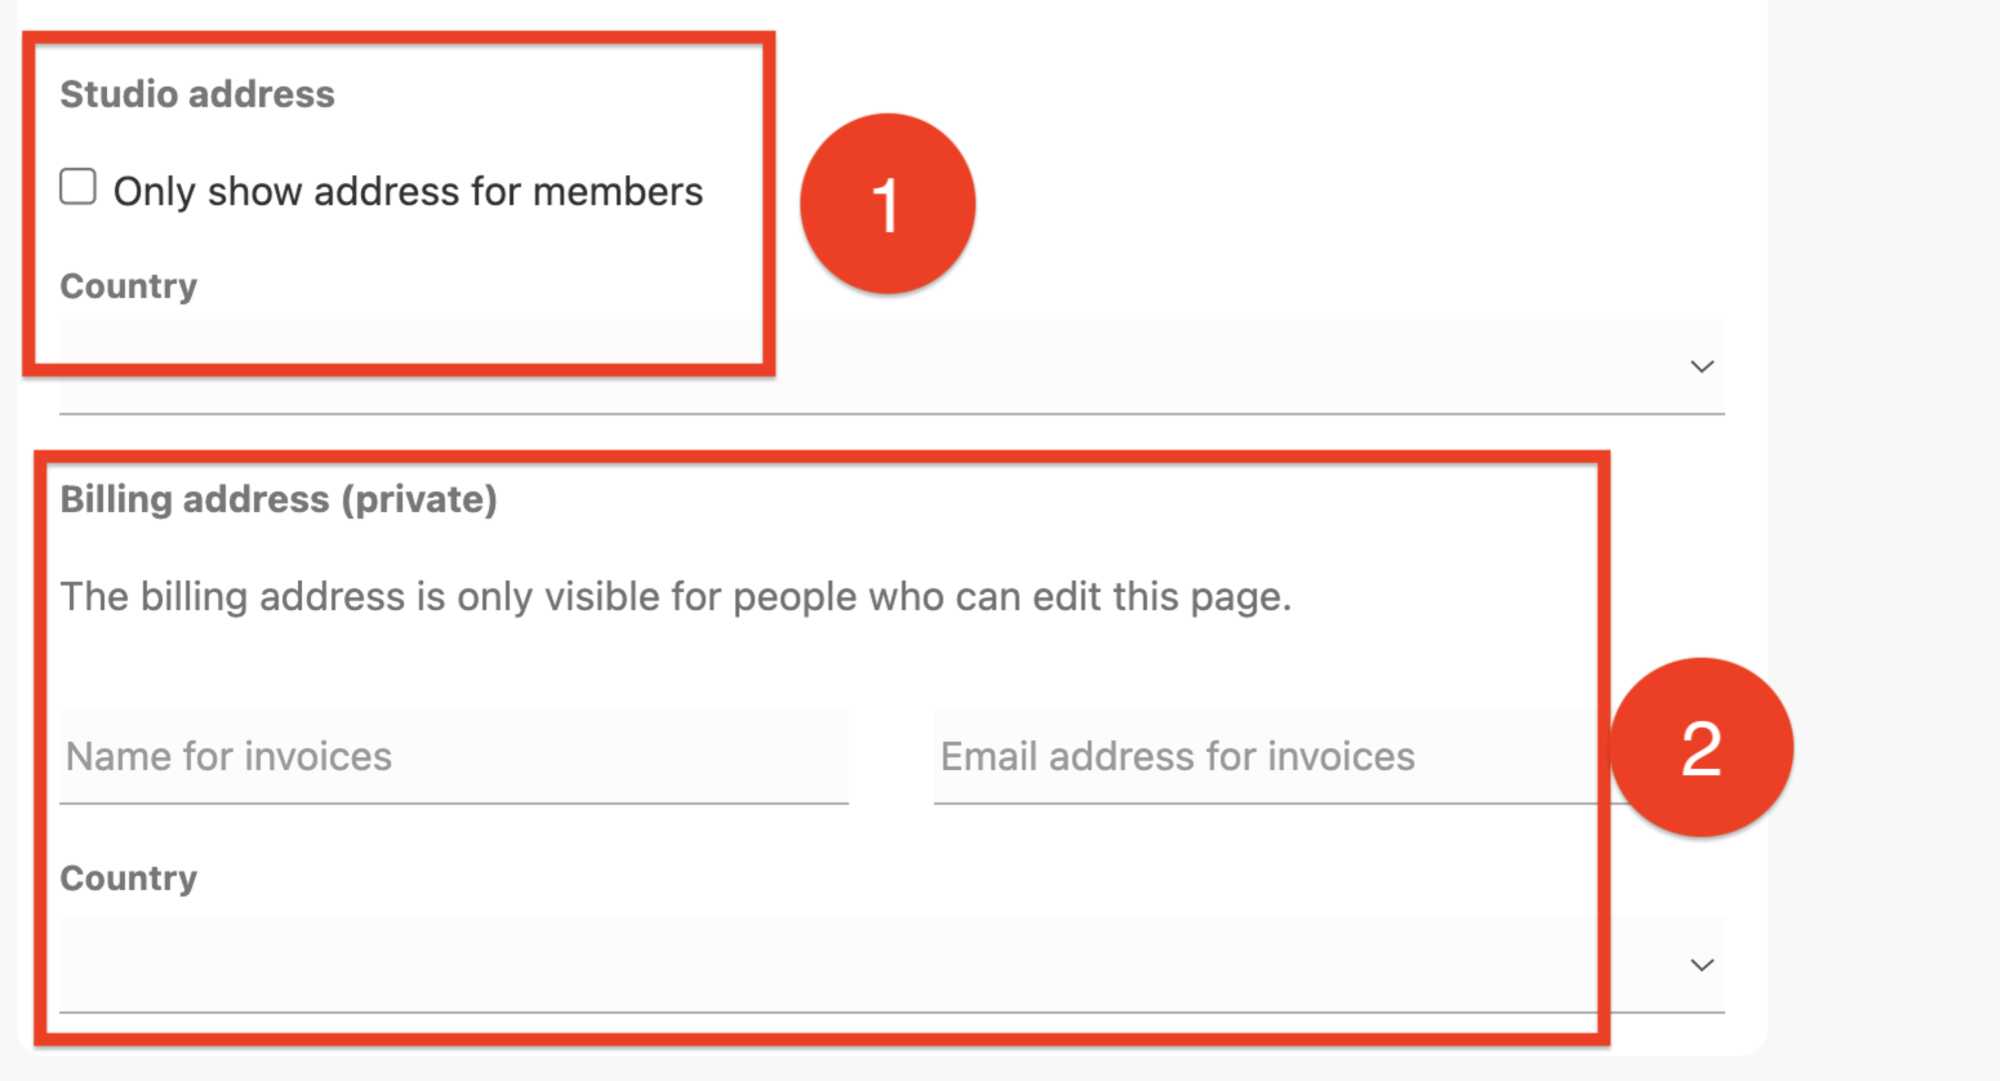
Address & Social Media
As well, this section of the Address & Social Media window will ask you for two postal addresses.
The first is entitled Studio address (private), marked as number 1, this is your studio address in the case that you have a second address that is NOT your Billing address (private), number 2.
Please be sure to include an Email address for the invoices, even if it is the same as your regular email address, and that way we are sure of which email you would like to use, both of these email addresses will be only used for administration purposes.
If you have checked the Opt Out button, shown in the diagram entitled Address and Social Media, number 4, three diagrams above or in the red box one diagram above, you will only receive an invoice at this email address and no other mailings or announcements from us.
Please fill in at least your Billing address, so the we can process your membership fees. The Studio address would be used, to inform members living in a certain area of an event, such as a Dialogue or a Studio visit that was planned by Sculpture Network for that specific area, but only if that member had agreed to receive notification of this type of event from the official Sculpture Network Coordinator in that specific area. Your CIty and Country of residence will be displayed on your Profile page to members only.
Introduction artist information
OK, enough of administration, now let’s talk about YOU on your Profile page!
The information and pictures concerning your sculpture will go elsewhere. This is covered in the Sculpture Network Help Page: Add Artwork to your Profile.
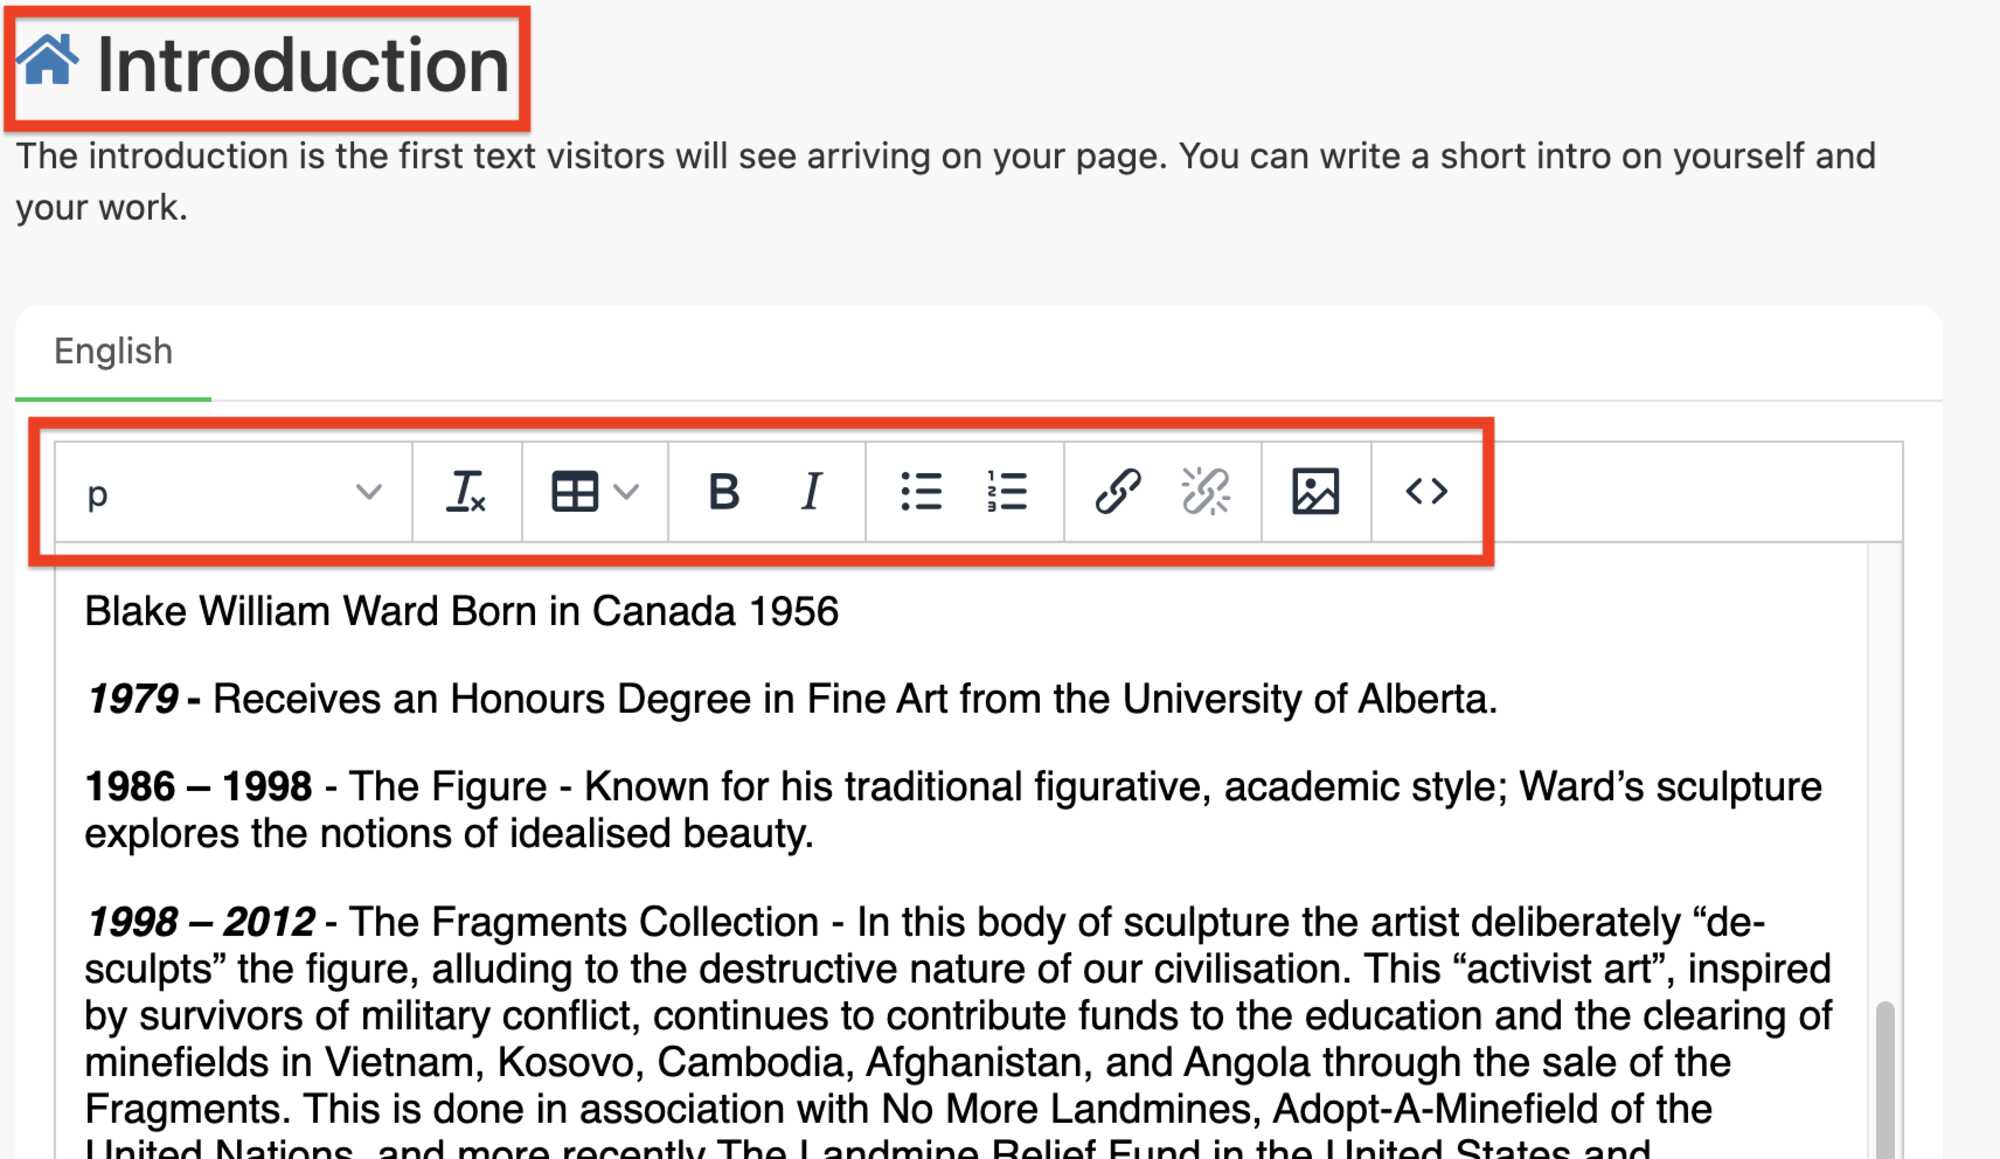
After the Address & Social Media window you will find the Introduction window text box, shown below.
The area beneath the Text Bar outlined by the long red rectangle, in the diagram below, is the section where you can copy and paste an almost unlimited amount of text about yourself. Here I put a short discription of the five different bodies of work that I have created during my artistic sejour. I have used this theme to organise my photos into colllections that match these five seperate bodies of sculpture.
Text Bar
The Text Bar, outlined by the long red rectangle, in the diagram above, offers some tools relating to this Introduction window text box, they are as follows, from left to right:
The small "p" stands for paragraph and if you click in this area, there are some tools you can use to insert larger text i.e., h2 and h3, as well as, some other text options, should you want to put bigger titles into your description.
The symbol "T" with a small x beside it Tx, is a Delete Format button that might help you when pasting copied items into your “Description” text box. In some Text Bars on the website, this can be found on the far right this row.
If you paste your text into the text box and you get a very small column of five words per line, or something like that, then try highlighting your text once you have pasted it in and click on the delete format button and see if that helps. If that does not work, try removing the text paste it another program, like MS Word, and click on "Keep Text Only" and remove the format that the text was in.
This is followed by an Insert Table setting for creating tables with rows and columns.
"B" stands for Bold text, and "I" for Italics.
Next you will find two icons for two different types of Bullet points.
The Chain link icon will allow you to put a “link to” an external webpage, remember to include (https://) in the URL address.
The “Broken link” beside the Chain symbol will remove or break that link.
If you would like to add a picture or a .pdf document to your text in this “Introduction” section, click on the little square icon with a drawing of a mountain and a sun in it, (at least that is what I think that icon represents). It is found just after the “brake chain link” symbol. Any media; photographic: .jpg or .png, can added here using the same method as you used for your Profile pictures.
The last symbol <> is for “source code” for those who know what you are doing… otherwise please ignore this symbol. Thanks.
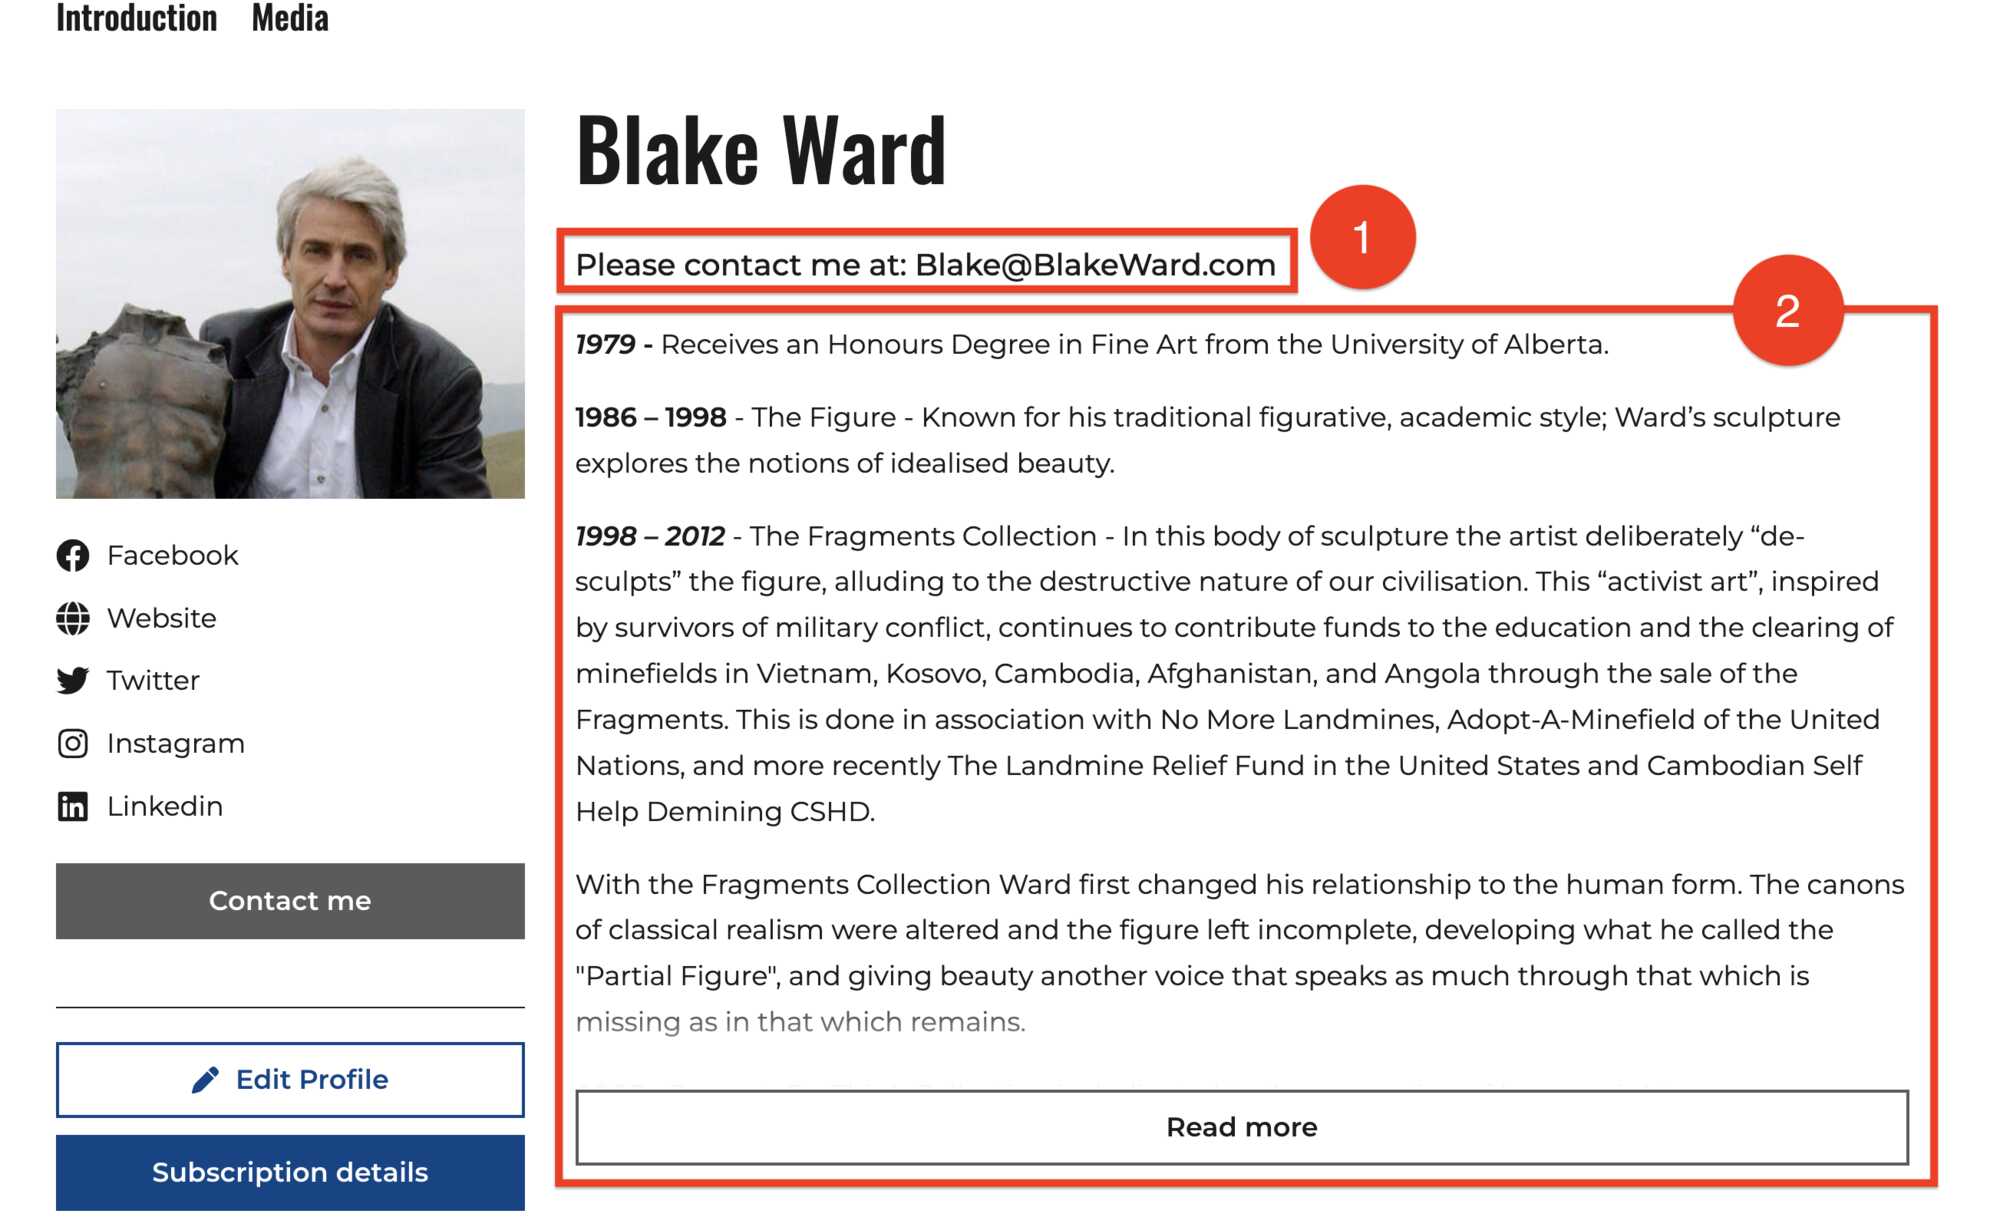
All text, media, photographs or text documents that you place in the Introduction text box, will appear on the “front end” of your Profile page in the section below ,marked by the numbe 2. If you have added a great deal of text then you will see the “Read more” Button that appears if there is more text to read.
The text shown in the box labled number 1 below, was placed in the summary text box at the top of the page in the Basic profile information, at the very begining of this section on the Basic profile information.
Remember, all you have to do is click on Save & view in the upper right-hand corner of the “back end” of your Profile page, to see what your page will look like on the “front end”!
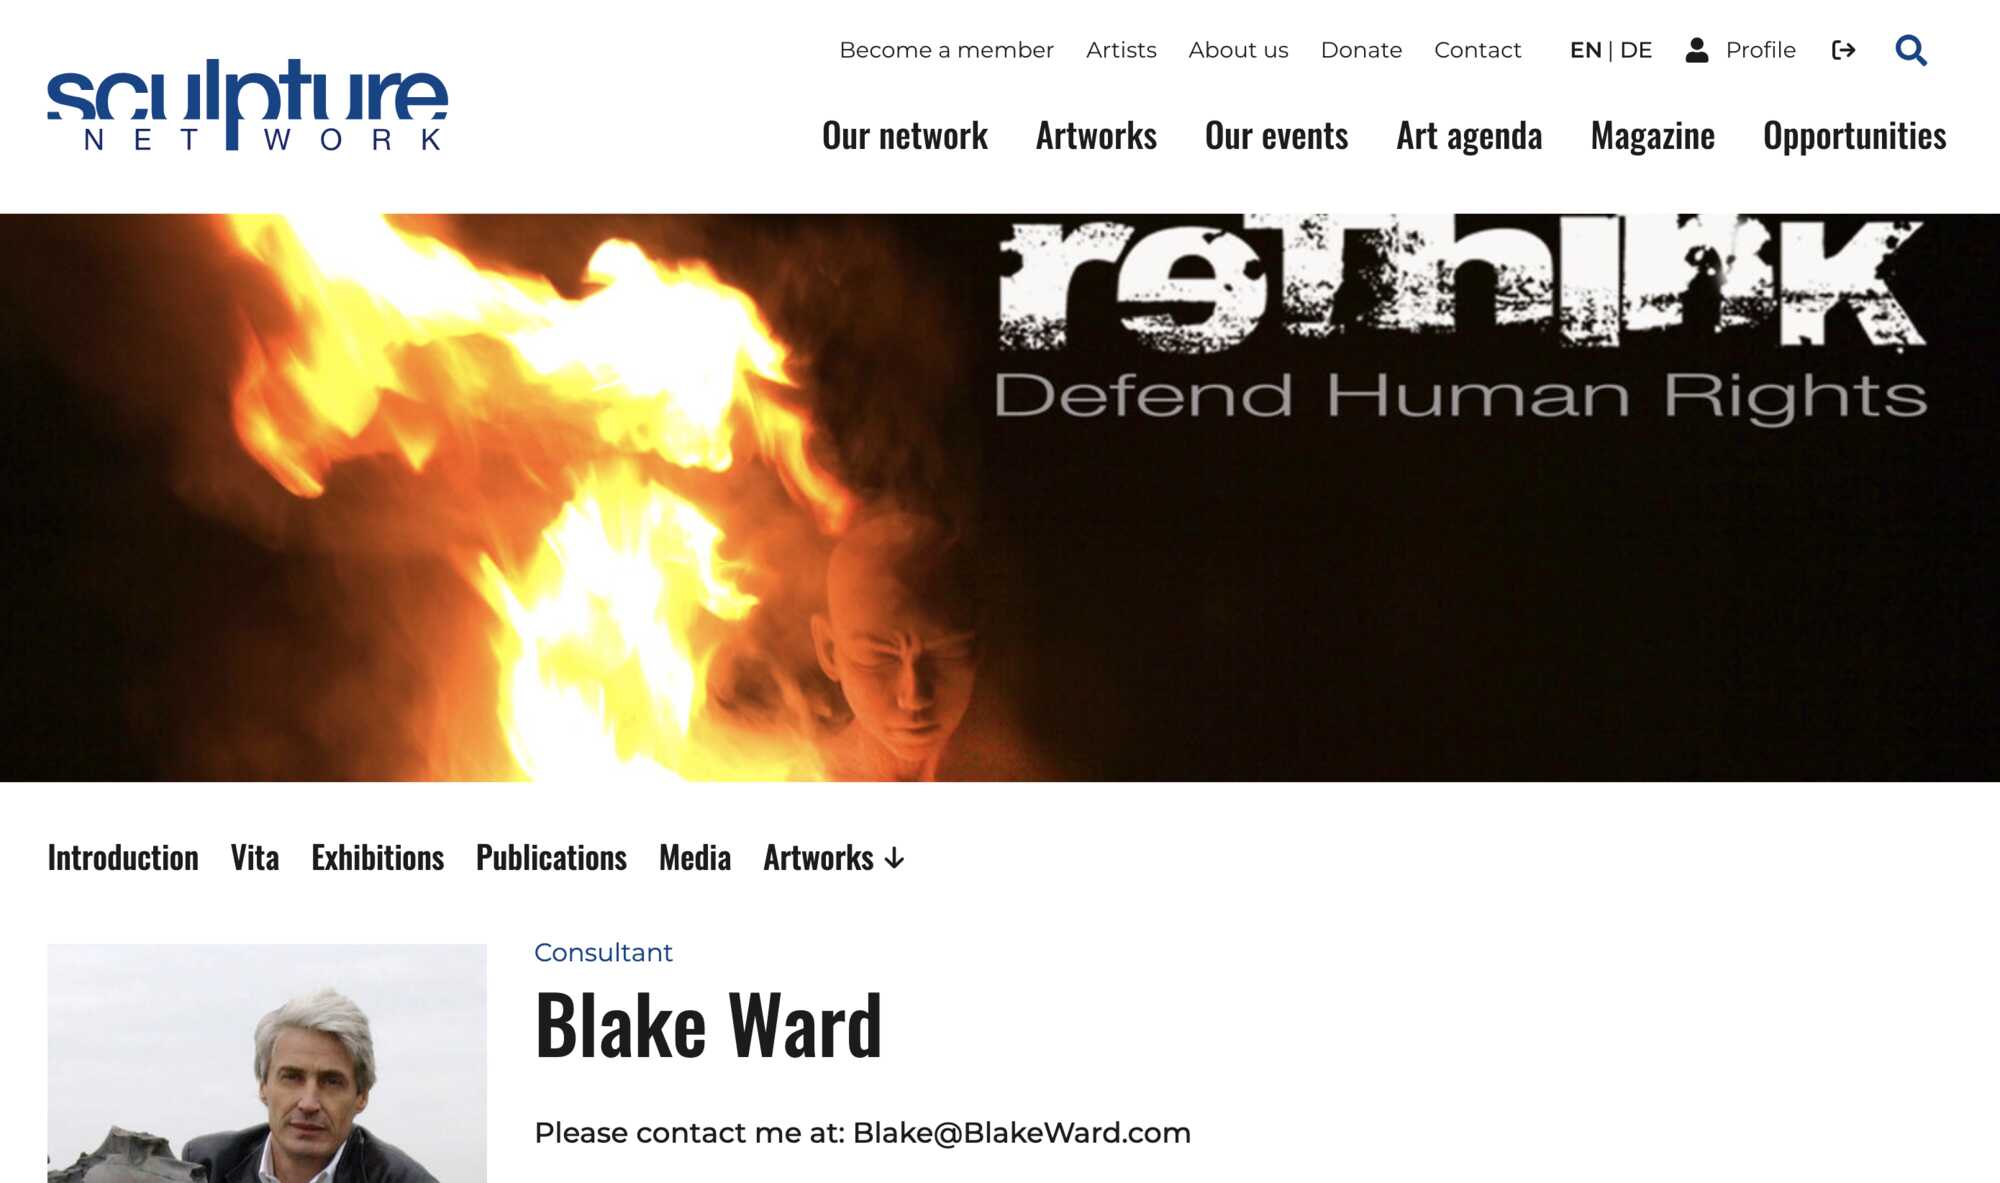
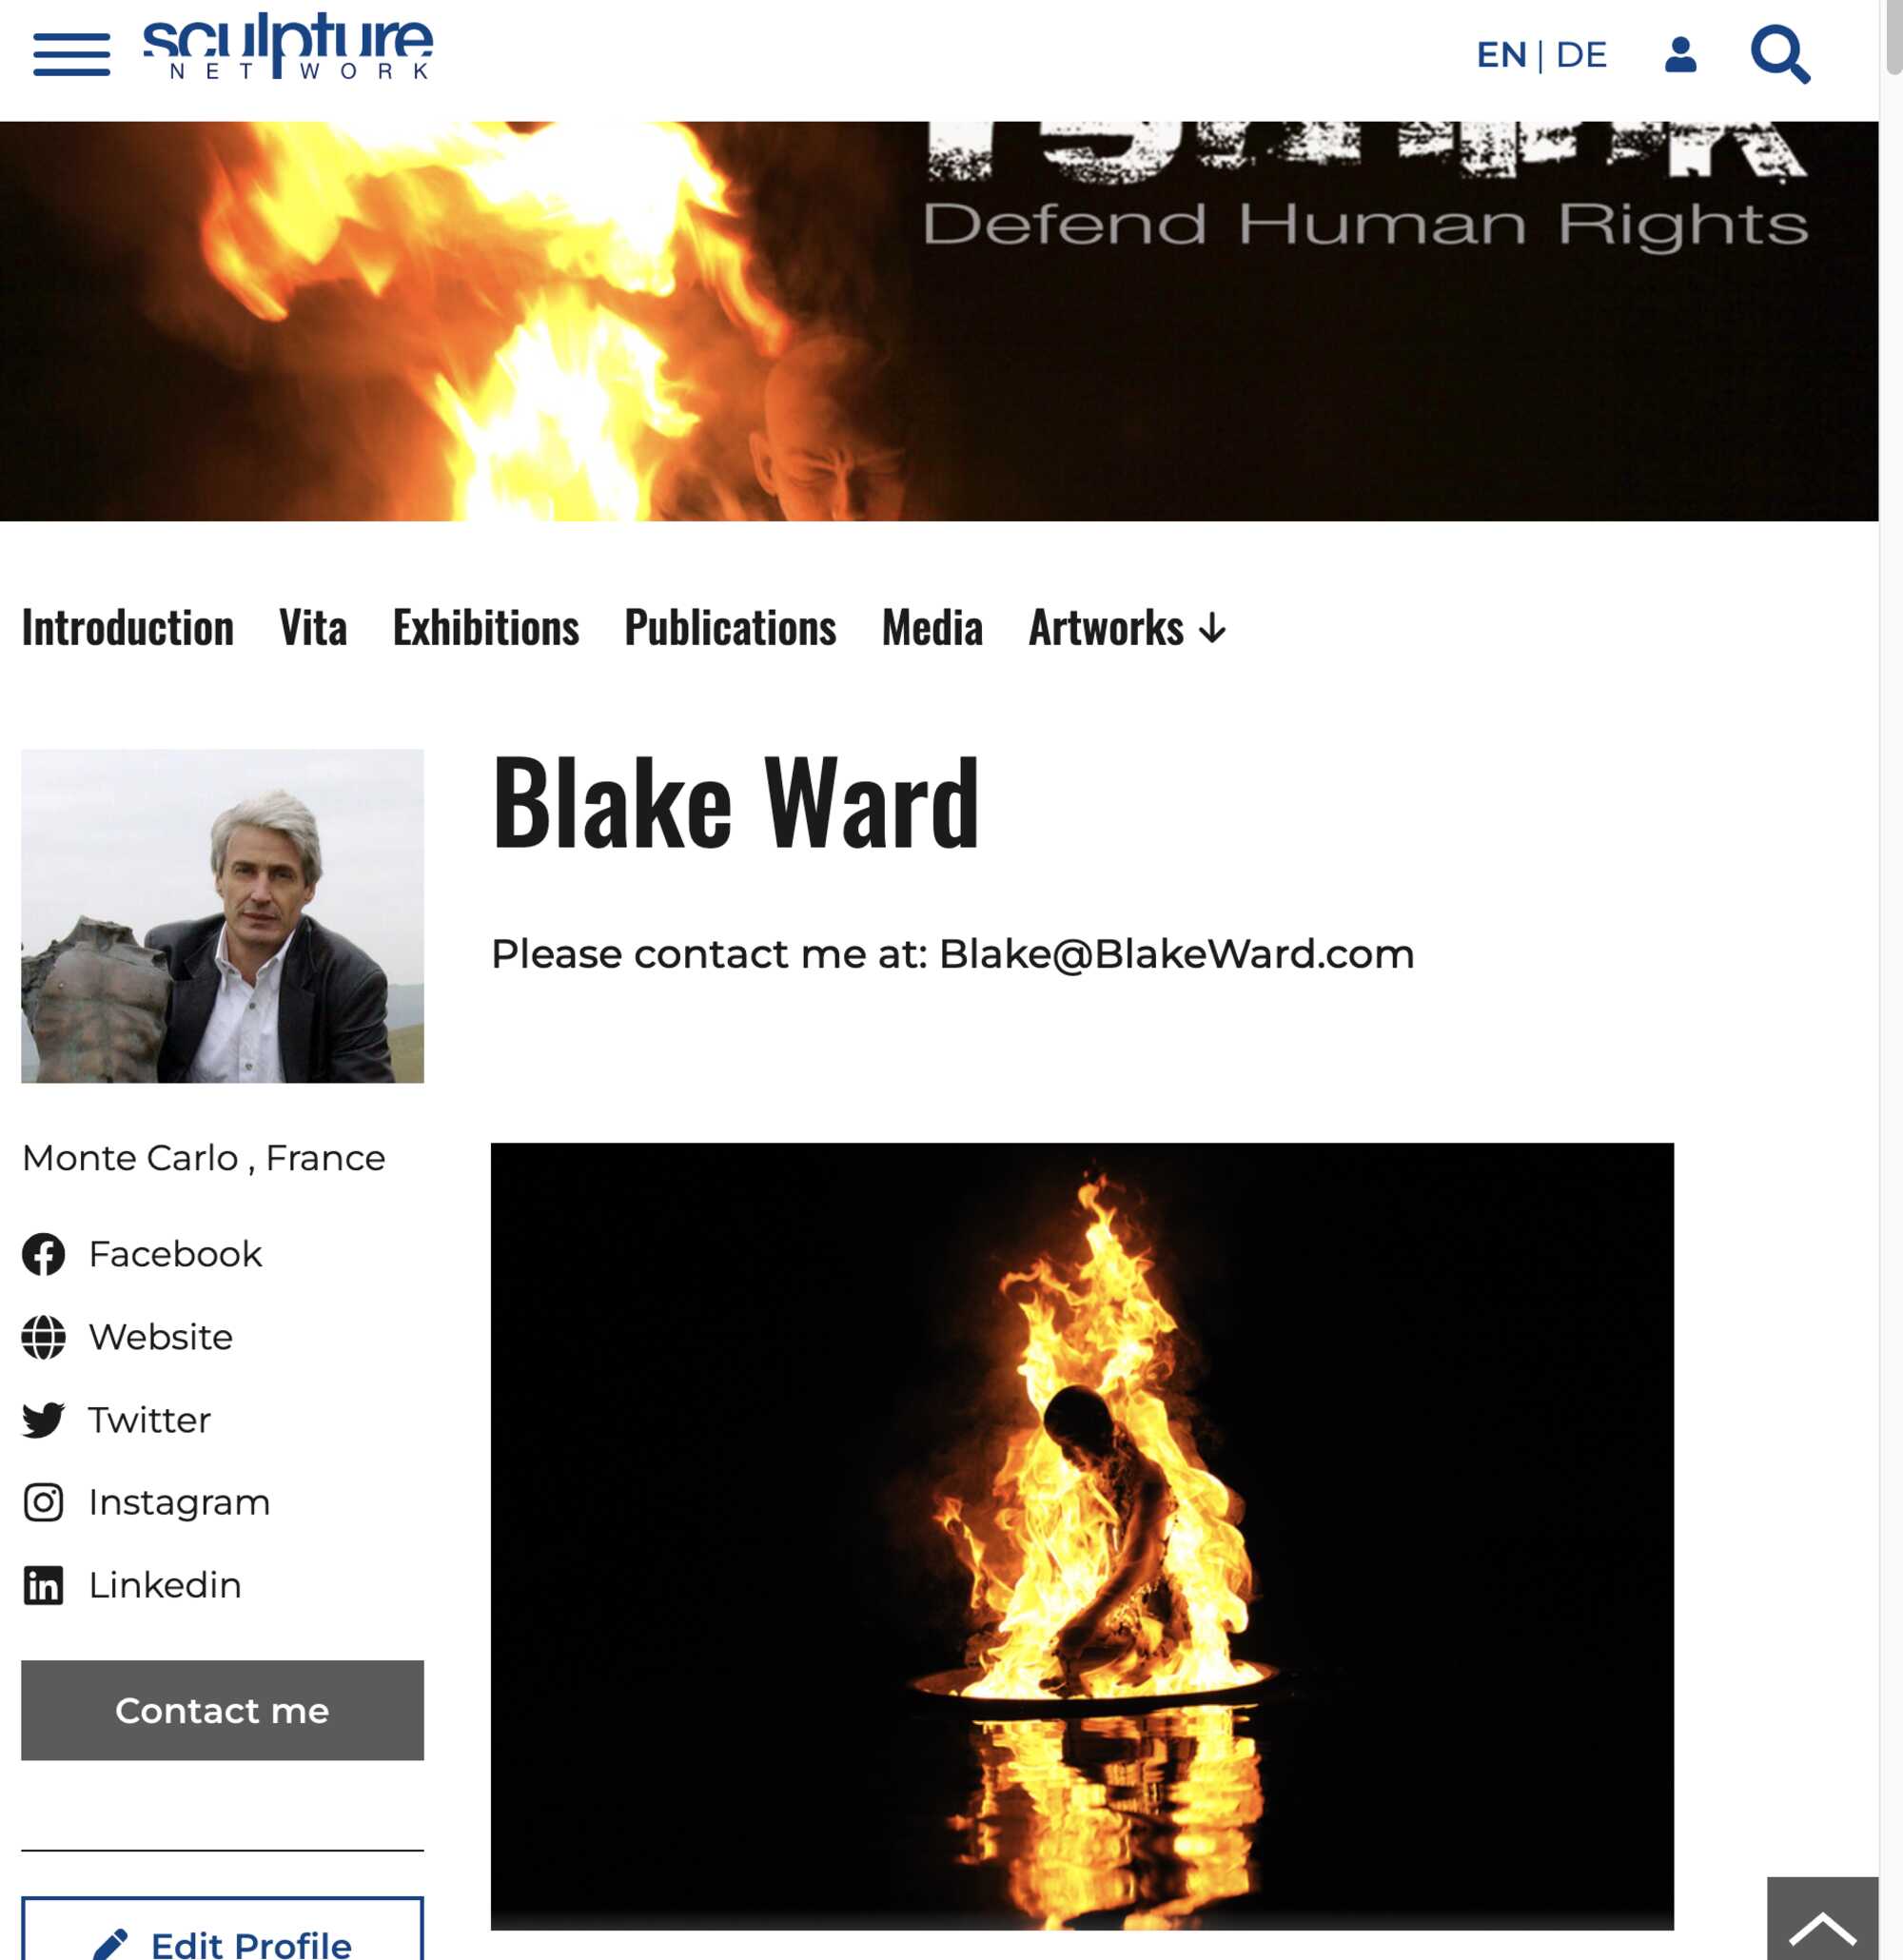
So, play around and see how you can build your personal website on Sculpture Network. Below, I have decided to place a photograph at the begining of the Introduction text to box so that I have a photograph that matches my Banner picture. Just for fun.
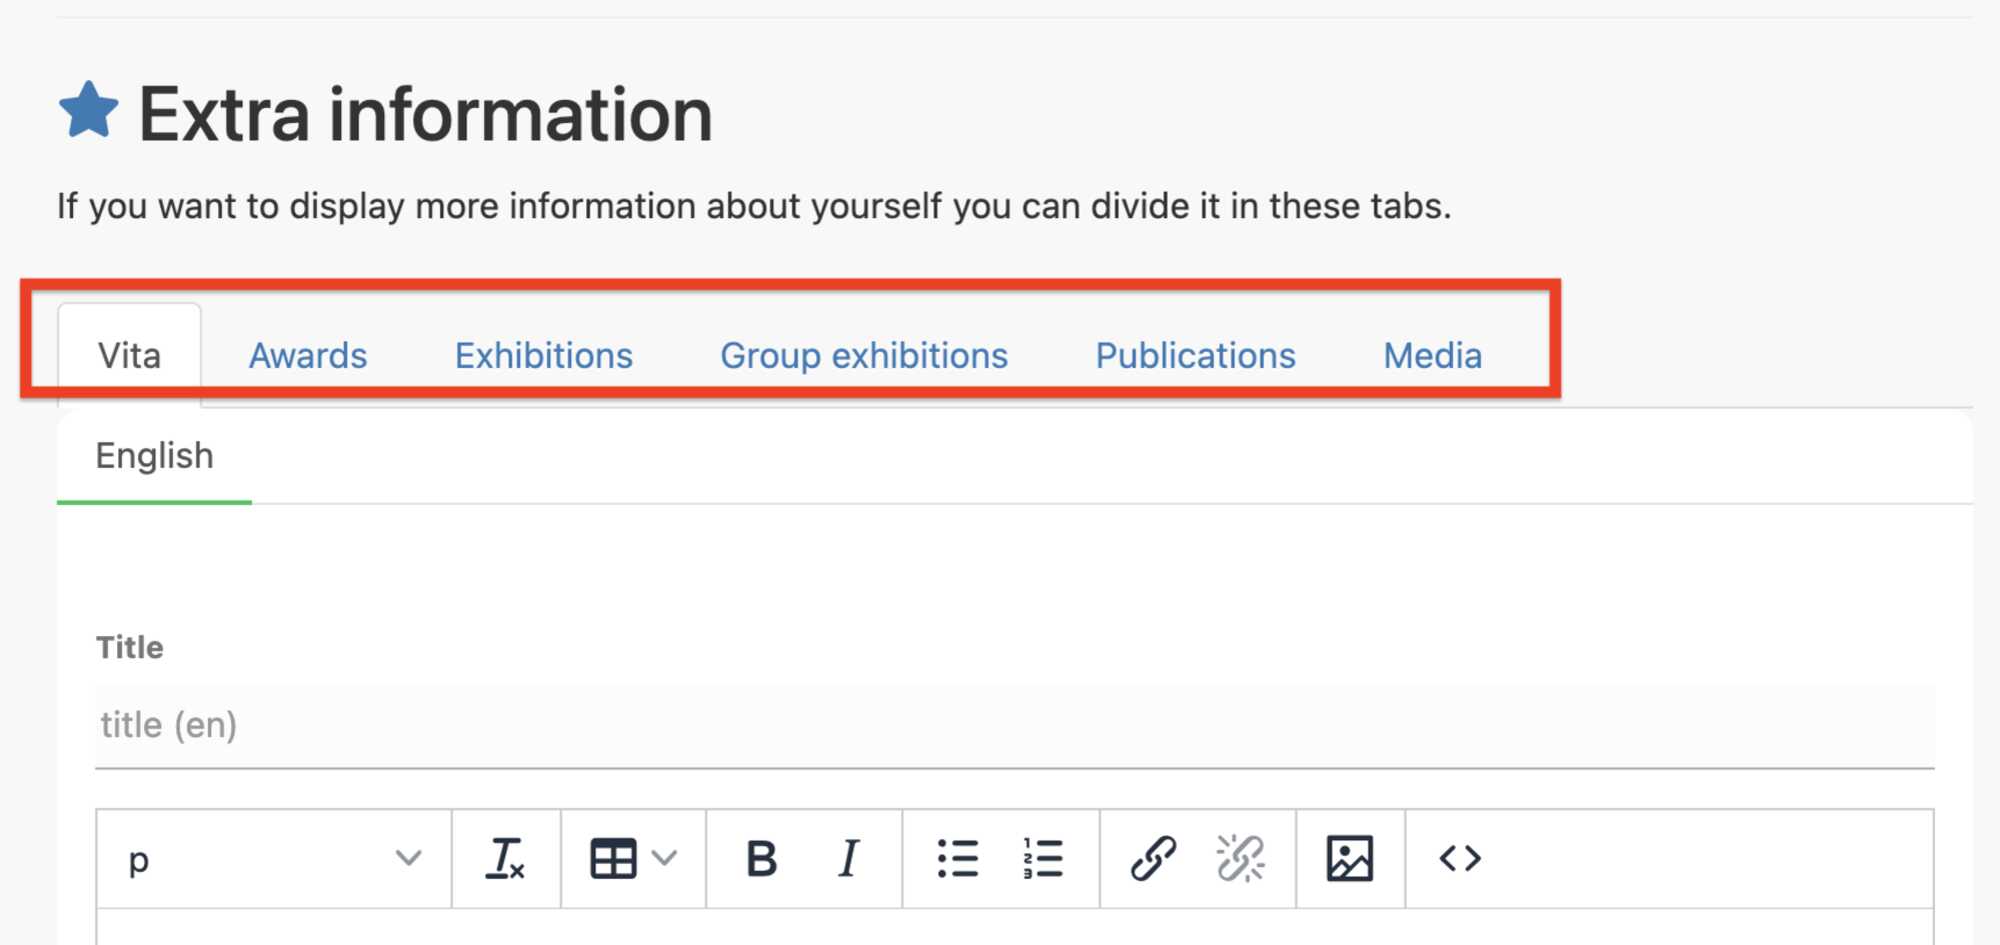
Extra information, vita, biography, awards, publications, media
Alright, now in order to finish your Profile page, you will want to add a Bio and a CV and perhaps some video and published articles of your work, and maybe even some nice photos of you and your dog. :
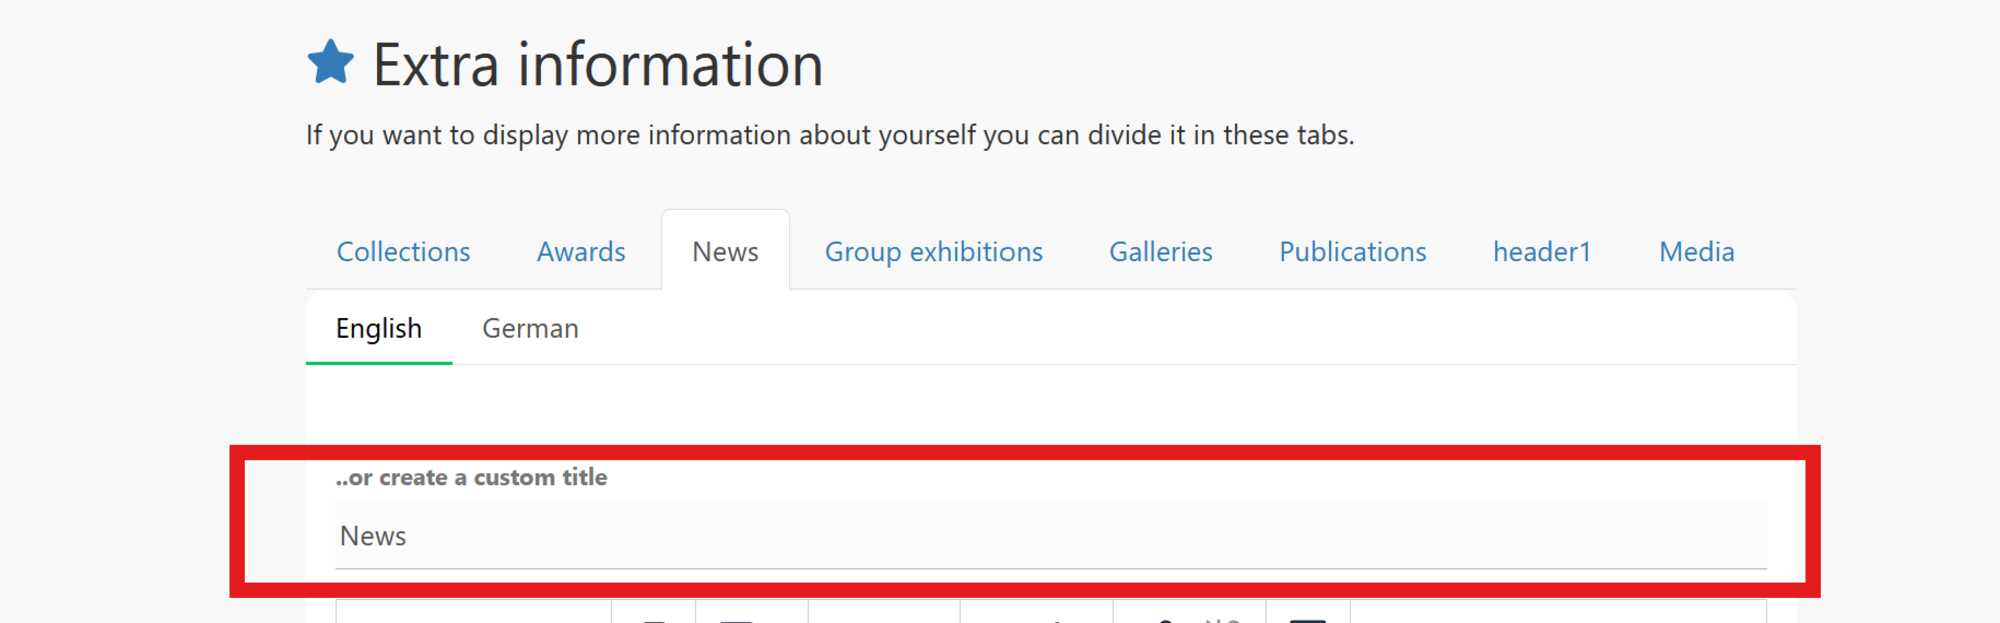
This Extra information window provides a number of “Tabs”, that can be used to file all of the "other information", the Tabs are titled: Vita, Awards, Exhibitions, Group Exhibitions, Publications and Media and you can use them as you like to add all of the Awards that you have received for your sculpture or the media publications that you have collected over the years.
You can change the title of the tabs to a personalized title by entering it in the title field below and saving it.
Keep in mind that the tabs won't appear in the profile menu until you've added content.
This Extra information window is found by scrolling further down the page in the “back end” of your Basic profile information page to the ver end of the page. It looks like the diagram below.
You can put whatever info you would like in this area, I used these “Tabs”, in the following manner;
In Vita, I put my Curriculum Vitae. I simply copied and pasted the text from an old Word document that I have created over the years, of exhibitions.
I did not put anything in Awards, so this title does not appear on my Profile page.
Under Exhibitions, I put some photographs of the solo shows that I have had over the years, and I included .pdf documents of the printed invitation card as well as some pictures of what the exhibitions looked like.
I did not put anything in Group Exhibitions, as I had included these in my Curriculum Vitae under Vita, so again the title does not appear on my Profile page.
In Publications I put some of the published articles and third-party writing that I have collected of critics and other people who had written about my work.
Media, was included on the site for your Videos, but a copy of all of the photographs and .pdf documents that you have uploaded to this Extra information section will also appear under this button.
As mentioned earlier, you can also rename these tabs and customize them to reflect the information you want to present. For example, you can add a tab for news or for public projects. Service providers among our members can use these tabs to present the history of their business or specific areas of their company. Museums can use them to present their origins, the history of their collections, or their team.
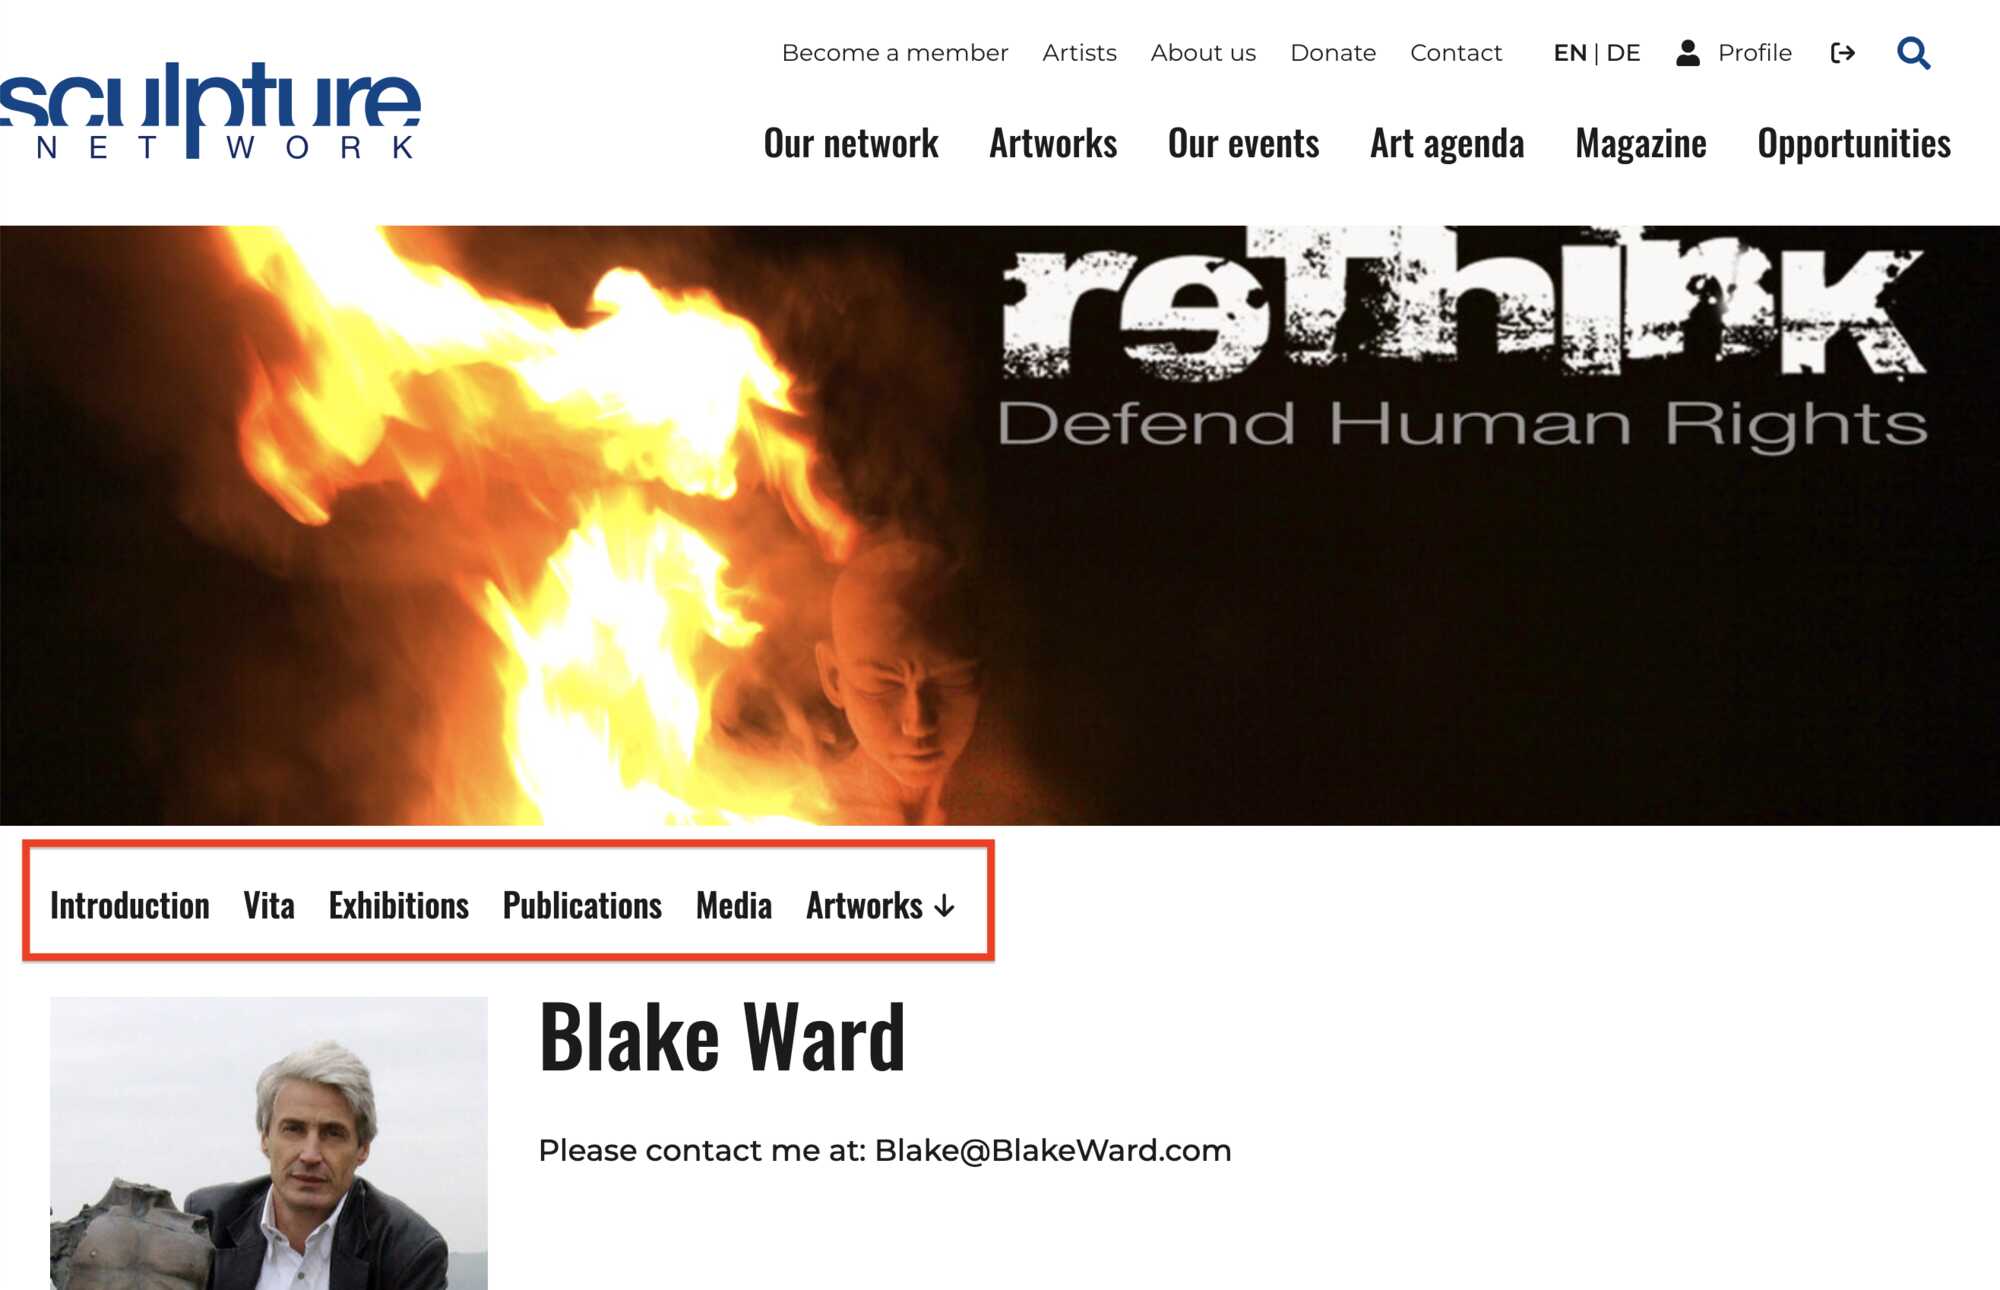
The Extra information “Tabs”, if you utilise them, will appear just below the Banner picture as shown in the diagram above. If you choose not to enter any information in these areas then they will not show on your profile page.
The Introduction button refers to the text that you have writen into the intorduction section text box on the “back end” of your Profile Page. So, it does nothing if you click on it when you are on the “front end” of your Profile page, because you are already there.
However, if you move away from this page, it will allow you to get back to your introduction page. Sounds logical, I know this because I stupidly asked the engineer who built the site and she was so polite that she did not even reply sarcastically as she told me why it was there. :)
Ok, it is evident that this explanation of how to complete your Profile page is not perfect but I hope that it is acceptable.
The next part of this How to series is the Sculpture Network Help Page: Add Artwork to your Profile.
If you get this far, and have a few moments, please drop me a note to let me know where this document needs more work, typos, mis-spellings, comments or corrections.